Using Google Sheets with Ibexa Connect
Google Sheets is one of the most popular apps Ibexa Connect customers use in their daily workflows.
This tutorial shows you how to connect your Google Sheets spreadsheets to Ibexa Connect and build automated workflows (we call these scenarios).
Spreadsheets have a wide range of usage in everyday admin work - but sometimes they may fall short on certain capabilities - especially when you’re using spreadsheets to store data that can be actionable in some other apps or tools.
You can use Google Sheets in Ibexa Connect scenarios to achieve the following basic use cases:
-
Trigger a workflow when a new row is added to a spreadsheet and send that data to another app;
-
Get data from other apps and add it to Google Sheets as new rows.
Use case 1: Trigger a workflow when a new row is added to a spreadsheet and send that data to another app
-
Choose a trigger
-
Connect to Google Sheets
-
Configure the module
-
Choose where to start
-
Select the action module
-
Map data from Google Sheets
-
Test your scenario
-
Activate your scenario
Step 1 - Choose a trigger
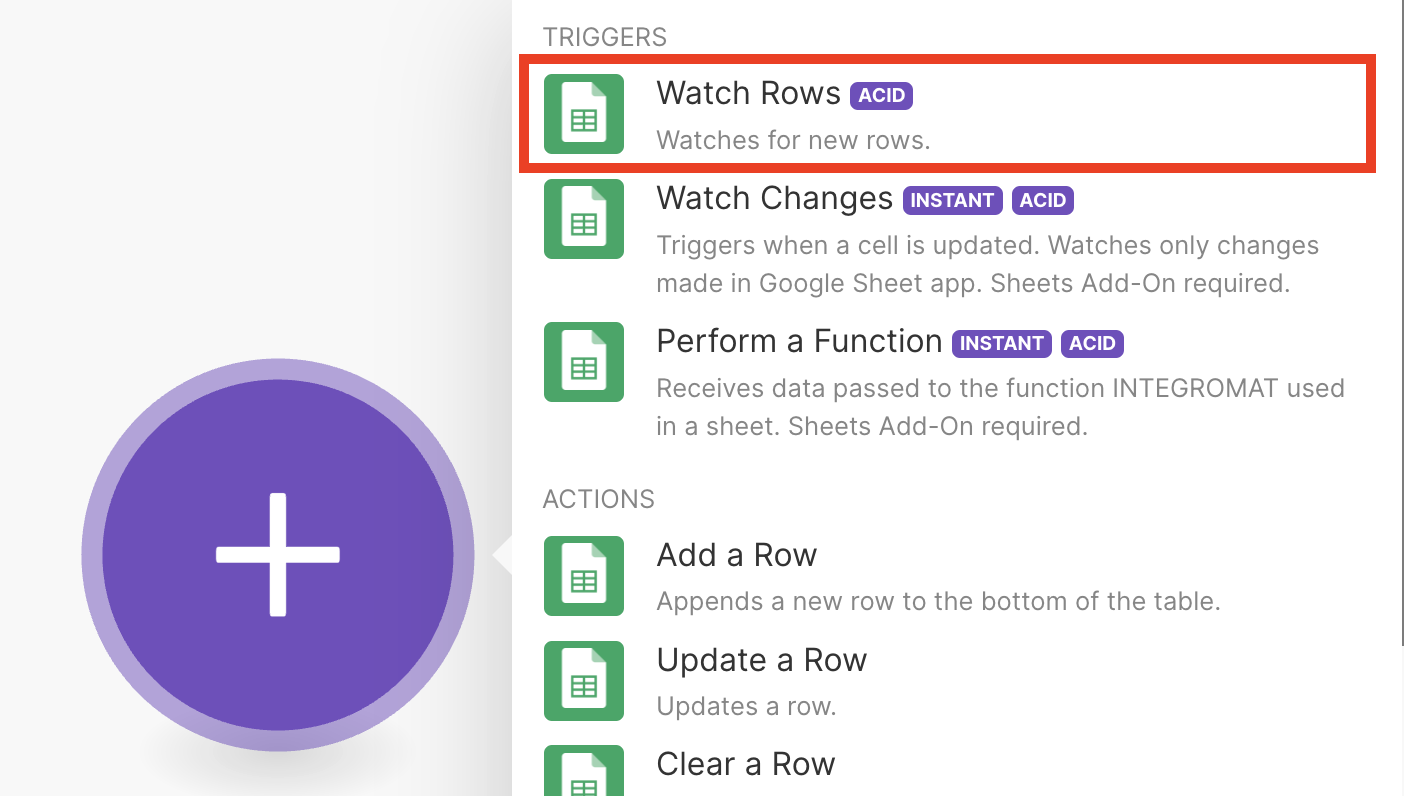
The first step in any scenario is choosing what will start your scenario, which is called a trigger.
As you can see in the screenshot below, Google Sheets has 3 types of triggers:
-
Watch Rows - Watches for newly added rows
-
Watch Changes - Watches changes of a specific cell (Google Sheets Add-on required)
-
Perform a Function - Performs a Ibexa Connect function and returns the data to the sheet (Google Sheets Add-on required)
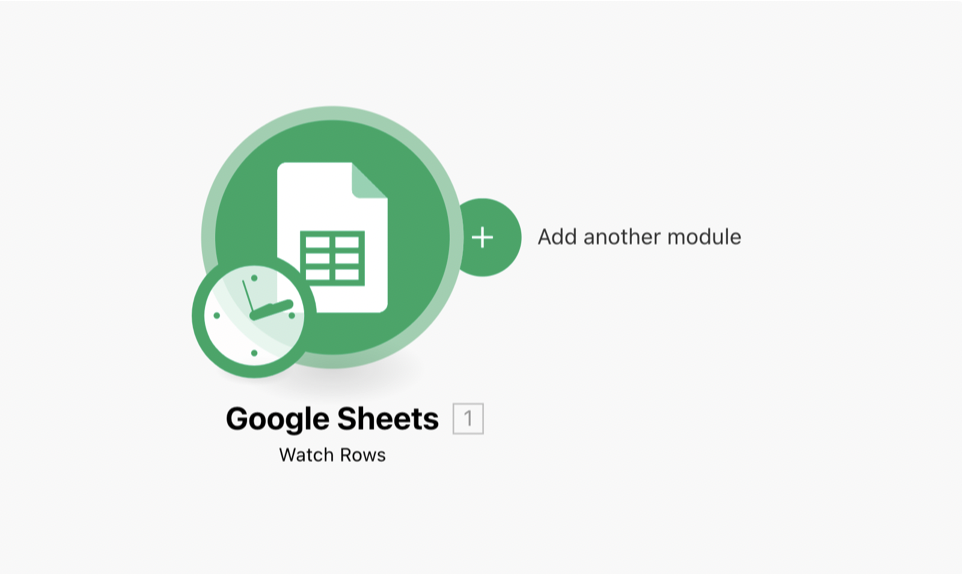
In our example, we use Watch Rows because we want Ibexa Connect to watch for new rows being added to our spreadsheet.
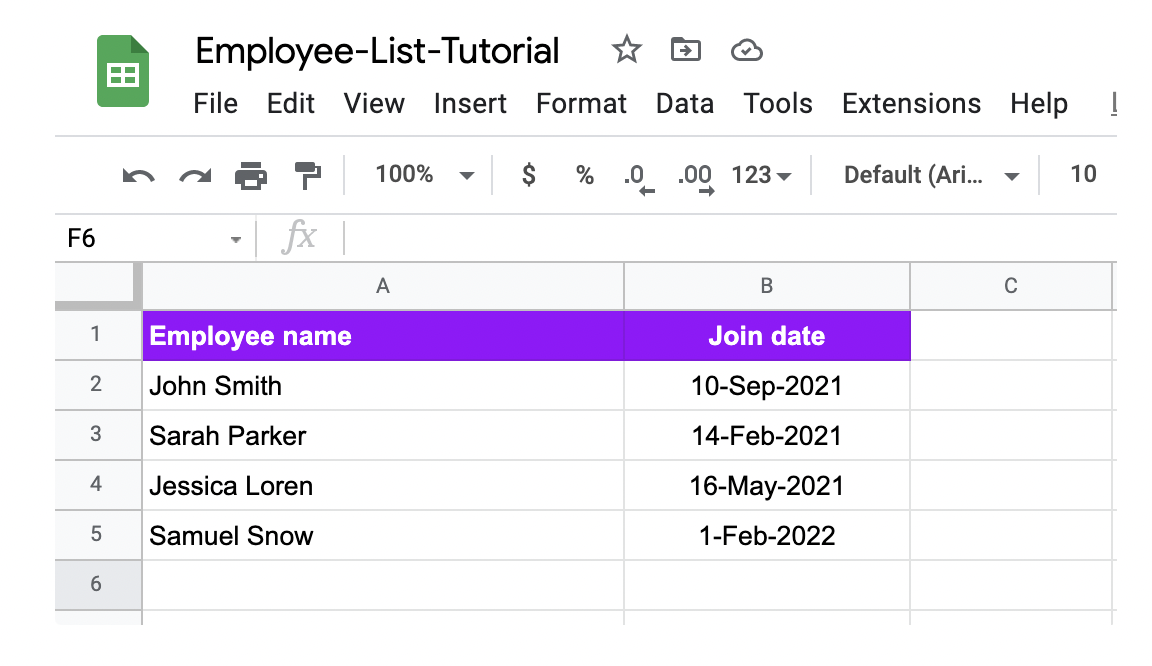
The sheet we use in this tutorial has these columns:
-
Employee name
-
Email
-
Starting date
-
Team
We want to perform an action each time a new employee is added to the spreadsheet. These actions can include informing your office manager that a new employee is starting, assigning onboarding tasks to the new employee’s manager, etc.
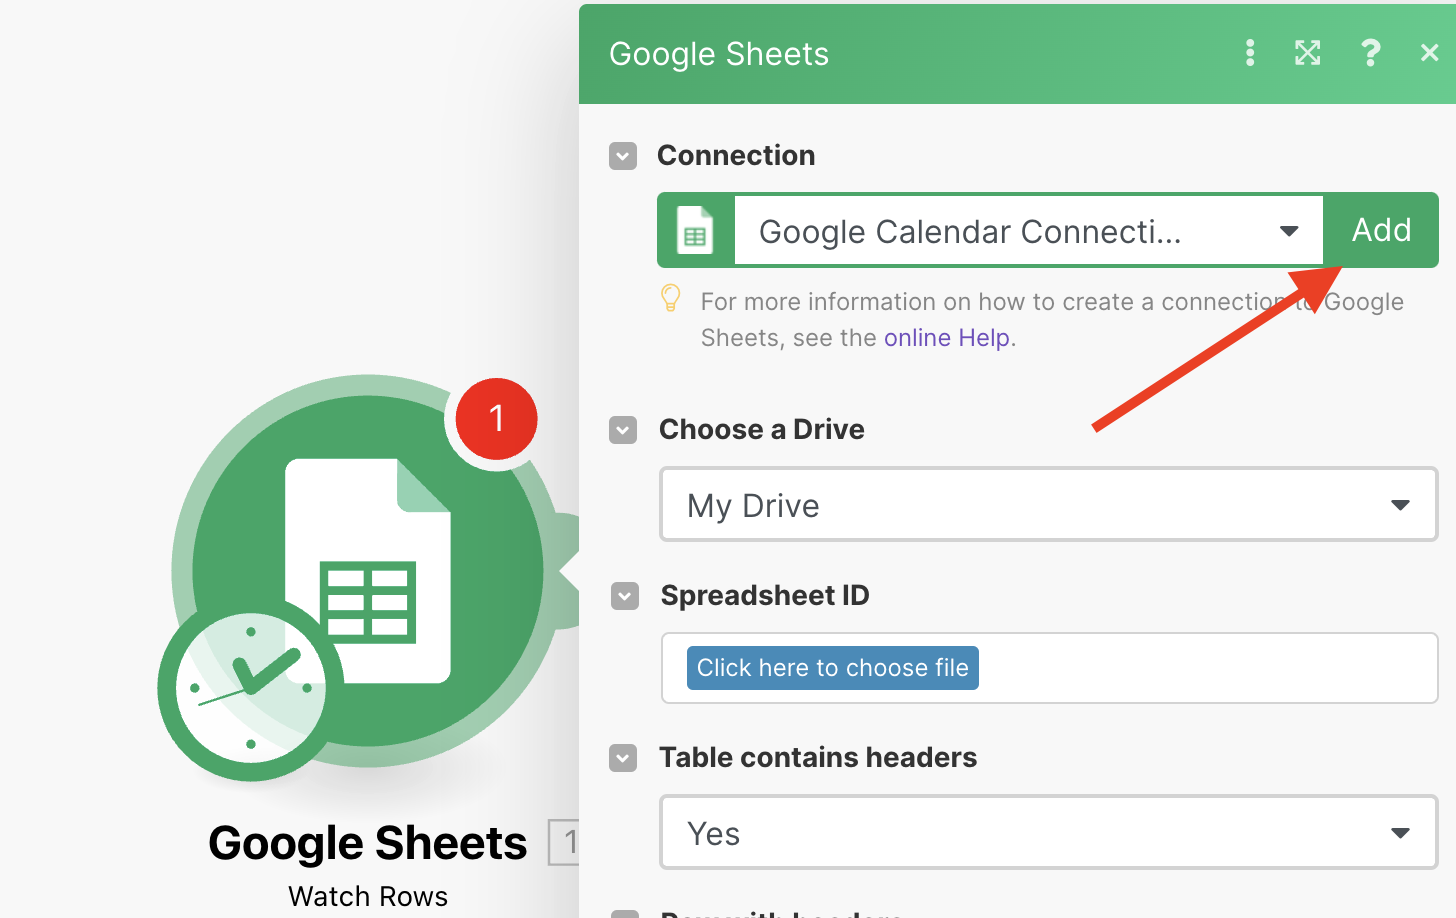
Step 2: Connect to Google Sheets
If you already authenticated your connection inside Ibexa Connect, the dropdown shows the previously connected account as an option.
If you are using Google Sheets on Ibexa Connect for the first time, follow the steps below.
-
In Connection, click Add button to add a new connection. You need the connection to allow Ibexa Connect to work with your spreadsheets.
A pop-up appears.
-
Enter your connection name.
In case you have several Google accounts, we recommend naming your connections differently so you can distinguish them.
You can also leave the connection name field as is.

-
Click Save.
A new window appears.
-
Select and click your Google account.
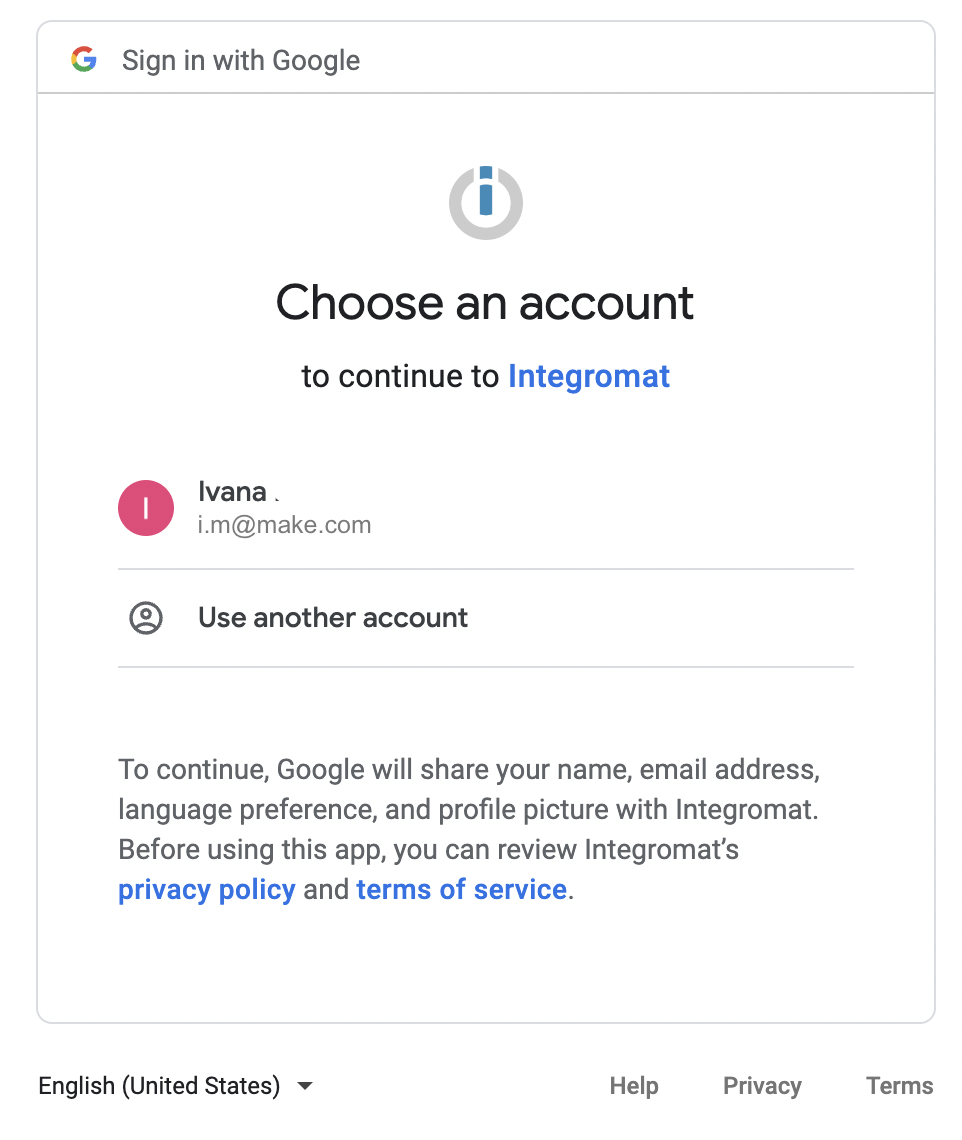
A new window appears.
-
Click Allow to allow Ibexa Connect to access your Google account.
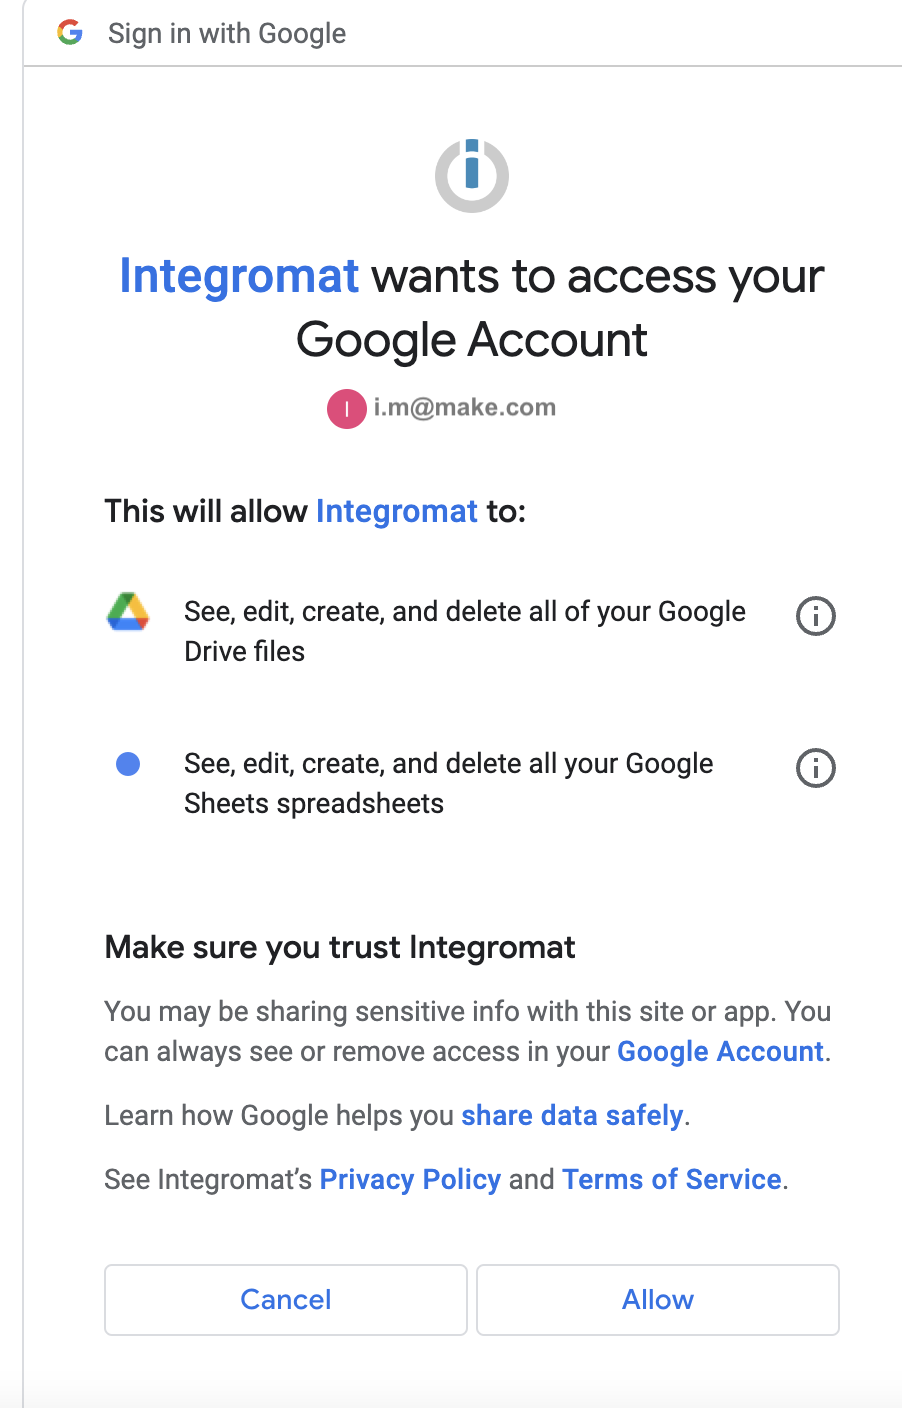
You added your connection. Your new connection appears under the Connection field.
Step 3: Configure the module
In this step, we need to complete the fields required by the module.
-
Under Choose a Drive, select your drive.
-
In Spreadsheet ID, select your spreadsheet.
If your spreadsheet is located in the folder, first select the folder. Then, click the plus sign to select the specific spreadsheet in the folder.
-
In Sheet, select the sheet name.
-
Select whether your table contains headers. Our table contains headers, but yours doesn't have to.
-
In Row with headers, enter the range of the table (headers included).
-
In Limit, enter the number of results you’d like to obtain. Whenever this workflow runs, it will return this number of results.
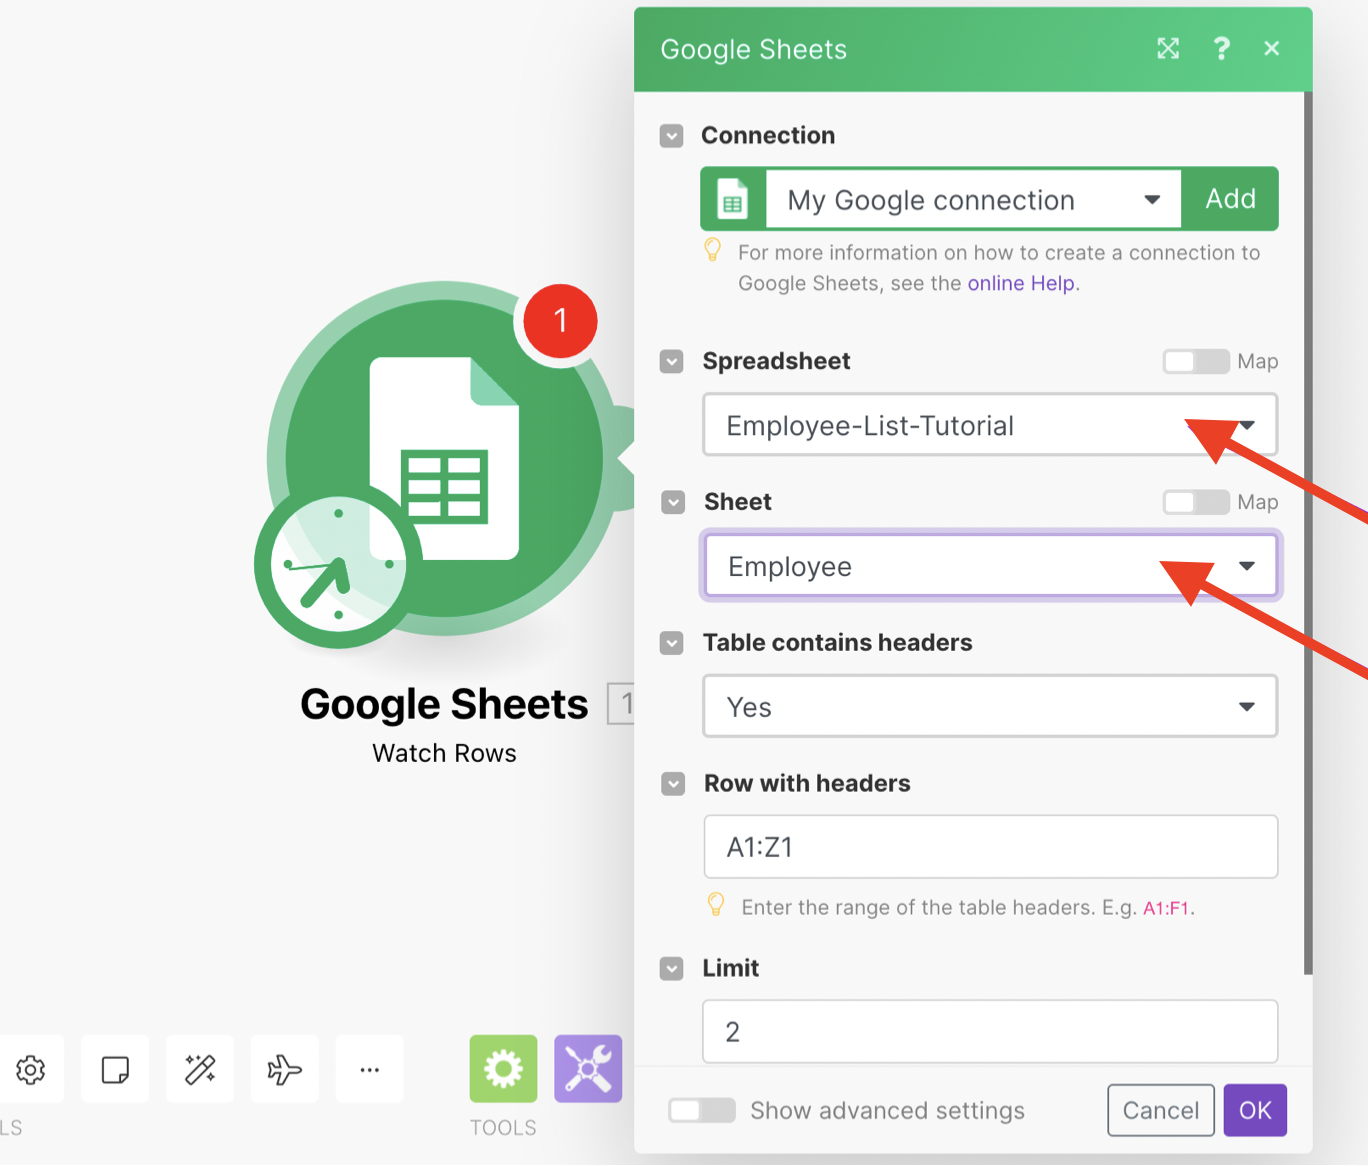
-
Click OK to save.
Step 4: Choose where to start
-
Choose where Ibexa Connect should start looking for data to process.
For Google Sheets, you can choose:
-
Since specific ID - You have to provide a parameter.
-
All - We process all records found in the spreadsheet.
-
Choose manually - You can pick the one you’d like to process first.
We use All, which is useful when testing new scenarios.
-
-
Click OK to save.
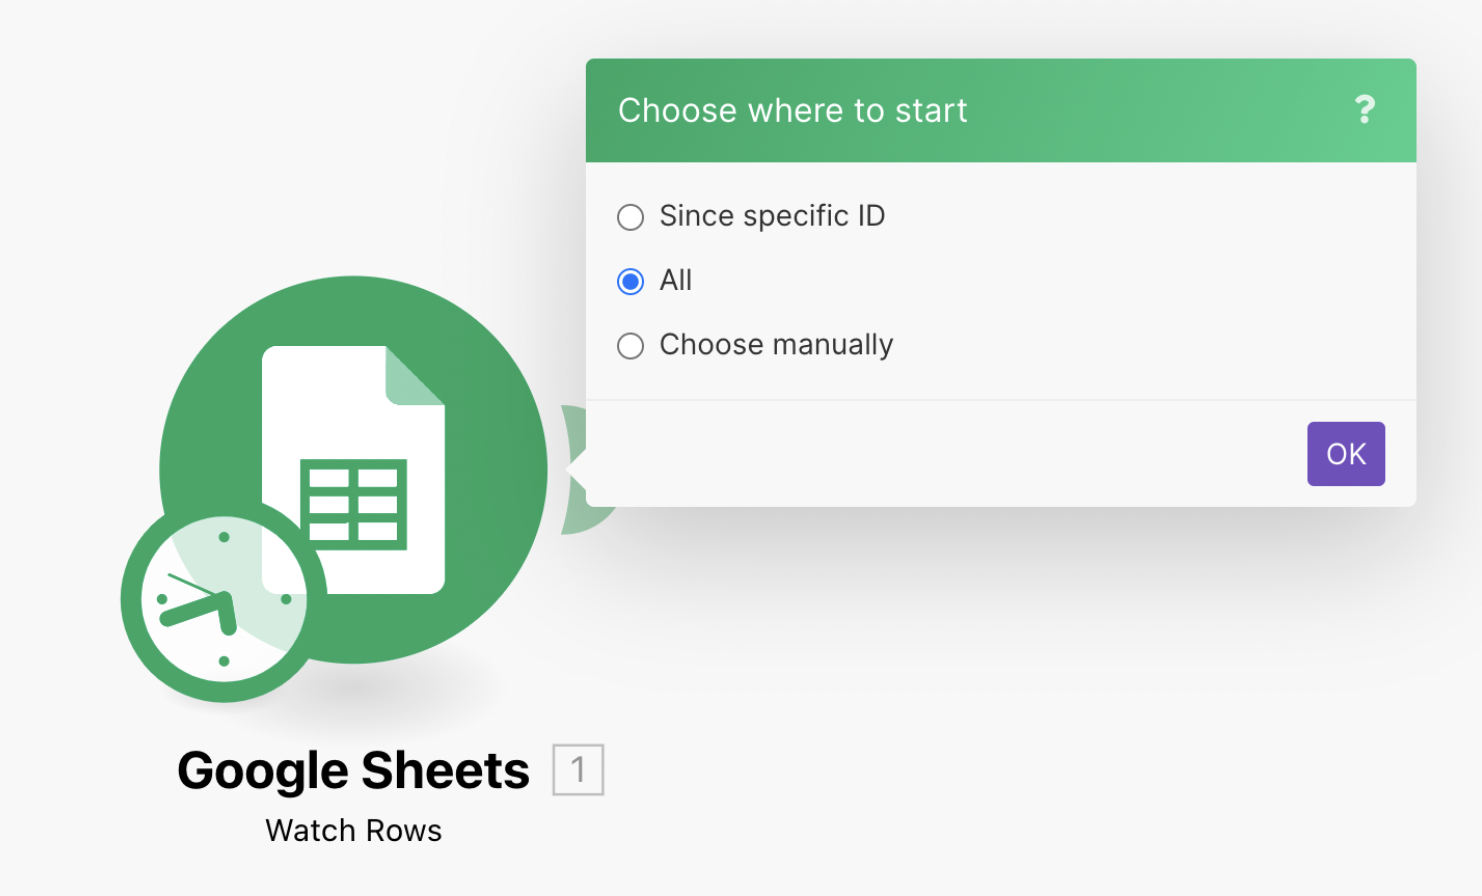
Your Google Sheets trigger module is completed.
By default, Ibexa Connect checks for new rows every 15 minutes and processes all the records created since the last time it checked. If you want to set a different schedule for your scenario, see step 6.
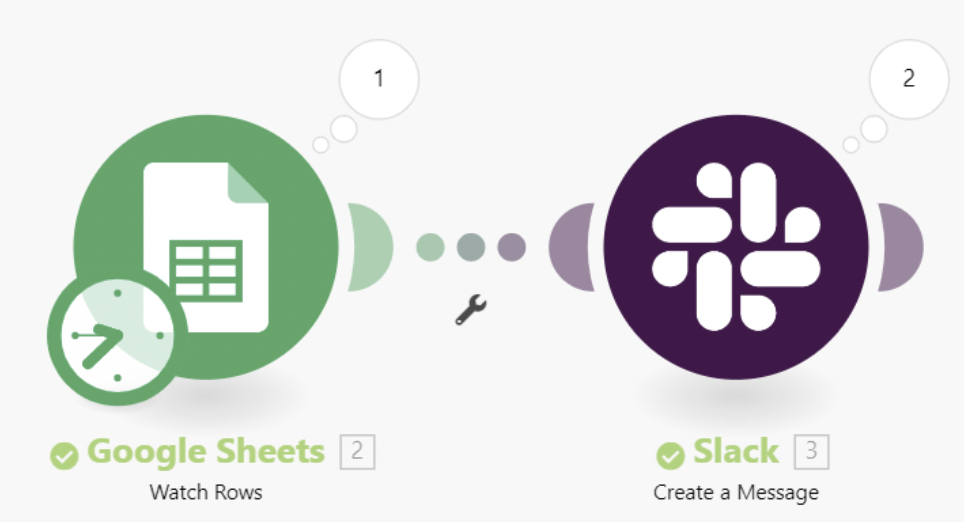
Step 5: Select the action module
Depending on what you want to do next, select your next module. You can send the data from Google Sheets to any of our 1000+ apps.
We will add a Slack module which will send a new Slack message to the office manager letting them know a new employee is starting.
-
Hover over the right part of the Google Sheets module. The plus sign appears.
Click Add another module. An empty module appears.
-
Search for and click the module you want. In this case, select Slack > Create a message module.
-
If you already authenticated your Slack connection inside Ibexa Connect, the dropdown shows the previously connected account as an option.
If you are using Slack on Ibexa Connect for the first time, you need to follow the instructions below to add and authorize the Slack connection.
In Connection, click Add.
A pop-up appears.
-
Connect as a user if you want Slack to send messages in your name.
-
Connect as a bot if you want Slack to send messages as the Ibexa Connect app (bot).
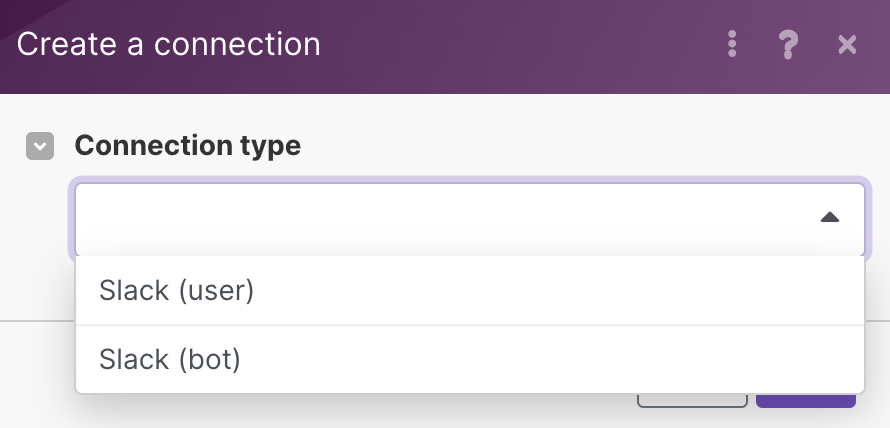
Enter your connection name and click Save.
-
-
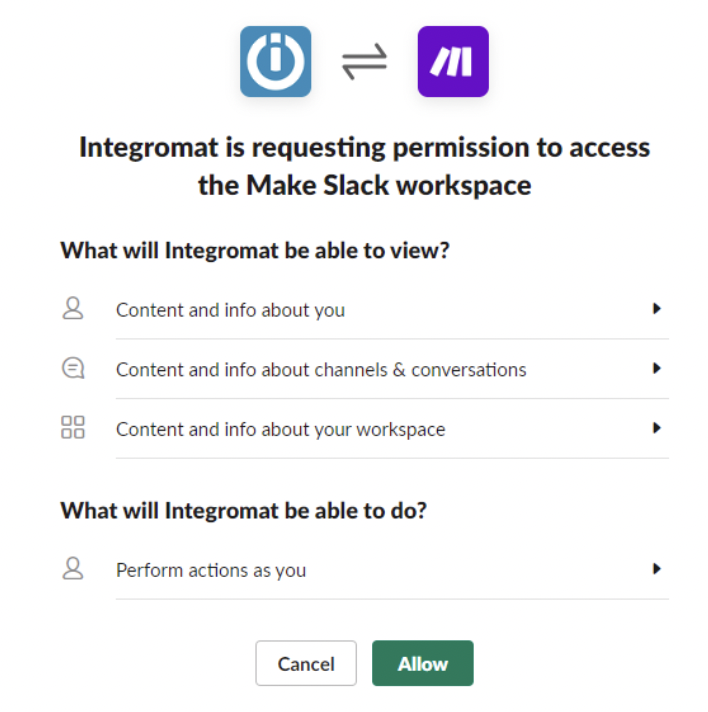
A new window appears. Sign in to your Slack.
-
Click Allow to authorize Ibexa Connect to access Slack.
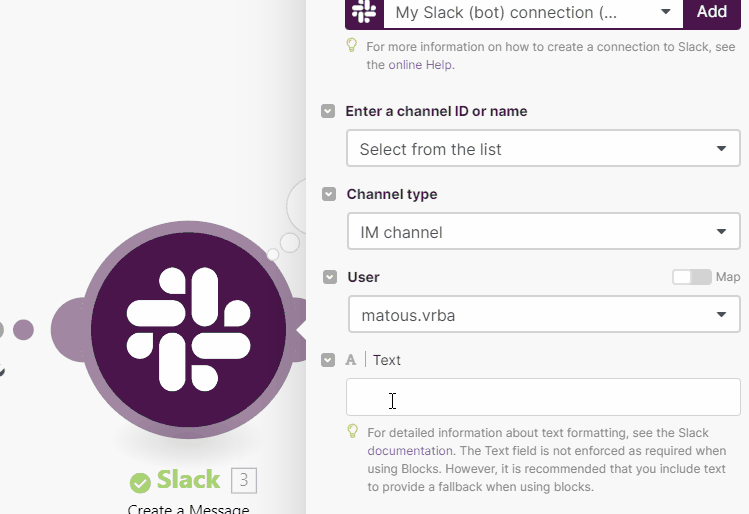
-
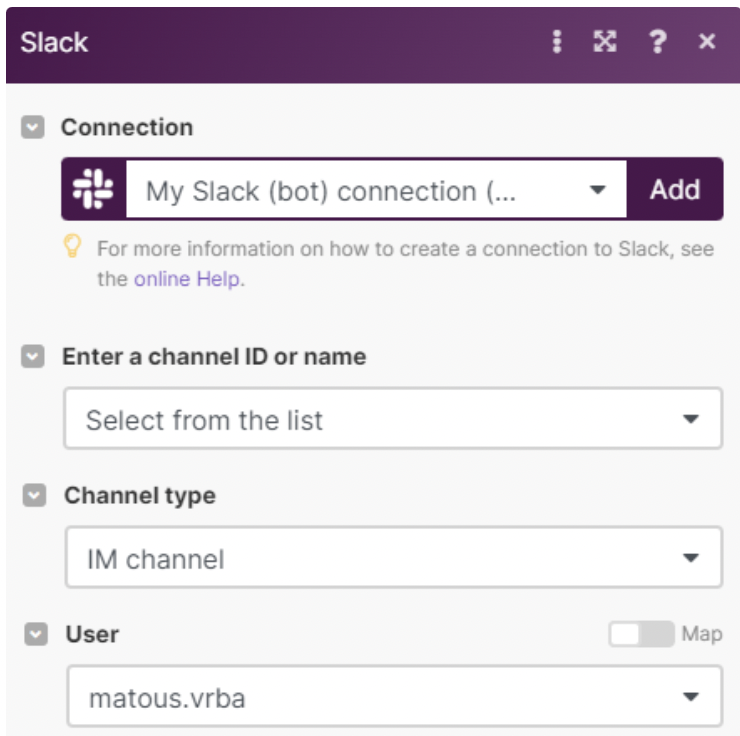
Select if you want to enter a channel ID or name manually or choose from the list.
-
Enter or select a channel you want to send the message to.
It can be a public channel, a private channel, or an IM channel.
To select a user, use the IM channel option and then select a user name. You can first try sending the message to yourself.
-
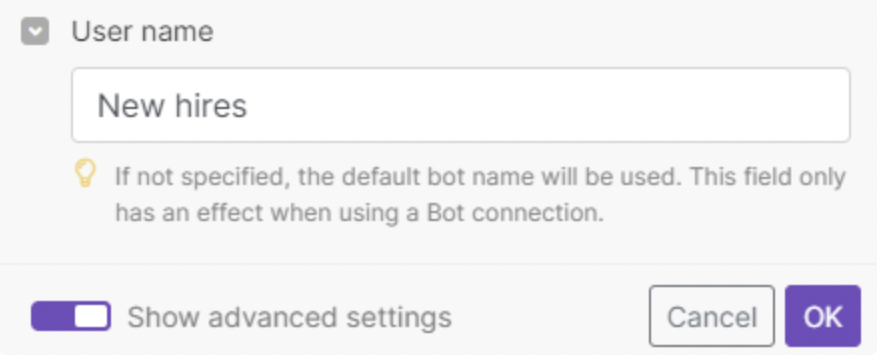
(Optional step)
If you chose the Bot option, you can define a custom bot name in the Advanced settings of this module.
Step 6: Map data from Google Sheets
Mapping means telling Ibexa Connect how it should move data from one app to another.
We want to compose a Slack message with the details of the new hire.
-
Click the Text field.
The mapping dialog opens.
-
Select data from the spreadsheet you want to use in the Slack message.
-
Click the variables from the spreadsheet (they will have the same color as the module) to add them to the message text.
For example:
Hi, our new [Team] hire [Employee name] is starting on [Starting date]. Please prepare everything for their first day, thank you!
will produce this as a result:
Hi, our new Marketing hire Sarah is starting on 14-Jul-2022. Please prepare everything for their first day, thank you!
-
Confirm OK to save the settings.
Step 7: Test your scenario
To verify that everything works as expected, test your scenario by clicking the Run once button.
If your scenario runs successfully, green checkmarks appear under the modules. Also, the messages(s) are delivered on Slack.
The modules should also have bubbles above them indicating how many operations the scenario used. Every time an app performs an action such as reading or writing data, it consumes an operation. Learn more about operations.
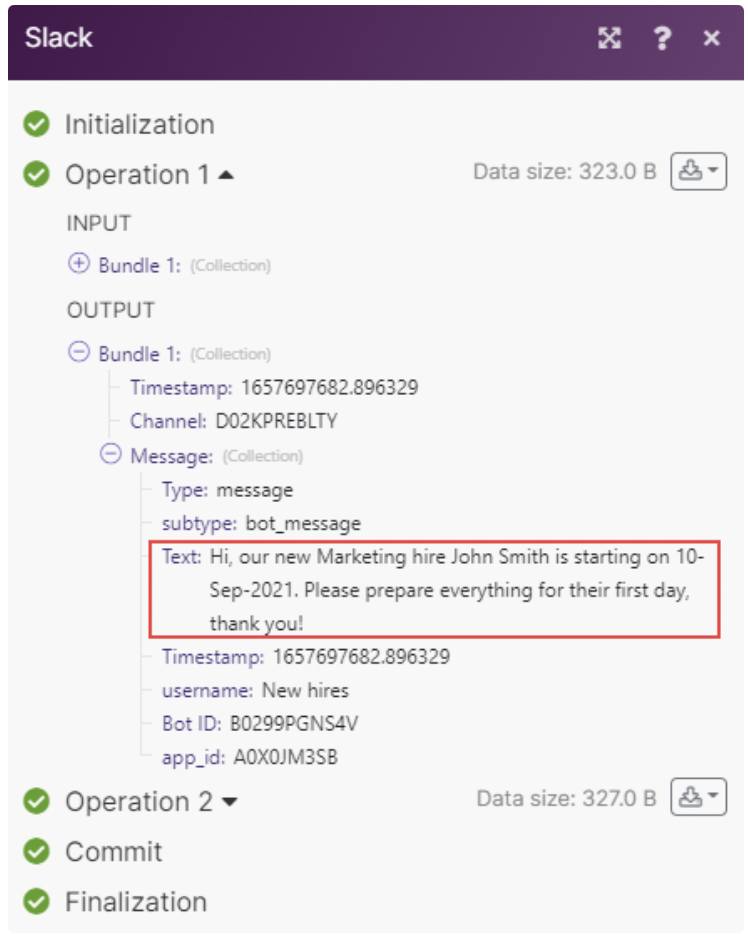
Click the bubble above the module to see the details of what the module just processed. The Google Sheets module in the screenshot below shows that it processed two rows of data (bundle 1 and bundle 2).
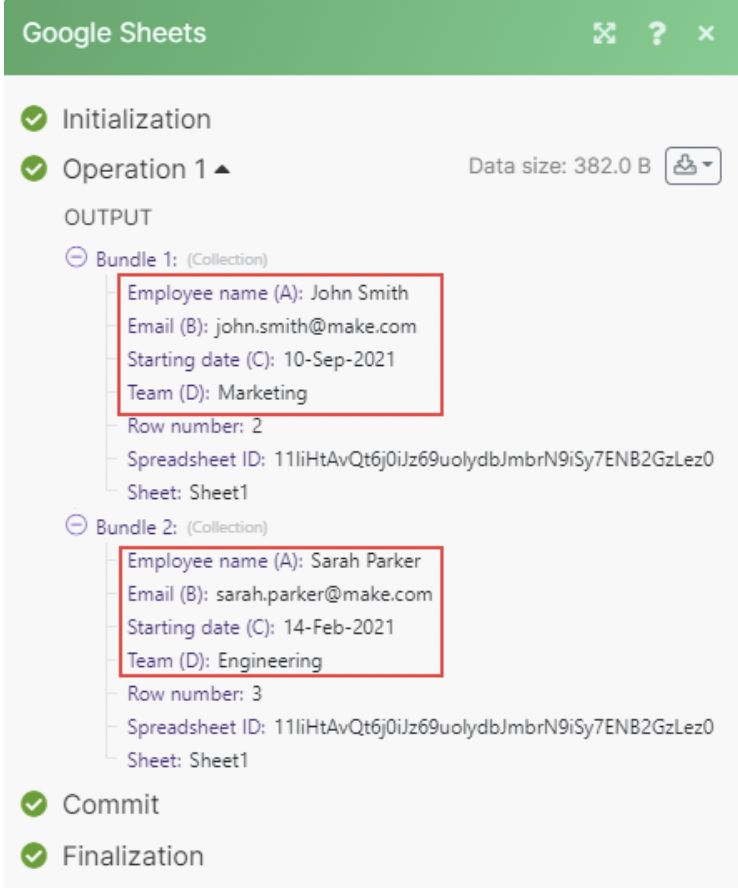
The Slack module shows that it sent 2 messages. Each message contains data from one of the rows from Google Sheets.
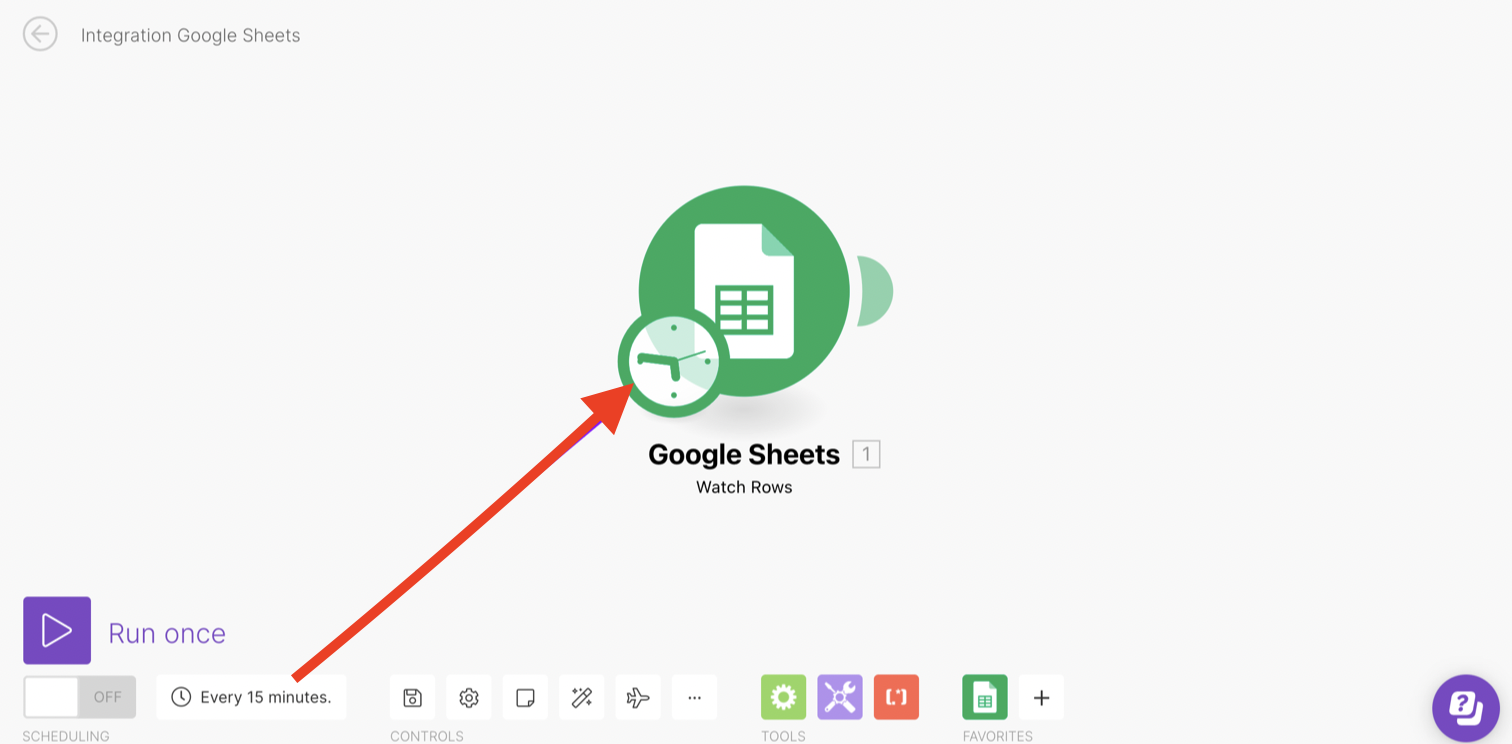
Step 8: Activate your scenario
If the scenario works as expected, you can activate it to make it run on a schedule.
-
Click the Schedule button or the clock icon next to the Google Sheets module.
-
Choose how often the scenario should run. The default is every 15 minutes.
-
Activate the scenario using the Scheduling switch.
-
Save the scenario.
That is it! You now have a working scenario that does a repetitive task for you!
Use case 2: Get data from other apps and add it to Google Sheets as new rows
This use case has 2 app modules - Gmail and Google Sheets. The Gmail module looks for new emails and filters those that have “Expense Report” in their subject line. Then, the Google Sheets module adds matching emails as new rows in a spreadsheet, where we can track if an expense report was paid or not.
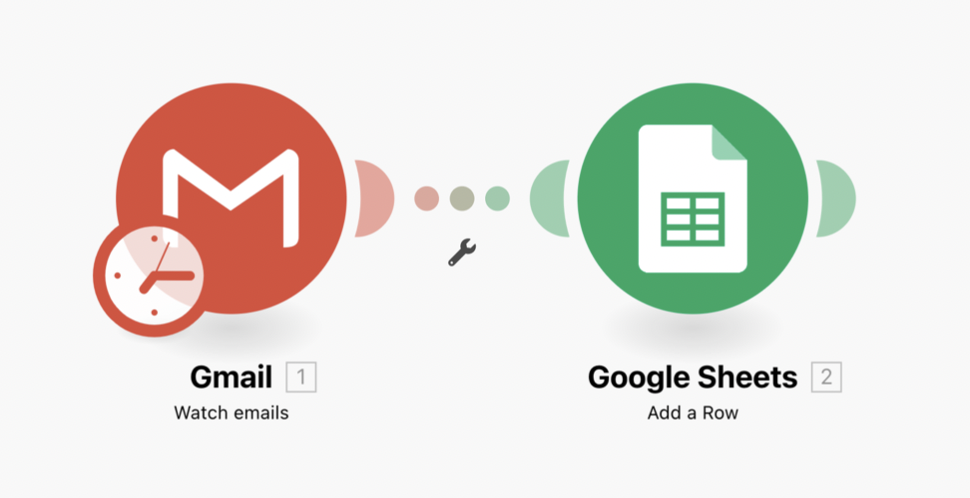
Watch for incoming emails and add a row to Google Sheets
Follow these steps to build the scenario:
-
Choose Gmail as the trigger module
-
Map the variables from Gmail in the Google Sheets module
-
Choose where to start
-
Test the scenario
-
Define the scenario schedule
-
Activate the scenario
Step 1: Choose Gmail as the trigger module
Select the Gmail app and choose the trigger Watch Emails from the list. Then proceed as follows:
-
Connect your Google Account if you haven’t done so before.
Note: If you are using a personal Gmail account, there are some extra connection steps required for using Gmail and Google Drive apps. Learn more.
-
Select the folder to monitor in your inbox.
-
Choose Gmail filter as the filter type.
-
Add the keyword to use for filtering in the “Query” field.
We want Gmail to return only emails with “Expense Report” phrase in the subject line. So we enter “Expense report” in the "Query" field.
You can enter any other words or phrases you want Gmail to filter. For example “Invoice”, “Demo request”, etc.
-
Select whether you want Ibexa Connect to mark the emails as read or unread when fetched.
-
Select the maximum number of results you’d like to return per execution (one run of the scenario).
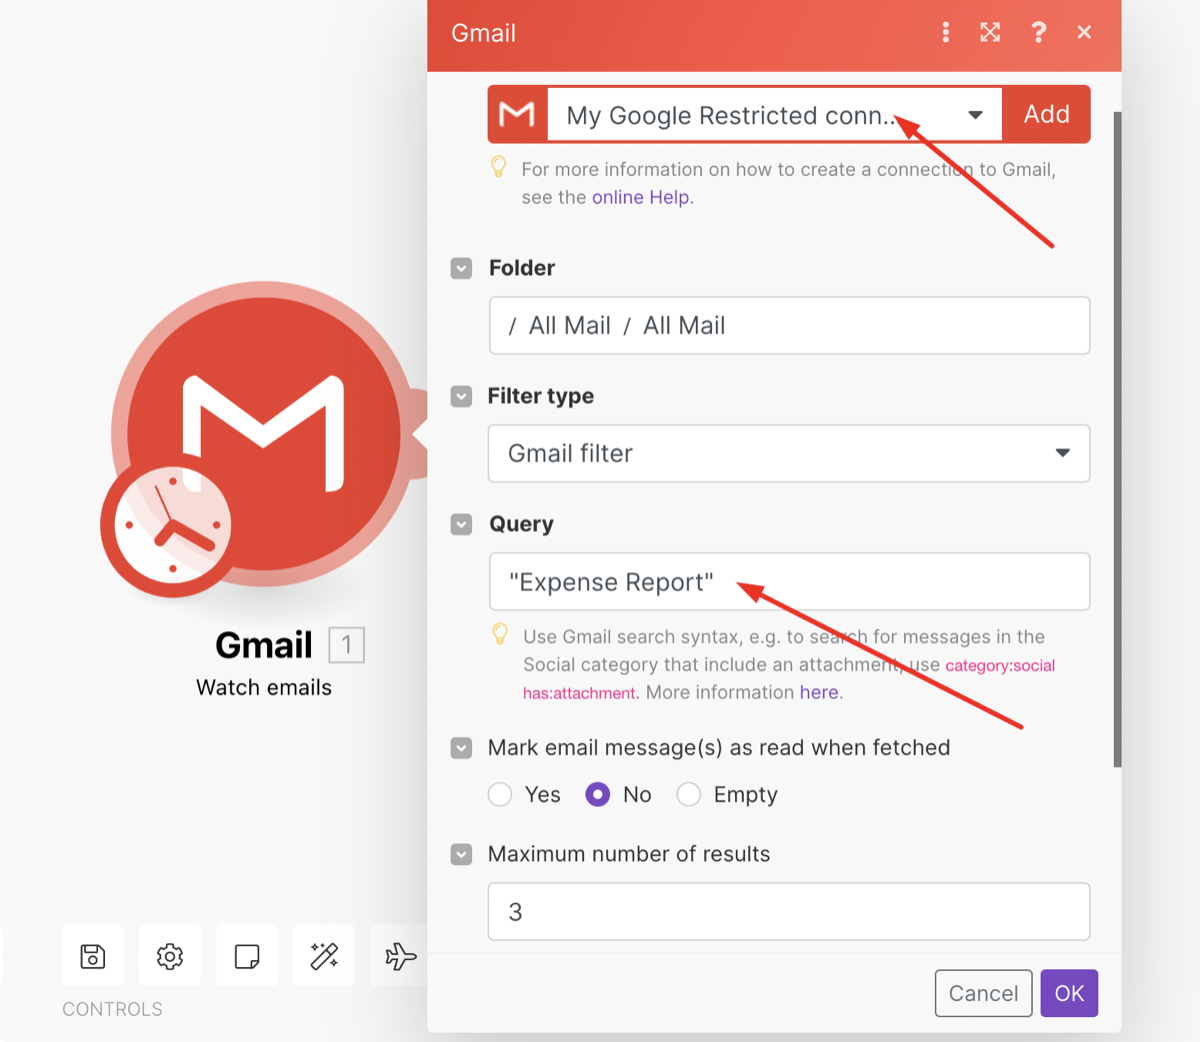
Gmail module configuration
Step 2: Map the variables from Gmail in the Google Sheets module
The process of mapping consists of using data from the previous module and adding it to subsequent modules in your scenario. In this example, our spreadsheet for tracking expenses looks like this:
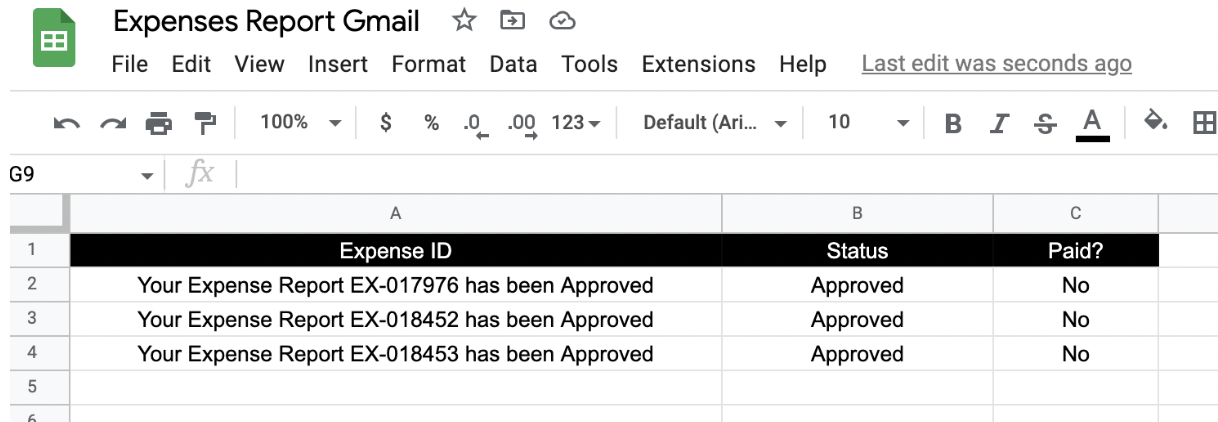
We have these columns in our spreadsheet:
-
A: Expense ID - The subject line of the email
-
B: Status - The status of the expense
-
C: Paid? - Shows whether the expense was paid or not
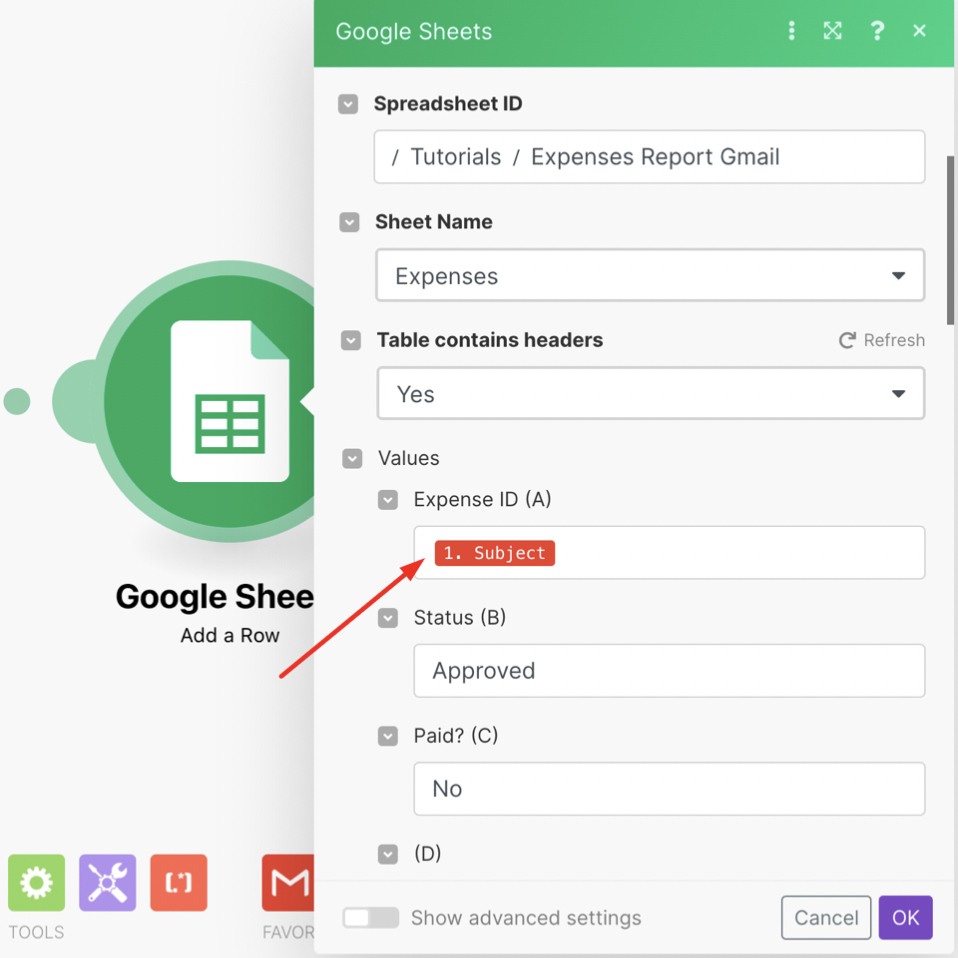
Google Sheets module - mapping Subject
Note that the subject variable is highlighted in red, which indicates that the value will come from the Gmail module. The other fields are typed in manually, so they will always be Status = Approved and Paid = No.
Step 3: Choose where to start
Now that your modules are set up, pick the starting point in your inbox - where Ibexa Connect should start looking for data. Right-click the Gmail module and select Choose where to start.
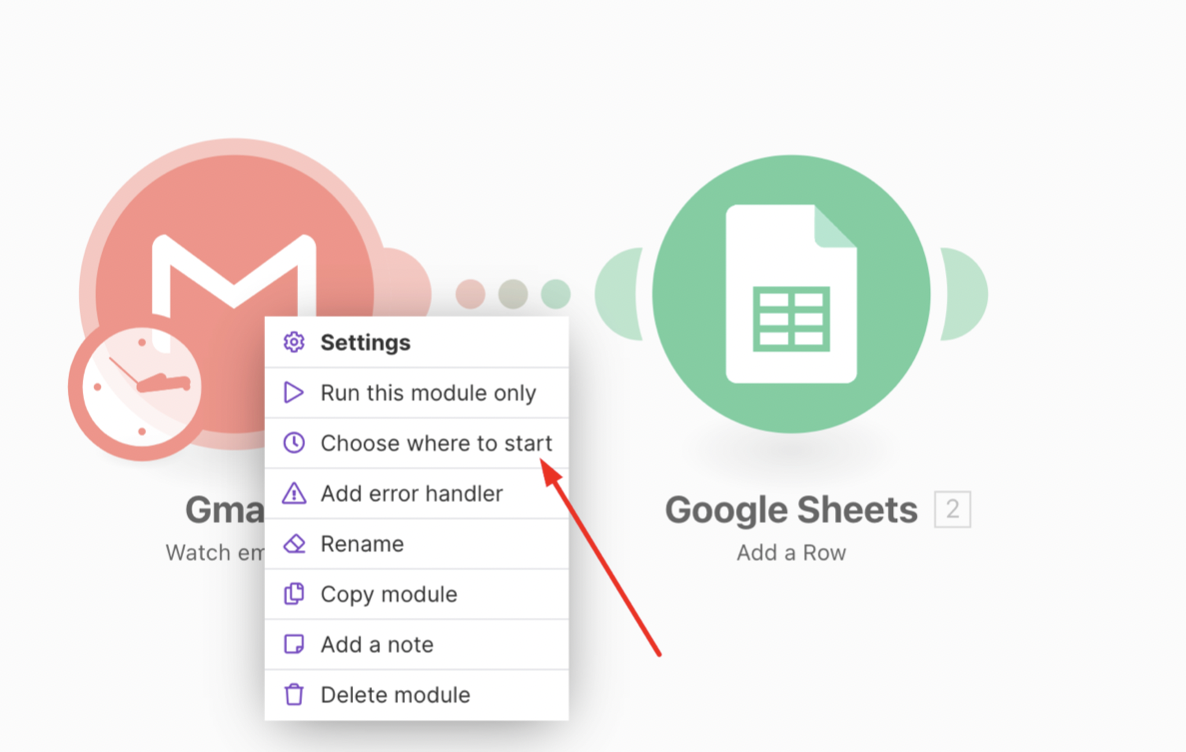
Action panel for the Gmail module
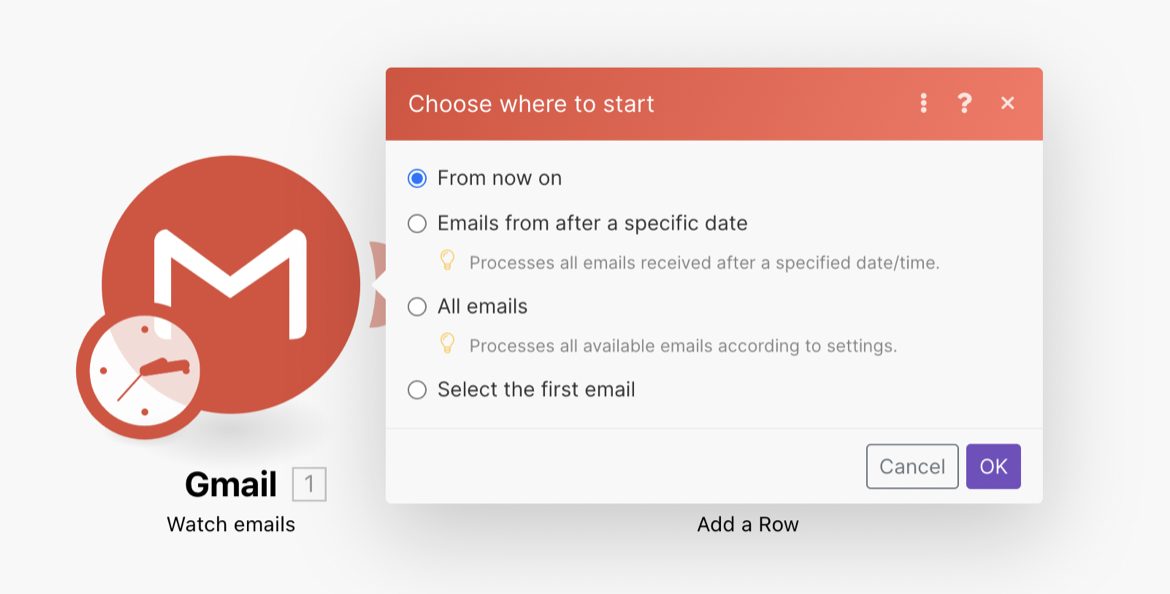
Options available in the “Choose where to start” configuration
-
From now on: The module processes only new incoming emails that come in after you activate your scenario.
-
Emails from after a specific date: You can select a date from which the emails will be processed.
-
All emails: It will go through your entire inbox (but grab only 3 records, which is what we defined in Step 1).
-
Select the first email: You can manually select the email you’d like to process. Usually, this is useful for testing purposes.
When building and testing scenarios, select All emails to ensure you have data coming in. Once you are finished with the setup, you can choose From now on to only process new incoming emails.
Step 4: Test the scenario
The next step is to run the scenario at least once to see its outcome. Click the Run once button to test your scenario.
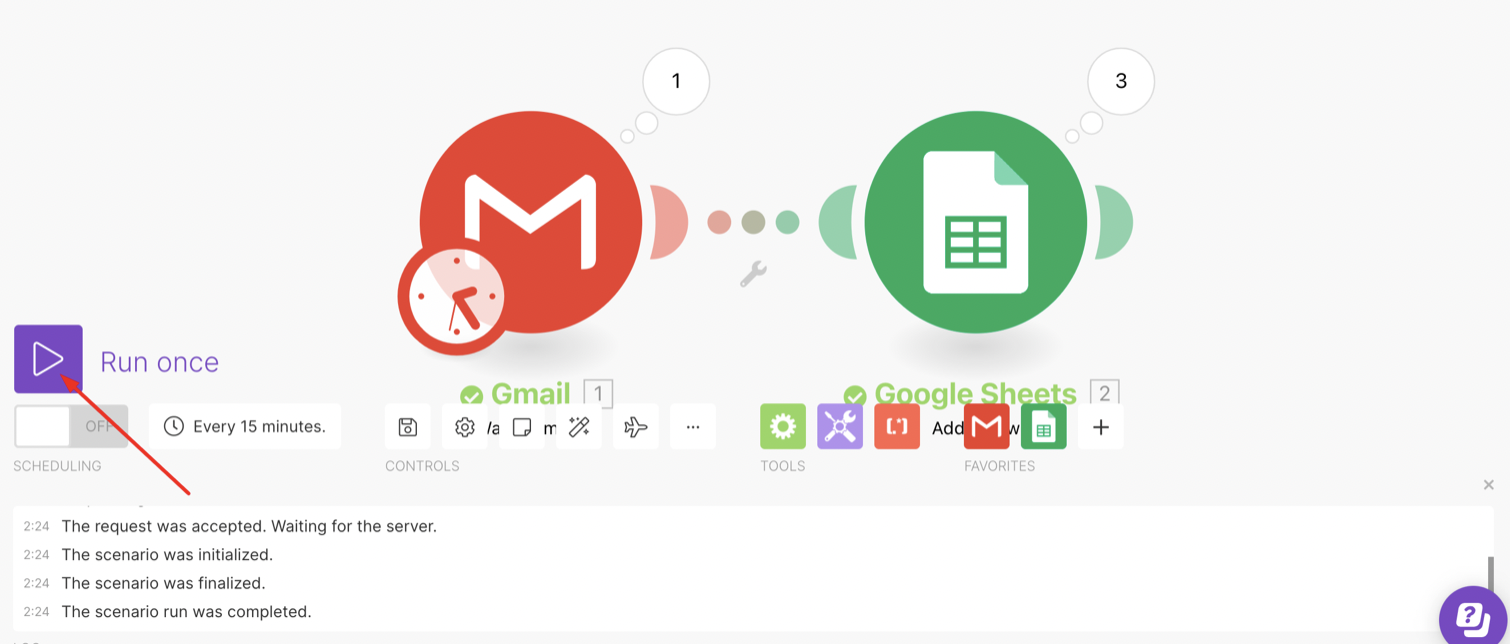
If the scenario runs successfully, green checkmarks appear under the modules. You should also see new rows added in your spreadsheet.
Click the numbers above the modules to see the details of how the data was processed and the output of the scenario.
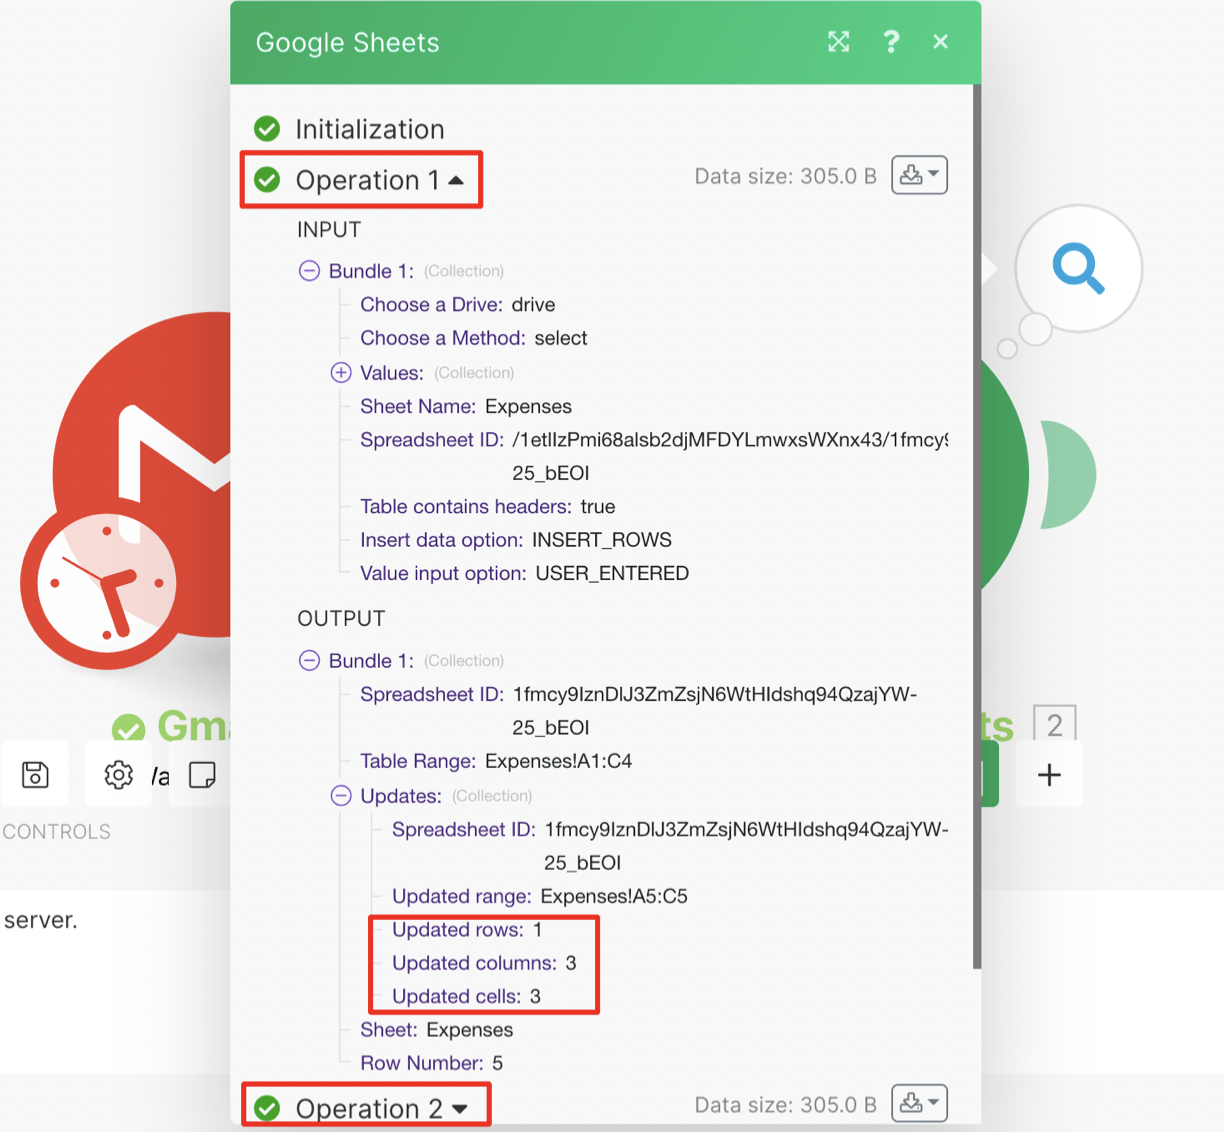
The number 3 in the bubble means that the Google Sheets module has consumed 3 operations, one for each email that it has found and processed. In our case for operation 1, 1 row was updated, 3 columns and 3 cells.
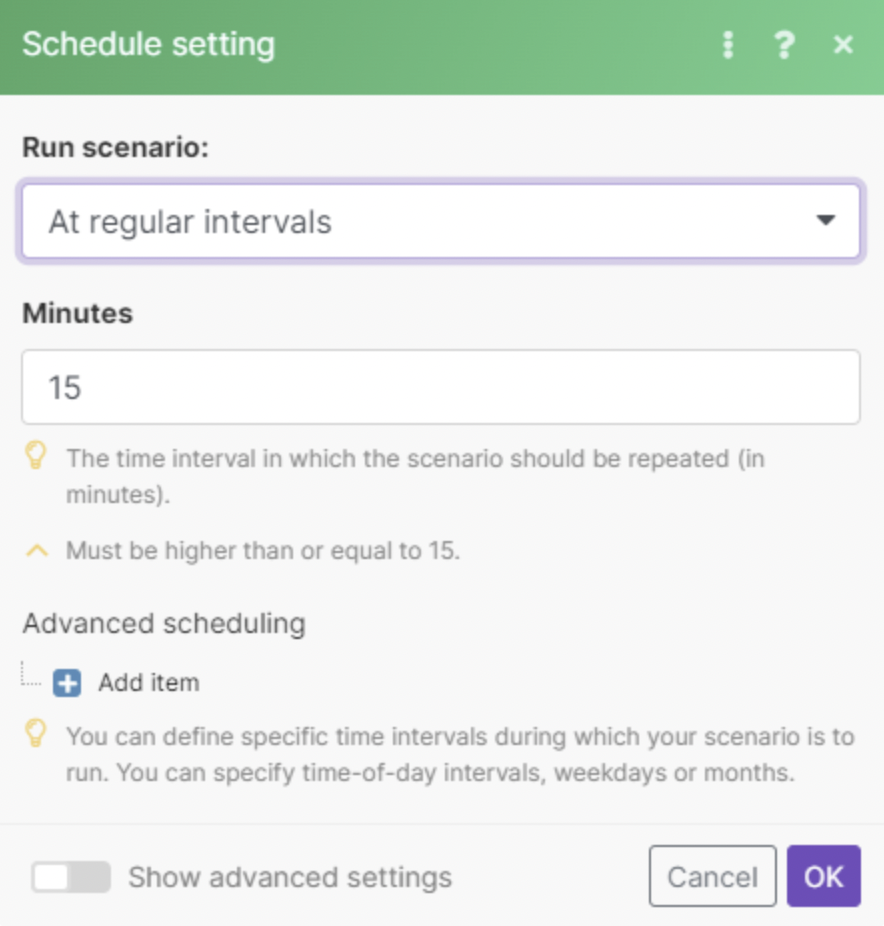
Step 5: Define the scenario schedule
Define how often the scenario should run.
By default, a scenario runs every 15 minutes. With the schedule settings, you can customize the run schedule of your scenario. You can choose the interval, pick a specific date and time, or other options. Learn more about scheduling.
-
Click on the clock icon next to the trigger module, or the Schedule setting button in the bottom toolbar.
-
Select how often you want your scenario to run.
-
Click OK to save your settings.
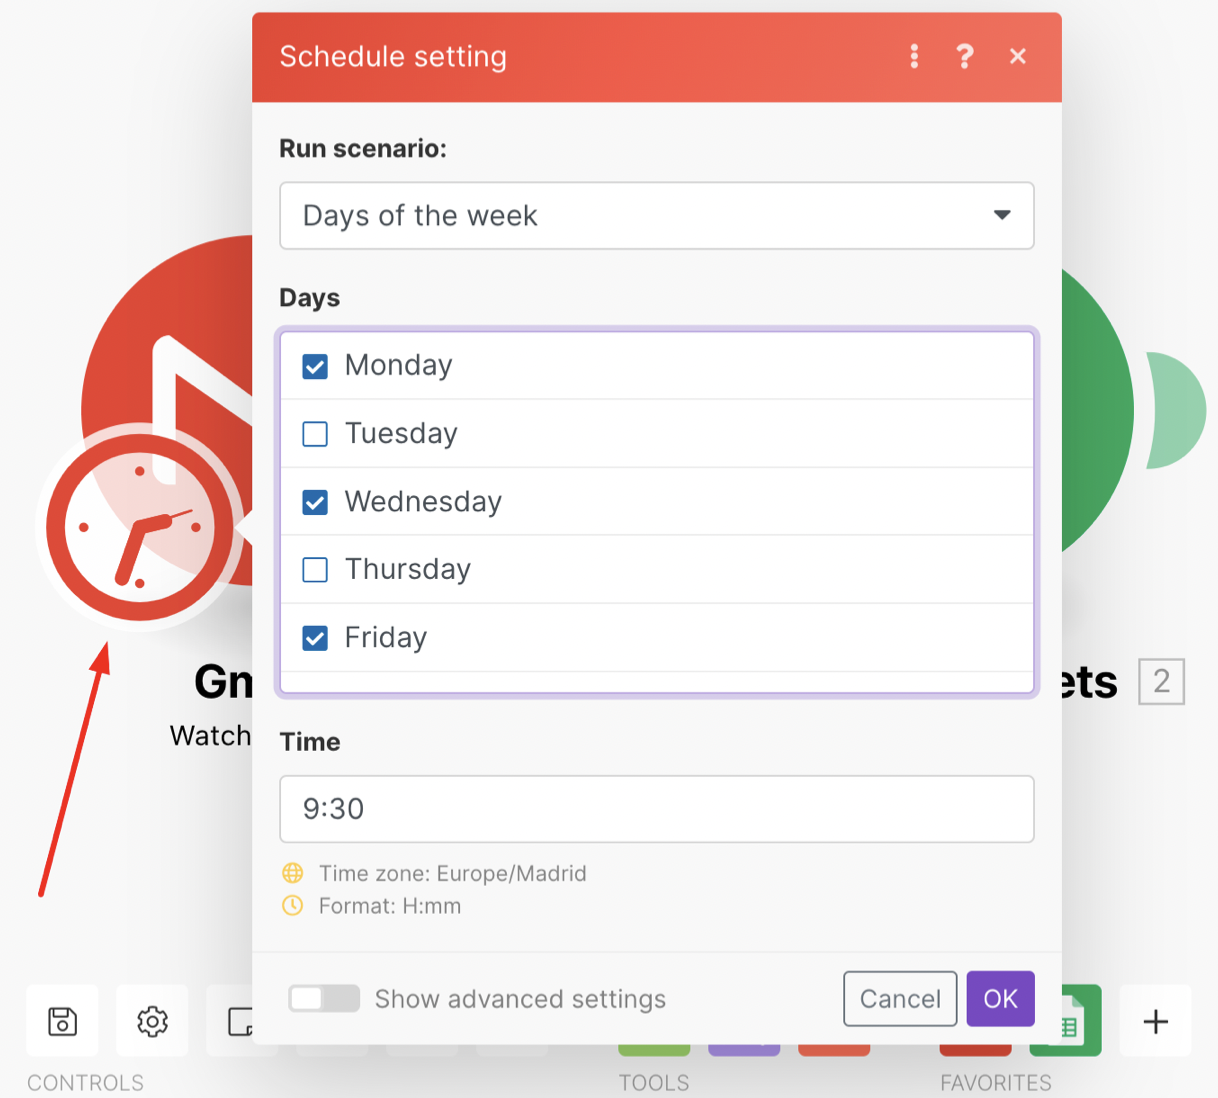
Schedule settings configuration
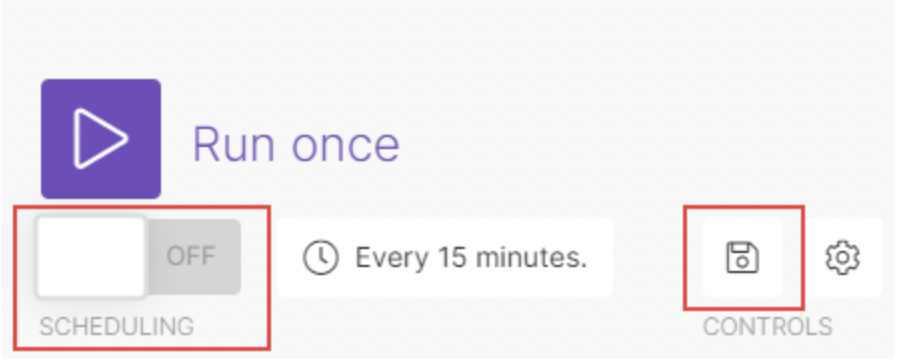
Step 6: Activate the scenario
Now it’s time to activate your scenario and let it run according to the conditions you specified in the previous steps.
-
Click on the scheduling button to activate your scenario.
-
Click the save icon to save your scenario.

How to activate your scenario
Here are a few more examples with links to our templates: