MOCO
The MOCO modules allow you to monitor, create, update, retrieve, list, and delete the activities, contacts, Comments, companies, invoices, invoice payments, leads, presence, projects, project tasks, project expenses, purchases, purchase categories, offers, and users in your MOCO account.
Getting Started with MOCO
Prerequisites
- A MOCO account
In order to use MOCO with Ibexa Connect, it is necessary to have a MOCO account. If you do not have one, you can create a MOCO account at mocoapp.com.
Connecting MOCO to Ibexa Connect
To connect your MOCO account to Ibexa Connect you need to obtain the API Key from your MOCO account and insert it in the Create a connection dialog in the Ibexa Connect module.
1. Log in to your MOCO account.
2. Click your account profile icon > Profile > Integrations.
3. Copy the API Key to your clipboard.
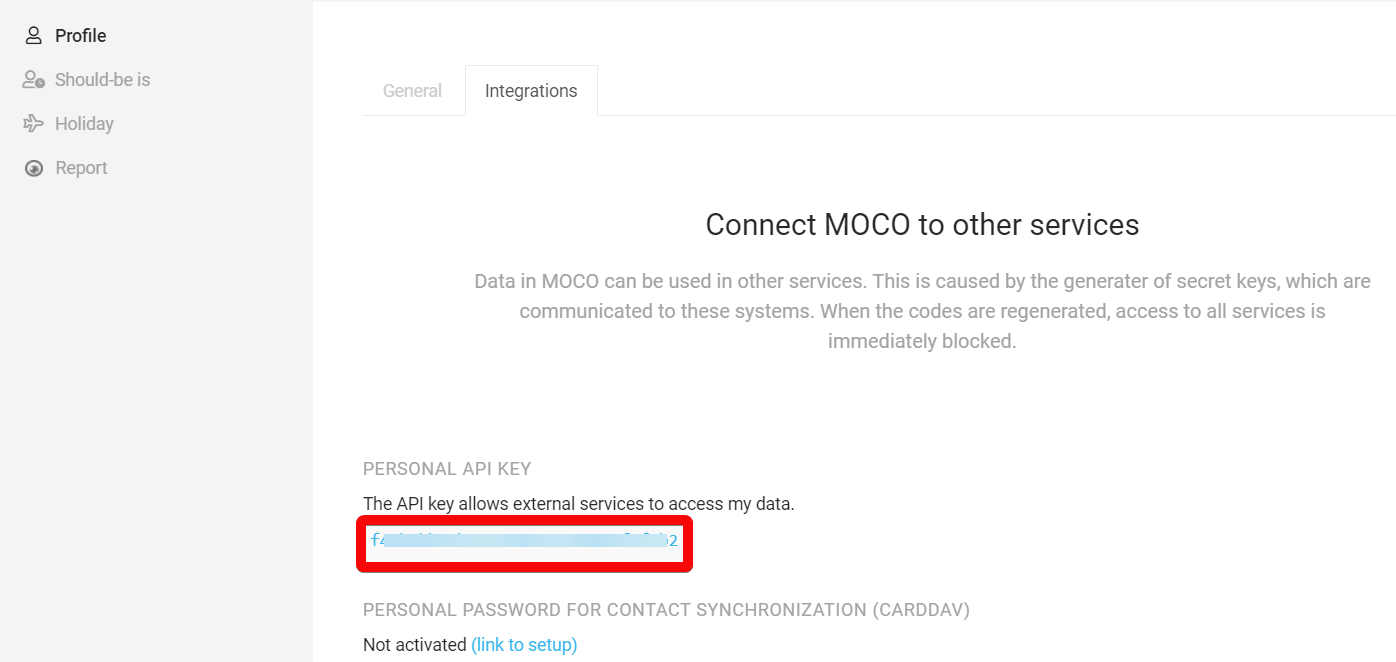
4. Go to**Ibexa Connect** and open the MOCO module's Create a connection dialog.
5. In the Connection name field, enter a name for the connection.
6. In the API Key field, enter the API key copied in step 3.
7. In the Subdomain field, enter your MOCO account's domain details. For example, if your MOCO account's URL address is www.xyz.mocoapp.com then your subdomain is xyz8. Click Continue.
The connection has been established.
Activities
Note
You do not have to add the webhooks in the MOCO as it is automatically done for you once you add and save an instant trigger module to your scenario.
Watch New Activity
Triggers when a new activity is created.
| Webhook Name | Enter a name for the webhook. |
Contacts
Note
You do not have to add the webhooks in the MOCO as it is automatically done for you once you add and save an instant trigger module to your scenario.
Watch New Contact
Triggers when a new contact is created.
| Webhook Name | Enter a name for the webhook. |
List Contacts
Lists all existing contacts.
| Term | Enter the full text to search contacts that match the specified term. For example, full name, first name, work email, company, and so on. |
| Phone | Enter (map) the phone number to search the contacts with the specified phone number. |
| Tags | Enter the tags to search for the contacts that match the specified tags. You can add multiple tags separated by a comma. |
| Limit | Set the maximum number of contacts Ibexa Connect will return during one execution cycle. |
Get a Contact
Returns information about the selected contact.
| Contact ID | Select or map the Contact ID whose details you want to retrieve. |
Create a Contact
Creates a new contact.
| First Name | Enter (map) the contact's first name. |
| Last Name | Enter (map) the contact's last name. |
| Gender | Select or map the contact's gender. For example, male. |
| Title | Enter (map) the contact's title. For example, Mr., Dr. |
| Company ID | Select or map the contact's company ID. |
| Job Position | Enter (map) the contact's job position in the company. |
| Mobile Phone | Enter (map) the contact's mobile phone number. |
| Work Fax | Enter (map) the contact's work fax number. |
| Work Phone | Enter (map) the contact's work phone number. |
| Work Email | Enter (map) the contact's work email address. |
| Work Address | Enter (map) the contact's work address. |
| Home Email | Enter (map) the contact's personal email address. |
| Home Address | Enter (map) the contact's personal home address. |
| Birthday | Enter (map) the contact's birthday. |
| Info | Enter (map) any additional information about the contact. |
| Tags | Add the tags for the contact. For example, lead, developer. You can add multiple tags. |
Update a Contact
Updates the selected contact.
| Contact ID | Select or map the Contact ID whose details you want to update. |
| First Name | Enter (map) the contact's first name. |
| Last Name | Enter (map) the contact's last name. |
| Gender | Select or map the contact's gender. For example, male. |
| Title | Enter (map) the contact's title. For example, Mr., Dr. |
| Company ID | Select or map the contact's company ID. |
| Job Position | Enter (map) the contact's job position in the company. |
| Mobile Phone | Enter (map) the contact's mobile phone number. |
| Work Fax | Enter (map) the contact's work fax number. |
| Work Phone | Enter (map) the contact's work phone number. |
| Work Email | Enter (map) the contact's work email address. |
| Work Address | Enter (map) the contact's work address. |
| Home Email | Enter (map) the contact's personal email address. |
| Home Address | Enter (map) the contact's personal home address. |
| Birthday | Enter (map) the contact's birthday. |
| Info | Enter (map) any additional information about the contact. |
| Tags | Add the tags for the contact. For example, lead, developer. You can add multiple tags. |
Comments
List Comments
Lists all existing comments.
| Commentable Type | Select the option whose comments you want to list. For example, deals, projects. |
| Commentable ID | Select the ID for the option selected above. |
| User ID | Select or map the User ID whose comments you want to list. |
| Manual | Select whether you want to list the user-created comments. |
| Limit | Set the maximum number of comments Ibexa Connect should return during one execution cycle. |
Get a Comment
Returns information about the selected comment.
| Comment ID | Select or map the Comment ID whose details you want to retrieve. |
Create a Comment
Creates a new comment.
| Commentable Type | Select the option whose comments you want to list. For example, deals, projects. |
| Commentable ID | Select the ID for the option selected above. For example, if you have selected User above, select the User ID. |
| Comment | Enter the comment text. |
Update a Comment
Updates the selected comment.
| Comment ID | Select or map the Comment ID whose details you want to update. |
| Commentable Type | Select the option whose comments you want to list. For example, deals, projects. |
| Commentable ID | Select the ID for the option selected above. For example, if you have selected User above, select the User ID. |
| Comment | Enter the comment text. |
Delete a Comment
Deletes a selected comment.
| Comment ID | Select or map the Comment ID you want to delete. |
Companies
Note
You do not have to add the webhooks in the MOCO as it is automatically done for you once you add and save an instant trigger module to your scenario.
Watch New Company
Triggers when a new company is created.
| Webhook Name | Enter a name for the webhook. |
List Companies
List all existing companies.
| Type | Select the company type you want to list. For example, supplier, Vendor. |
| Tags | Add the tags to list the companies that match the tags. |
| Identifier | Enter the company identifier number you want to list. |
| Limit | Set the maximum number of companies Ibexa Connect should return during one execution cycle. |
Get a Company
Returns information about the selected company.
| Company ID | Select or map the Company ID whose details you want to retrieve. |
Create a Company
Creates a new company.
| Name | Enter the company name. |
| Type | Select or map the company type and enter the specific details. |
| Currency | Enter (map) the company's applicable three-character currency code. For example, EUR. By default EUR currency is available. To add a different currency, see Adding Multiple Currencies in Your MOCO Account. |
| Country Code | Select or map the country in which the company is located. |
| VAT Identifier | Enter (map) the company's VAT identifier. |
| Website | Enter (map) the company's website URL address. |
| Fax | Enter (map) the company's fax number. |
| Phone | Enter (map) the company's contact phone number. |
| Enter (map) the company's contact email address. | |
| Billing Email CC | Enter the company's billing email address. |
| Address | Enter (map) the company's contact address. |
| Info | Enter the details about the company. |
| Custom Properties | Add the custom fields and their values for the company. For example, company billing address. |
| Labels | Add the labels for the company. For example, Automobile. You can add multiple labels. |
| User ID | Select the User ID who is the contact person for the company. |
| Footer | Enter the information that appears in the footer of the company's invoice. |
Update a Company
Updates the selected company.
| Company ID | Select the Company ID whose details you want to update. |
| Name | Enter the company name. |
| Type | Select or map the company type and enter the specific details. |
| Currency | Enter (map) the company's applicable three-character currency code. For example, EUR. By default EUR currency is available. To add a different currency, see Adding Multiple Currencies in Your MOCO Account. |
| Country Code | Select or map the country in which the company is located. |
| VAT Identifier | Enter (map) the company's VAT identifier. |
| Website | Enter (map) the company's website URL address. |
| Fax | Enter (map) the company's fax number. |
| Phone | Enter (map) the company's contact phone number. |
| Enter (map) the company's contact email address. | |
| Billing Email CC | Enter the company's billing email address. |
| Address | Enter (map) the company's contact address. |
| Info | Enter the details about the company. |
| Custom Properties | Add the custom fields and their values for the company. For example, company billing address. |
| Labels | Add the labels for the company. For example, Automobile. You can add multiple labels. |
| User ID | Select the User ID who is the contact person for the company. |
| Footer | Enter the information that appears in the footer of the company's invoice. |
Invoices
Note
You do not have to add the webhooks in the MOCO as it is automatically done for you once you add and save an instant trigger module to your scenario.
Watch New Invoice
Triggers when a new invoice is created.
| Webhook Name | Enter a name for the webhook. |
List Invoices
Lists all existing invoices.
Status |
Select the status of the invoice you want to list:
|
Date From |
Enter the date to list the invoices created on or after the specified date. See the list of supported date and time formats. |
Date To |
Enter the date to list the invoices created on or before the specified date. See the list of supported date and time formats. |
Tags |
Add the tags to list the invoices that match the specified tags. You can add multiple tags separated by a comma. |
Identifier |
Enter the company identifier whose invoices you want to list. |
Term |
Enter a keyword or phrase to search the invoices that match the specified terms. |
Limit |
Set the maximum number of invoices Ibexa Connect will return during one execution cycle. |
Get an Invoice
Returns information about the selected invoice.
| Invoice ID | Select the Invoice ID whose details you want to retrieve. |
Create an Invoice
Creates a new invoice.
Customer ID |
Select the Customer ID whose invoice you are creating. |
||||||||||||||
Recipient Address |
Enter the recipient email address to which the invoice is sent. |
||||||||||||||
Date |
Enter the date on which the invoice is created. See the list of supported date and time formats. |
||||||||||||||
Due Date |
Enter the date on which the invoice is due for payment. See the list of supported date and time formats. |
||||||||||||||
Title |
Enter a name for the invoice. |
||||||||||||||
Tax |
Enter the tax applicable to the invoice. |
||||||||||||||
Currency |
Enter the three-character currency code applicable to the invoice. By default EUR currency is available. To add a different currency, see Adding Multiple Currencies in Your MOCO Account. |
||||||||||||||
Items |
Add the items to the invoice:
|
||||||||||||||
Service Period From |
Enter the service for the items in the invoice starts from. |
||||||||||||||
Service Period To |
Enter the service for the items in the invoice ends on. |
||||||||||||||
Status |
Select the status of the invoice:
|
||||||||||||||
Change Address |
Select the option to change the address on the invoice:
|
||||||||||||||
Salutation |
Enter the applicable salutation to the address. For example, |
||||||||||||||
Footer |
Enter the text that appears on the footer of the invoice. |
||||||||||||||
Discount |
Enter the discount applicable to the invoice in percenter. For example, for |
||||||||||||||
Cash Discount |
Enter the cash discount applicable on the invoice. |
||||||||||||||
Cash Discount Days |
Enter the number of days the cash discount applicable on the invoice. |
||||||||||||||
Project ID |
Select the Project ID associated with the invoice. |
||||||||||||||
Tags |
Add the tags for the invoice. You can add multiple tags. |
Update an Invoice Status
Updates status of the selected invoice.
Invoice ID |
Select or map the Invoice ID whose status you want to update. |
Status |
Select the status of the invoice:
|
Invoice Payments
List Invoice Payments
Lists all existing invoice payments.
| Invoice ID | Select the Invoice ID whose payments you want to list. |
| Date From | Enter the date to list the invoice payment created on or after the specified date. See the list of supported date and time formats. |
| Date To | Enter the date to list the invoice payments created on or before the specified date. See the list of supported date and time formats. |
| Limit | Set the maximum number of invoice payments Ibexa Connect should return during one execution cycle. |
Get an Invoice Payment
Returns information about the selected invoice payment.
| Invoice Payment ID | Select the Invoice Payment ID whose details you want to retrieve. |
Create an Invoice Payment
Creates a new invoice payment.
| Date | Select the Invoice Payment ID whose details you want to retrieve. See the list of supported date and time formats. |
| Invoice ID | Select the Invoice ID whose payment you want to create. |
| Paid Total | Enter the total invoice amount is to be paid. |
| Currency | Enter the applicable currency to the invoice payment. For example, USD. By default EUR currency is available. To add a different currency, see Adding Multiple Currencies in Your MOCO Account. |
| Partially Paid | Select whether the partial invoice amount is paid. |
Update an Invoice Payment
Updates the selected invoice payment.
| Invoice Payment ID | Select the invoice payment ID whose details you want to update. |
| Date | Select the Invoice Payment ID whose details you want to retrieve. See the list of supported date and time formats. |
| Invoice ID | Select the Invoice ID whose payment you want to create. |
| Paid Total | Enter the total invoice amount is to be paid. |
| Currency | Enter the applicable currency to the invoice payment. For example, USD. By default EUR currency is available. To add a different currency, see Adding Multiple Currencies in Your MOCO Account. |
| Partially Paid | Select whether the partial invoice amount is paid. |
Delete an Invoice Payment
Deletes the selected invoice payment.
| Invoice Payment ID | Select the Invoice Payment ID you want to delete. |
Leads
Note
You do not have to add the webhooks in the MOCO as it is automatically done for you once you add and save an instant trigger module to your scenario.
Watch New Lead
Triggers when a new lead is created.
| Webhook Name | Enter a name for the webhook. |
List Leads
Lists all existing leads.
Status |
Select the lead's status you want to list:
|
Tags |
Enter the tags to list the leads that match the specified leads. You can enter multiple tags separated by a comma. |
Limit |
Set the maximum number of leads Ibexa Connect should return during one execution cycle. |
Get a Lead
Returns information about the selected lead.
| Lead ID | Select or map the Lead ID whose details you want to retrieve. |
Create a Lead
Creates a new lead.
Name |
Enter the lead's name. |
Currency |
Enter the three-character currency code applicable to the lead. By default EUR currency is available. To add a different currency, see Adding Multiple Currencies in Your MOCO Account. |
Money |
Enter the amount expected from this lead or deal. |
Reminder Date |
Enter the date to remind the lead. See the list of supported date and time formats. |
User ID |
Select or map the User ID associated with this lead or deal. |
Deal Category ID |
Select or map the deal category. |
Company ID |
Select or map the Company ID with which the lead is associated. |
Person ID |
Select or map the Person ID associated with the project. |
Info |
Enter additional information about the |
Status |
Select the status of the lead:
|
Update a Lead
Updates the selected lead.
Lead ID |
Select the Lead ID whose details you want to update. |
Name |
Enter the lead's name. |
Currency |
Enter the three-character currency code applicable to the lead. By default EUR currency is available. To add a different currency, see Adding Multiple Currencies in Your MOCO Account. |
Money |
Enter the amount expected from this lead or deal. |
Reminder Date |
Enter the date to remind the lead. See the list of supported date and time formats. |
User ID |
Select or map the User ID associated with this lead or deal. |
Deal Category ID |
Select or map the deal category. |
Company ID |
Select or map the Company ID with which the lead is associated. |
Person ID |
Select or map the Person ID |
Info |
Enter additional information about the |
Status |
Select the status of the lead:
|
Presence
Note
You do not have to add the webhooks in the MOCO as it is automatically done for you once you add and save an instant trigger module to your scenario.
Watch New Presence
Triggers when a new presence is created.
| Webhook Name | Enter a name for the webhook. |
List Presences
Lists all presences.
| From Date | Enter the date to list the presences created on or after the specified date. See the list of supported date and time formats. |
| To Date | Enter the date to list the presences created on or before the specified date. See the list of supported date and time formats. |
| User ID | Select the User ID whose presences you want to list. |
| Limit | Set the maximum number of presences Ibexa Connect should return during one execution cycle. |
Get a Presence
Returns information about the selected presence.
| Presence ID | Select the Presence ID whose details you want to retrieve. |
Create a Presence
Creates a new presence.
| Date | Enter the date on which you want to create the presence. See the list of supported date and time formats. |
| From Time | Enter the start time of the presence. See the list of supported date and time formats. |
| To Time | Enter the end time of the presence. See the list of supported date and time formats. |
Update a Presence
Updates the selected presence.
| Presence ID | Select the Presence ID whose details you want to update. |
| Date | Enter the date on which you want to create the presence. See the list of supported date and time formats. |
| From Time | Enter the start time of the presence. See the list of supported date and time formats. |
| To Time | Enter the end time of the presence. See the list of supported date and time formats. |
Delete a Presence
Deletes the selected presence.
| Presence ID | Select the Presence ID you want to delete. |
Projects
Note
You do not have to add the webhooks in the MOCO as it is automatically done for you once you add and save an instant trigger module to your scenario.
Watch New Project
Triggers when a new project is created.
| Webhook Name | Enter a name for the webhook. |
List Projects
Lists all existing projects.
Get a Project
Returns information about the selected project.
| Project ID | Select the Project ID whose details you want to retrieve. |
Create a Project
Creates a new project.
| Name | Enter a name for the project. |
| Currency | Enter the three-character currency code applicable for the project. By default EUR currency is available. To add a different currency, see Adding Multiple Currencies in Your MOCO Account. |
| Finish Date | Enter the date on which the project ends. See the list of supported date and time formats. |
| Leader ID | Select or map the Leader ID who will lead the project. |
| Customer ID | Select or map the Customer ID associated with the project. |
| Deal ID | Select or map the Deal ID associated with the project. |
| Identifier | Enter the project identifier. |
| Billing Address | Enter the project's billing address. |
| Billing Email To | Enter the email address to which you will send the project billing. |
| Billing Email CC | Enter the email address to add the CC field of the email. |
| Billing Notes | Enter the text that appears as a billing note. |
| Setting Include Time Report | Select whether you want to include the time report in the project. |
| Billing Variant | Select the option whose billing you want to include. For example, project, task, or user. |
| Hourly Rate | Enter the hourly rate of the billing variant. |
| Budget | Enter the budget assigned to the project. |
| Labels | Add the labels to the project. For example, implementation, hosting. |
| Info | Enter the additional information about the project. |
| Custom Properties | Add the custom fields and their values for the company. For example, company billing address. |
Update a Project
Updates the selected project.
| Project ID | Select the Project ID whose details you want to update. |
| Name | Enter a name for the project. |
| Currency | Enter the three-character currency code applicable for the project. By default EUR currency is available. To add a different currency, see Adding Multiple Currencies in Your MOCO Account. |
| Finish Date | Enter the date on which the project ends. See the list of supported date and time formats. |
| Leader ID | Select or map the Leader ID who will lead the project. |
| Customer ID | Select or map the Customer ID associated with the project. |
| Deal ID | Select or map the Deal ID associated with the project. |
| Identifier | Enter the project identifier. |
| Billing Address | Enter the project's billing address. |
| Billing Email To | Enter the email address to which you will send the project billing. |
| Billing Email CC | Enter the email address to add the CC field of the email. |
| Billing Notes | Enter the text that appears as a billing note. |
| Setting Include Time Report | Select whether you want to include the time report in the project. |
| Billing Variant | Select the option whose billing you want to include. For example, project, task, or user. |
| Hourly Rate | Enter the hourly rate of the billing variant. |
| Budget | Enter the budget assigned to the project. |
| Labels | Add the labels to the project. For example, implementation, hosting. |
| Info | Enter the additional information about the project. |
| Custom Properties | Add the custom fields and their values for the company. For example, company billing address. |
Project Tasks
List Project Tasks
Lists all existing project tasks.
| Project ID | Select the Project ID whose tasks you want to list. |
| Limit | Set the maximum number of project tasks Ibexa Connect should return during one execution cycle. |
Get a Project Task
Returns information about the selected project task.
| Project Task ID | Select the Project Task ID whose details you want to retrieve. |
Create a Task on a Project
Creates a new task on the selected project.
| Project ID | Select the Project ID on which you want to create the task. |
| Name | Enter a name for the task. |
| Billable | Select whether this task is billable. |
| Active | Select whether the task is active. |
| Budget | Enter the amount allocated for the task. |
| Hourly Rate | Enter the hourly rate assigned for the task. |
Update a Project Task
Updates the selected project task.
| Project ID | Select the Project ID on which you want to create the task. |
| Task ID | Select the Task ID whose details you want to update. |
| Name | Enter a name for the task. |
| Billable | Select whether this task is billable. |
| Active | Select whether the task is active. |
| Budget | Enter the amount allocated for the task. |
| Hourly Rate | Enter the hourly rate assigned for the task. |
Delete a Project Task
Deletes an existing project task. Deleting a task on the project is only possible as long as no hours were tracked on this task.
| Project Task ID | Select the Project Task ID you want to delete. |
Project Expenses
Note
You do not have to add the webhooks in the MOCO as it is automatically done for you once you add and save an instant trigger module to your scenario.
Watch New Expense
Triggers when a new expense is created.
| Webhook Name | Enter a name for the webhook. |
List Project Expenses
Lists all existing project expenses.
| Project ID | Select the Project ID whose expenses you want to list. |
| Limit | Set the maximum number of project expenses Ibexa Connect should return during one execution cycle. |
Get a Project Expense
Returns information about the selected project expense.
| Project Expense ID | Select the Project Expense ID whose details you want to retrieve. |
Create a Project Expense
Creates a new project expense.on
| Project ID | Select the Project ID for which you want to create an expense. |
| Title | Enter a name for the expense. |
| Date | Enter the date when the project expense is created. See the list of supported date and time formats. |
| Quantity | Enter the number of items that are part of the expense. |
| Unit | Enter the unit applicable for the expense. For example, month. |
| Unit Price | Enter the unit price applicable for the expense. For example, 30. Default currency in the MOCO settings is applied. |
| Unit Cost | Enter the cost price of the units. For example, 19. Default currency in the MOCO settings is applied. Unit cost should be less than the unit price. |
| Description | Enter the details of the expense. For example, hosting. |
| Billable | Select whether the expense is billable to the client. |
| Budget Relevant | Select whether the expense is relevant to the budget assigned to the project. |
| Custom Properties | Add the custom fields and their values for the company. For example, company billing address. |
Update a Project Expense
Updates the selected project expense. Updates are only possible if this entry is not yet billed.
| Project ID | Select the Project ID whose expense details you want to update. |
| Title | Enter a name for the expense. |
| Date | Enter the date when the project expense is created. See the list of supported date and time formats. |
| Quantity | Enter the number of items that are part of the expense. |
| Unit | Enter the unit applicable for the expense. For example, month. |
| Unit Price | Enter the unit price applicable for the expense. For example, 30. Default currency in the MOCO settings is applied. |
| Unit Cost | Enter the cost price of the units. For example, 19. Default currency in the MOCO settings is applied. Unit cost should be less than the unit price. |
| Description | Enter the details of the expense. For example, hosting. |
| Billable | Select whether the expense is billable to the client. |
| Budget Relevant | Select whether the expense is relevant to the budget assigned to the project. |
| Custom Properties | Add the custom fields and their values for the company. For example, company billing address. |
Delete a Project Expense
Deletes an existing project expense. Deletions are only possible if this entry is not yet billed.
| Project Expense ID | Select the Project Expense ID you want to delete. |
Purchases
List Purchases
List all existing purchases.
| Identifier of the Purchase | Enter the purchase ID whose details you want to list. |
| Category ID | Select the Category ID to list the purchases that belong to the specified category. |
| Term | Enter a word to list the purchases that match the specified terms. |
| Company ID | Select the Company ID whose purchases you want to list. |
| Status | Select the status of the purchase you want to list. For example, pending. |
| Tags | Enter the tags to list the purchases that match the specified tags. You can enter multiple tags separated by a comma. |
| Date | Enter a date range to list the purchases from the specified date range. For example, enter a range in the form 2020-02-01:2020-02-22. |
| Unpaid | Select whether the purchase is unpaid. |
| Limit | Set the maximum number of purchases Ibexa Connect should return during one execution cycle. |
Get a Purchase
Returns information about the selected purchase.
| Purchase ID | Select the Purchase ID whose details you want to retrieve. |
Create a Purchase
Creates a new purchase.
Date |
Enter the date of purchase. See the list of supported date and time formats. |
||||||||||||||
Currency |
Enter the three-character currency code applicable to the purchase. By default EUR currency is available. To add a different currency, see Adding Multiple Currencies Ïin Your MOCO Account. |
||||||||||||||
Payment Method |
Select the payment method of purchase. For example, |
||||||||||||||
Items |
Add the items purchased:
|
||||||||||||||
Due Date |
Enter the date when the purchase payment is due. See the list of supported date and time formats. |
||||||||||||||
Service Period From |
Enter the service for the items in the invoice starts from. |
||||||||||||||
Service Period To |
Enter the service for the items in the invoice ends on. |
||||||||||||||
Company ID |
Select or map the Company ID to which the purchase belongs to. |
||||||||||||||
Receipt Identifier |
Enter the receipt number. |
||||||||||||||
Info |
Enter the information about the purchase. |
||||||||||||||
IBAN |
Enter the company IBAN details to whom the purchase belongs to. |
||||||||||||||
Reference |
Enter the purchase reference number. |
||||||||||||||
Custom Properties |
Add the custom field and its values. For example, |
||||||||||||||
Tags |
Add the tags to relate to the purchase. |
||||||||||||||
File Name |
Enter the file name. For example, |
||||||||||||||
File Data |
Enter or map the file data. |
Update a Purchase Status
Updates status of the selected purchase.
Purchase ID |
Select or map the Purchase ID whose status you want to update. |
Status |
Select or map the status to update the purchase:
|
Delete a Purchase
Deletes the selected purchase. It is possible only if the status is pending and no payments have been registered.
| Purchase ID | Select the Purchase ID you want to delete. |
Purchase Categories
List Purchase Categories
Lists all purchase categories.
| Limit | Set the maximum number of Purchase Categories Ibexa Connect should return during one execution cycle. |
Get a Purchase Category
Returns information about the selected purchase category.
| Purchase Category ID | Select the Purchase Category ID whose details you want to retrieve. |
Offer
Note
You do not have to add the webhooks in the MOCO as it is automatically done for you once you add and save an instant trigger module to your scenario.
Watch New Offer
Triggers when a new offer is created.
| Webhook Name | Enter a name for the webhook. |
Users
Note
You do not have to add the webhooks in the MOCO as it is automatically done for you once you add and save an instant trigger module to your scenario.
Watch New User
Triggers when a new user is created.
| Webhook Name | Enter a name for the webhook. |
List Users
Lists all existing Users.
| Include Archive | Select whether you want to include archived users in the results. |
| Limit | Set the maximum number of users Ibexa Connect should return during one execution cycle. |
Get a User
Returns information about the selected user.
| User ID | Select the User ID whose details you want to retrieve. |
Create a User
Creates a new user.
| First Name | Enter the user's first name. |
| Last Name | Enter the user's last name. |
| Enter the user's email address. | |
| Password | Enter the user's password. |
| Unit ID | Select or map the Unit ID (team) to which the user belongs to. |
| Active | Select whether the user is active. |
| External | Select whether this is an external user. |
| Language | Enter the user's native language. |
| Mobile Phone | Enter the user's mobile number. |
| Work Phone | Enter the user's work phone number. |
| Home Address | Enter the user's home address information. |
| Birthday | Enter the user's date of birth. See the list of supported date and time formats. |
| Custom Properties | Add the custom field and its values. For example, alternative email address. |
| Info | Enter any additional information about the user which you would like to mention. |
Update a User
Updates the selected user.
| User ID | Select the User ID whose details you want to update. |
| First Name | Enter the user's first name. |
| Last Name | Enter the user's last name. |
| Enter the user's email address. | |
| Password | Enter the user's password. |
| Unit ID | Select or map the Unit ID (team) to which the user belongs to. |
| Active | Select whether the user is active. |
| External | Select whether this is an external user. |
| Language | Enter the user's native language. |
| Mobile Phone | Enter the user's mobile number. |
| Work Phone | Enter the user's work phone number. |
| Home Address | Enter the user's home address information. |
| Birthday | Enter the user's date of birth. See the list of supported date and time formats. |
| Custom Properties | Add the custom field and its values. For example, alternative email address. |
| Info | Enter any additional information about the user which you would like to mention. |
Delete a User
Deletes the selected user. Deleting a staff member is only possible if no hours are billed already.
| User ID | Select the User ID you want to delete. |
Other
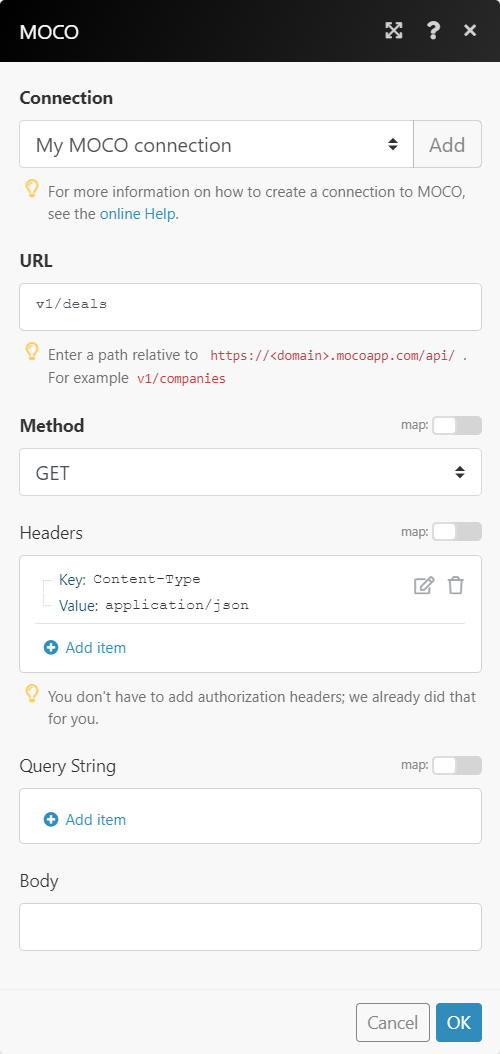
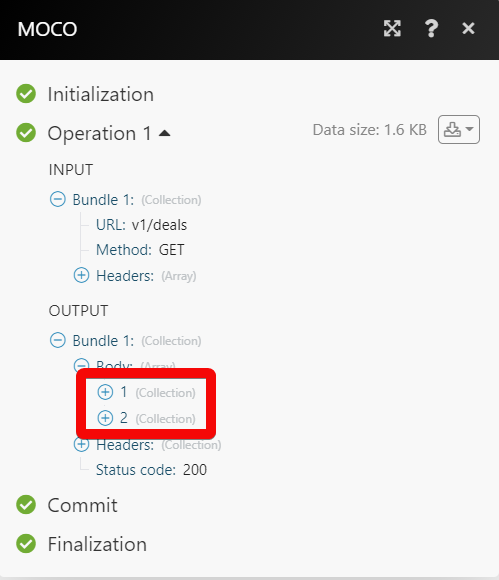
Make an API Call
Performs an arbitrary authorized API call.
URL |
Enter a path relative to For the list of available endpoints, refer to the MOCO API Documentation. |
Method |
Select the HTTP method you want to use: GETto retrieve information for an entry. POSTto create a new entry. PUTto update/replace an existing entry. PATCHto make a partial entry update. DELETEto delete an entry. |
Headers |
Enter the desired request headers. You don't have to add authorization headers; we already did that for you. |
Query String |
Enter the request query string. |
Body |
Enter the body content for your API call. |
Example of Use - List Deals
The following API call returns all the deals from your MOCO account:
URL:
/v1/deals
Method:
GET
Matches of the search can be found in the module's Output under Bundle > Body.
In our example, 2 deals were returned:
Adding Multiple Currencies in Your MOCO Account
1. Log in to your MOCO account.
2. Click the Setting ( ) > Currency > Add Currency.
3. Select the Currency code you want to add and enter the conversion amount in EUR. You can also check the conversion using Google Currency Converter.
4. Click Save.
You can add multiple currencies.