Segment
Getting Started with Segment
The Segment modules allow you to identify users and track their actions in your Segment account.
Prerequisites
- A Segment account
In order to use Segment with Ibexa Connect, it is necessary to have a Segment account. If you do not have one, you can create a Segment account at app.segment.com/signup.
Note
The module dialog fields that are displayed in bold (in the Ibexa Connect scenario, not in this documentation article) are mandatory!
Connecting Segment to Ibexa Connect
To connect your Segment account to Ibexa Connect, you need to create a token.
1. Log in to your Segment account.
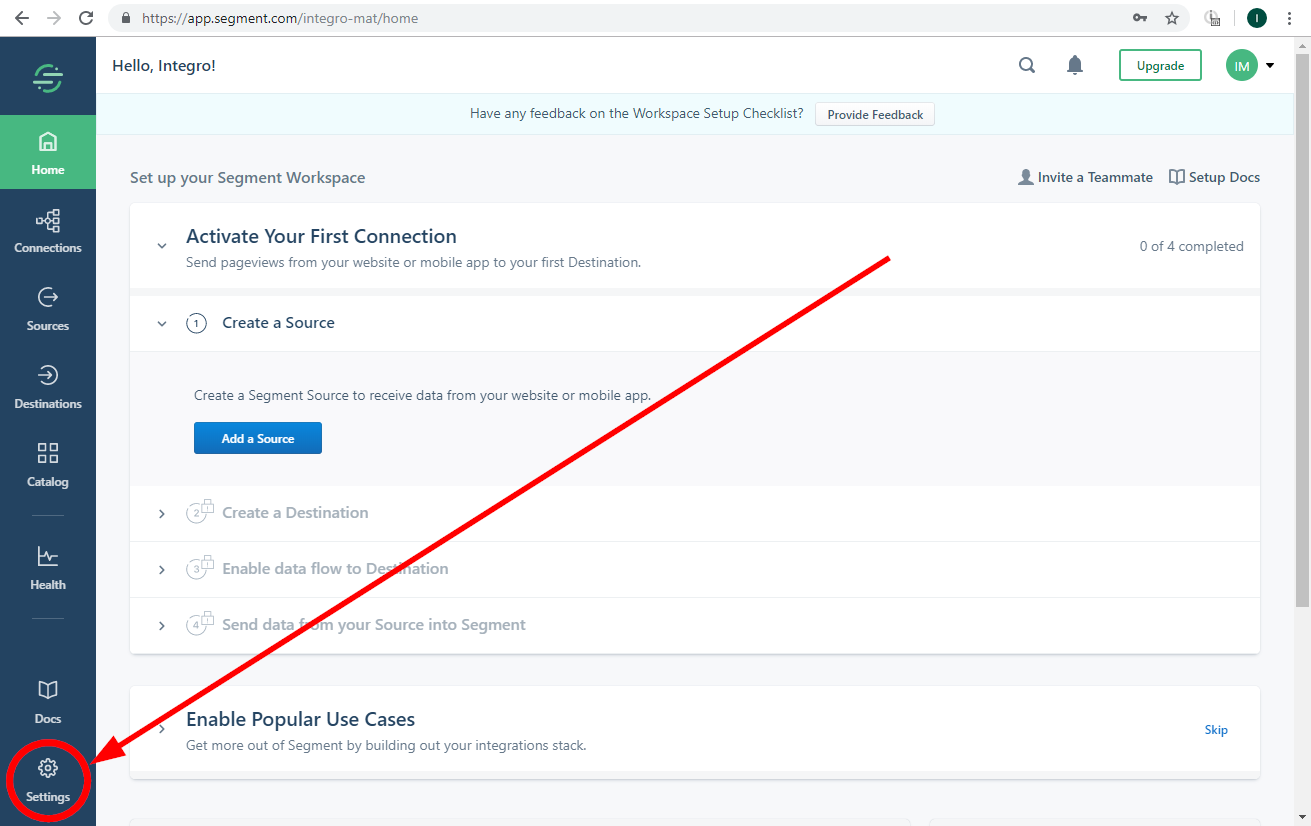
2. Open Settings from the bottom-left corner.
3. Navigate to the Access Management section, and click on the Tokens tab.
4. Click on the Create Token button.
5. Enter the token description, select the Workspace Owner option, and click the Create button.
6. Copy the Created Token, and store it in a safe place.
7. Go to Ibexa Connect, and open the Segment's module Create a connection dialog.
8. Enter the token you have created in step 5, and click the Continue button to establish the connection.
Actions
Identify
This module lets you tie a user to their actions and record traits about them. It includes a unique User ID and any optional traits you know about them.
Note
Segment recommends calling the Identify module a single time when the user’s account is first created, and only identifying again later when their traits change.
Write Key
Obtain the Write Key from the Source. To find a write key, you first need to create a non-cloud Source, such as a website, server, or mobile source.
1. Open Sources.
2. Select the Segment Source you want to use. E.g., Autopilot.
3. Copy the Write Key.
4. Insert the write key in the respective field in Ibexa Connect.
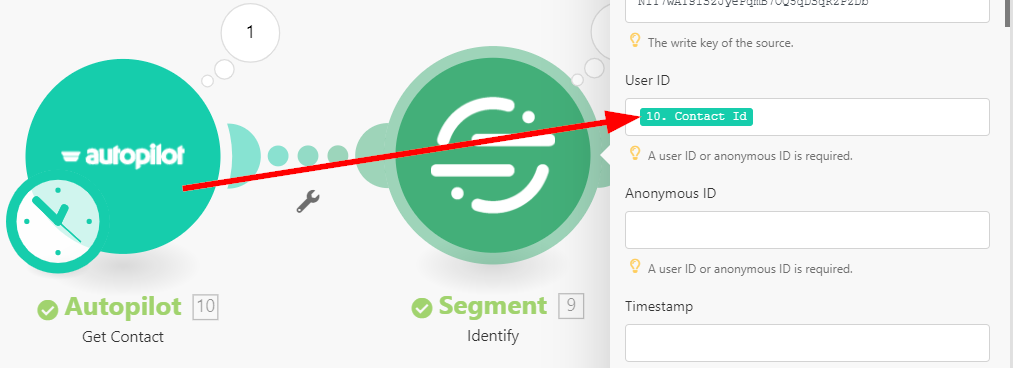
User ID
Enter (map) the user ID to identify a user from your source. A User ID is usually the unique identifier that you recognize a user by in your own database. For example, if you’re using the Autopilot app, it might look something like person_D97F88AD-E835-4565-AD1A-9F75C5C381F6.
Anonymous ID
Enter (map) the Anonymous ID. The Anonymous ID can be any pseudo-unique identifier. For example, on your servers, you can use a Session ID. If you don’t have any readily available identifier, you can always generate a new random one—e.g., UUIDs.
For more detailed information, please refer to the Segment documentation.
Timestamp
Enter the time in the ISO-8601 format, if you’re importing data from the past. If the event just happened, leave it out, and we’ll use the server’s time.
Traits
Enter the traits you know about the user.
Reference: Segment documentation.
| Trait | Description |
address |
Street address of the user, optionally containing: city, country, postalCode, state or street |
age |
Age of the user |
avatar |
URL to an avatar image for the user |
birthday |
User’s birthday |
company |
Company the user represents, optionally containing: name (a String), id (a String or Number), industry (a String), employee_count (a Number), or plan (a String) |
createdAt |
Date the user’s account was first created We recommend ISO-8601 date strings. |
description |
Description of the user |
email |
Email address of the user |
firstName |
First name of the user |
gender |
Gender of the user |
id |
Unique ID in your database for the user |
lastName |
Last name of the user |
name |
Full name of the user If you only pass a first and last name, we’ll automatically fill in the full name for you. |
phone |
Phone number of the user |
title |
Title of the user, usually related to their position at their specific company Example: “VP of Engineering” |
username |
User’s username This should be unique to each user, like the usernames of Twitter or GitHub. |
website |
Website of the user |
Custom Traits
The custom trait names should not match the reserved names, as listed in the official Segment documentation.
Track
The module allows you to record any actions your users perform, along with any properties that describe the action.
| Write Key | Obtain the Write Key from the Source. To find a write key, you first need to create a non-cloud Source such as a website, server, or mobile source. 1. Open Sources. 2. Select the Segment Source you want to use. E.g., Autopilot. 3. Copy the Write Key. 4. Insert the write key in the respective field in Ibexa Connect. |
| Event Name | Enter the name of the action that the user has performed. For more detailed information about events, please refer to the Segment documentation. |
| User ID | Enter (map) the user ID to identify the user from your source. A User ID is usually the unique identifier that you recognize a user by in your own database. For example, if you’re using the Autopilot app, it might look something like person_D97F88AD-E835-4565-AD1A-9F75C5C381F6. |
| Anonymous ID | Enter (map) the Anonymous ID. The Anonymous ID can be any pseudo-unique identifier. For example, on your servers you can use a Session ID. If you don’t have any readily available identifier, you can always generate a new random one—e.g., UUIDs. For more detailed information please refer to the Segment documentation. |
| Timestamp | Enter the time in the ISO-8601 format if you’re importing data from the past. If the event just happened, leave it out, and we’ll use the server’s time. |
| Currency | Enter the currency of the revenue an event resulted in. This should be sent in the ISO 4127 format. If this is not set, we assume the revenue to be in US dollars. |
| Revenue | Enter the amount of revenue an event resulted in. This should be a decimal value, so a shirt worth $19.99 would result in a revenue of 19.99. |
| Value | This is an abstract “value” to associate with an event. This is typically used in situations where the event doesn’t generate real-dollar revenue, but has an intrinsic value to a marketing team, like newsletter signups. |
| Custom Properties | Add custom properties. Properties are extra pieces of information you can tie to events you track. They can be anything that will be useful while analyzing the events later. We recommend sending properties whenever possible, because they give you a more complete picture of what your users are doing. Note: The custom property names should not match the reserved names, as listed in the official Segment documentation. |
Make an API Call
Allows you to perform a custom API call. Uses HTTP Tracking API.
| URL | Enter a path relative to https://api.segment.io. For example: /v1/group.Note: For the list of available endpoints, refer to the Segment HTTP API Documentation. |
Method
Select the HTTP method you want to use:
GET to retrieve information for an entry.
POST to create a new entry.
PUT to update/replace an existing entry.
PATCH to make a partial entry update.
DELETE to delete an entry.
Headers
Enter the desired request headers. You don't have to add authorization headers; we've already added these for you.
Query String
Enter the request query string.
Body
Enter the body content for your API call.
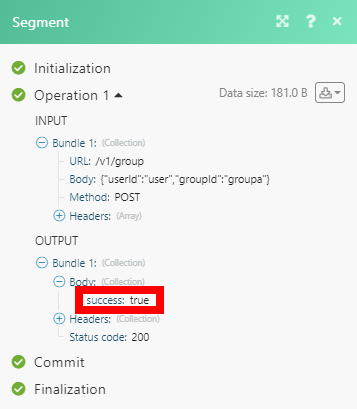
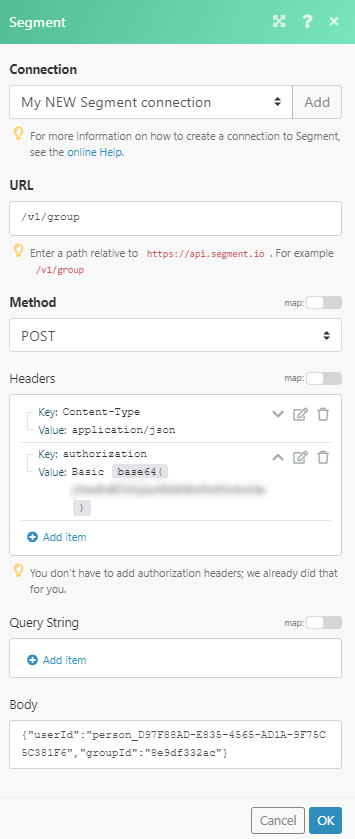
Example of Use - Associate a User With a Group
The following API call associates an identified user with a group in your Segment account:
URL: /v1/group/
Method: POST
Headers:
Key: Content-Type
Value: application/json
Key: authorization
Value: Basic {{base64("your_Write_Key:")}}

Body:
1 | |
If the action is successfully completed, you can find the success: true information in the module's Output under Bundle > Body: