Postmark
The Postmark modules enable you to monitor emails, send and list emails or retrieve bounces and manage statistics in your Postmark account.
Getting Started with Postmark
Prerequisites
- A Postmark account
In order to use Postmark with Ibexa Connect, it is necessary to have a Postmark account. If you do not have one, you can create a Postmark account at Postmark.
Note
The module dialog fields that are displayed in bold (in the Ibexa Connect scenario, not in this documentation article) are mandatory!
Connecting Postmark to Ibexa Connect
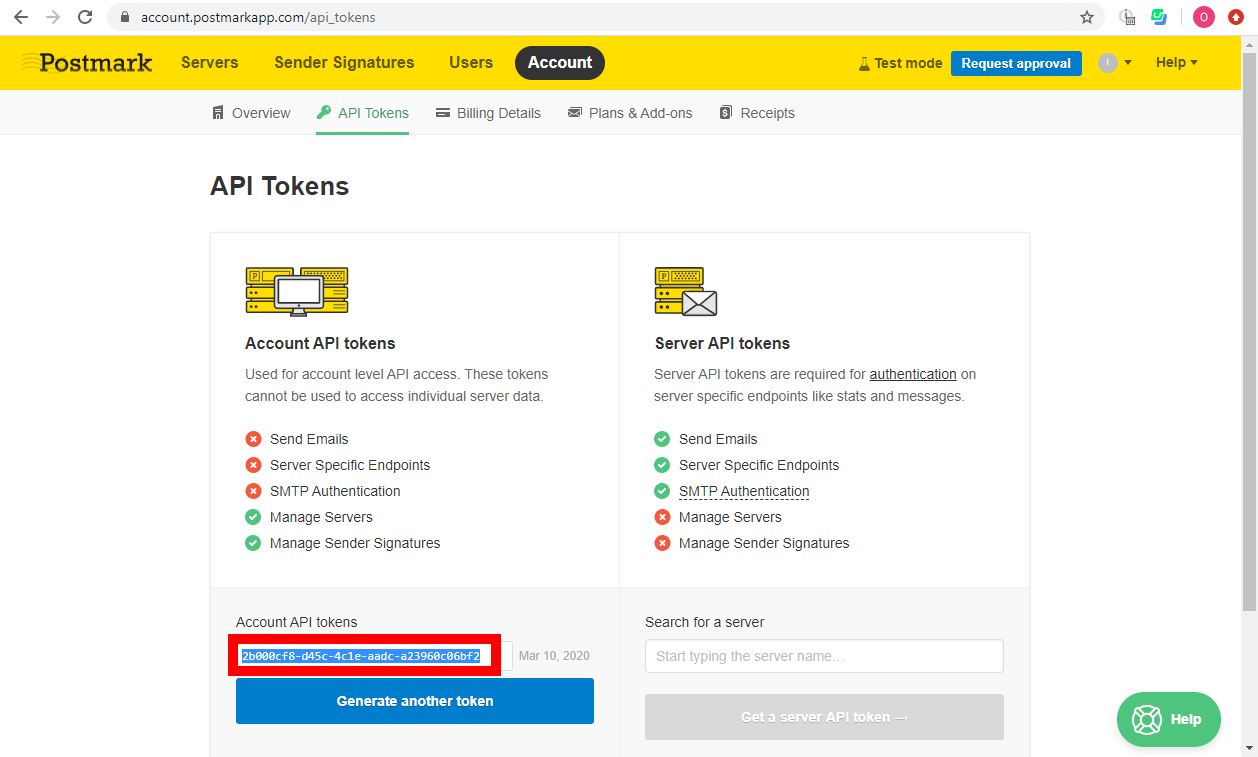
To connect your Postmark account to Ibexa Connect you need to obtain your Server API token for most of the modules and Account API token for the Watch Inbound Emails module.
Retrieving the Server API Token
-
Log in to your Postmark account.
-
Go to Servers and select the server you want to use.
-
Go to the API Tokens tab and copy the provided Server API Token.
Retrieving the Account API Token (for the Watch Inbound Emails module)
-
Log in to your Postmark account.
-
Go to Account and open the API Tokens tab.

-
Copy the provided Account API Token.
Emails
Watch Inbound Emails
Triggers when a new inbound email is received.
| Webhook Name | Enter the name for the webhook. |
| API or Web Platform | Select whether you want set the webhook automatically using the API or manually using the Postmark web platform. * API The URL will be added to the server selected below automatically. Note: When a new webhook is created, the URL is overwritten in the server settings. **Web Platform**You have to add the URL to the Postmark manually. 1. 1. Click the Show address button (  ) and copy the provided URL. ) and copy the provided URL.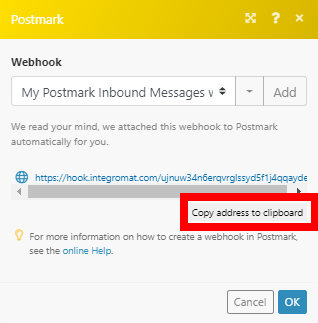 2. Log in to Postmark. 3. Go to Servers > your server > Inbound Stream > Settings tab.  4. Enter the URL copied in step 1 to the Inbound webhook field and click the Save changes button. 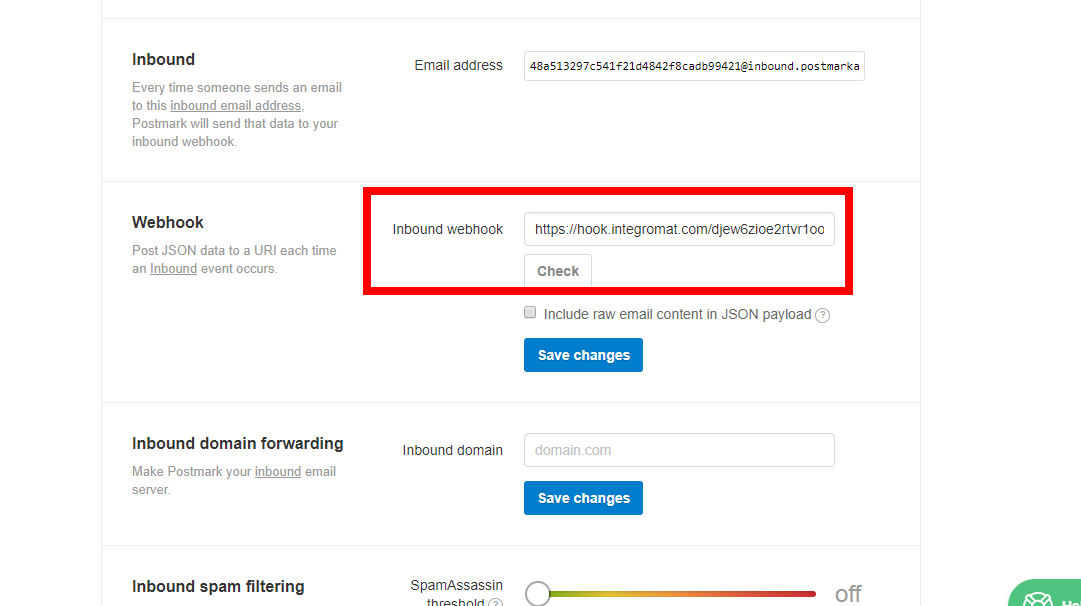 |
| Select Server | Select the server where you want to add the hook URL to. |
Watch Outbound Events
Triggers when a specified event occurs.
| Webhook Name | Enter the name for the webhook. |
| API or Web Platform | Select whether you want set the webhook automatically using the API or manually using the Postmark web platform. * API The URL will be added to the server automatically. Note: When a new webhook is created, the URL is overwritten in the server settings. * **Web Platform**You have to add the URL to the Postmark manually. 1. Click the Show address button ( ) and copy the provided URL.2. Log in to Postmark. 3. Go to Servers > your server > Transactional Stream > Webhooks tab.  4. Enter the URL copied in step 1 to the Webhook URL field, select events that will trigger the module and click the Save webhook button. 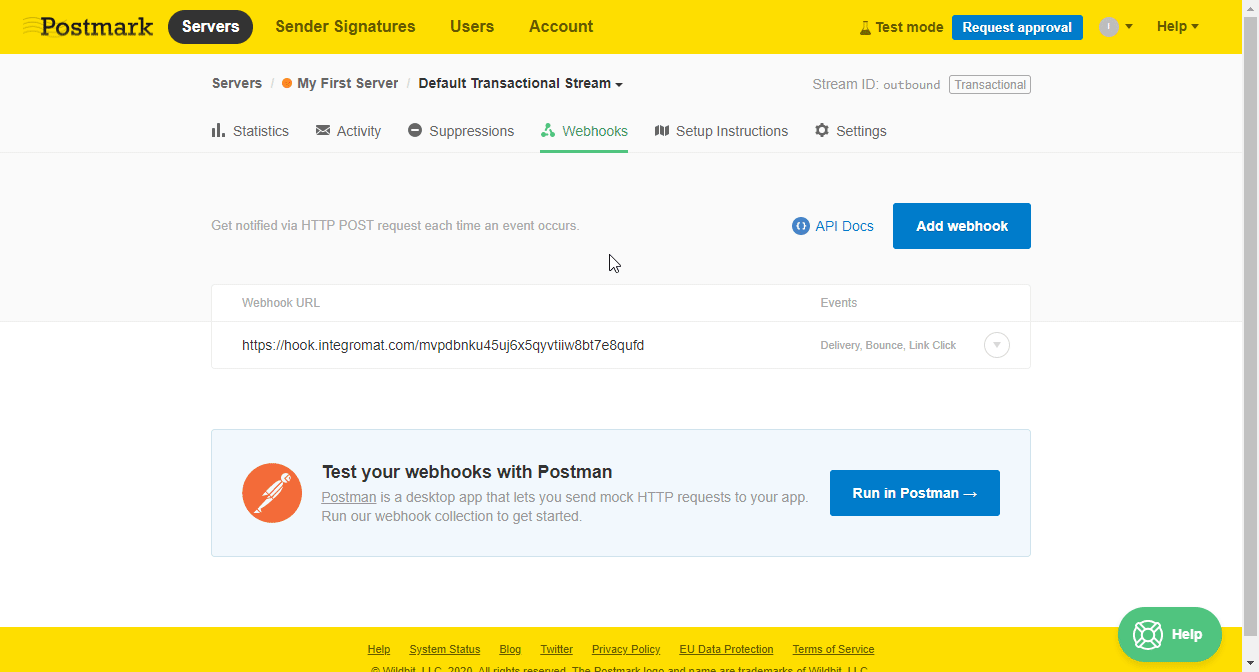 |
Watch Bounced Emails
Triggers when bounces are received.
| Webhook Name | Enter the name for the webhook. |
| API or Web Platform | Select whether you want set the webhook automatically using the API or manually using the Postmark web platform. * API The URL will be added to the server automatically. Note: When a new webhook is created, the URL is overwritten in the server settings. * **Web Platform**Add the URL to the Postmark manually. 1. Click the Show address button ( ) and copy the provided URL.2. Log in to Postmark. 3. Go to Servers > your server > Transactional Stream > Webhooks tab. 4. Enter the URL copied in step 1 to the Webhook URL field, select events that will trigger the module and click the Save webhook button. |
| Include bounce content | Includes the message content to the sent data set. |
Watch Opened Emails
Triggers when a sent email is opened by recipients.
| Webhook Name | Enter the name for the webhook. |
| API or Web Platform | Select whether you want set the webhook automatically using the API or manually using the Postmark web platform. * API The URL will be added to the server automatically. Note: When a new webhook is created, the URL is overwritten in the server settings. * **Web Platform**Add the URL to the Postmark manually. 1. Click the Show address button ( ) and copy the provided URL.2. Log in to Postmark. 3. Go to Servers > your server > Transactional Stream > Webhooks tab. 4. Enter the URL copied in step 1 to the Webhook URL field, select events that will trigger the module and click the Save webhook button. |
| Post First Open Only | Select the Yes option to send only the first open to the webhook. Defaults: No (all opens). |
Watch Delivered Emails
Triggers when an email has been delivered successfully.
| Webhook Name | Enter the name for the webhook. |
| API or Web Platform | Select whether you want set the webhook automatically using the API or manually using the Postmark web platform. * API The URL will be added to the server automatically. Note: When a new webhook is created, the URL is overwritten in the server settings. * **Web Platform**Add the URL to the Postmark manually. 1. Click the Show address button ( ) and copy the provided URL.2. Log in to Postmark. 3. Go to Servers > your server > Transactional Stream > Webhooks tab. 4. Enter the URL copied in step 1 to the Webhook URL field, select events that will trigger the module and click the Save webhook button. |
Watch Clicked Emails
Triggers when a tracked link is clicked.
| Webhook Name | Enter the name for the webhook. |
| API or Web Platform | Select whether you want set the webhook automatically using the API or manually using the Postmark web platform. * API The URL will be added to the server automatically. Note: When a new webhook is created, the URL is overwritten in the server settings. * Web Platform Add the URL to the Postmark manually. 1. Click the Show address button ( ) and copy the provided URL.2. Log in to Postmark. 3. Go to Servers > your server > Transactional Stream > Webhooks tab. 4. Enter the URL copied in step 1 to the Webhook URL field, select events that will trigger the module and click the Save webhook button. |
Watch Spam Complaints
Triggers when a user marks the email as a spam in his/her email client.
| Webhook Name | Enter the name for the webhook. |
| API or Web Platform | Select whether you want set the webhook automatically using the API or manually using the Postmark web platform. * API The URL will be added to the server automatically. Note: When a new webhook is created, the URL is overwritten in the server settings. * **Web Platform**Add the URL to the Postmark manually. 1. Click the Show address button ( ) and copy the provided URL.2. Log in to Postmark. 3. Go to Servers > your server > Transactional Stream > Webhooks tab. 4. Enter the URL copied in step 1 to the Webhook URL field, select events that will trigger the module and click the Save webhook button. |
| Include Spam Content | Includes the message content. |
Watch Subscription Change
Triggers when an email address is added or removed from the suppression list. Recipients on the suppression list cannot receive emails on this message stream. Recipients who unsubscribe, hard bounce, or mark your emails as spam are automatically added to this list.
| Webhook Name | Enter the name for the webhook. |
| API or Web Platform | Select whether you want set the webhook automatically using API or manually using the Postmark web platform. * API The URL will be added to the server automatically. Note: When a new webhook is created, the URL is overwritten in the server settings. * **Web Platform**Add the URL to the Postmark manually. 1. Click the Show address button ( ) and copy the provided URL.2. Log in to Postmark. 3. Go to Servers > your server > Transactional Stream > Webhooks tab. 4. Enter the URL copied in step 1 to the Webhook URL field, select events that will trigger the module and click the Save webhook button. |
List Outbound Emails
Retrieves outbound emails from the server by filter settings.
| Recipient | Enter the recipient's email address to filter by the user who was receiving the email. |
| Sender | Enter the email address to filter emails by the sender. |
| Subject | Enter the subject you want to filter emails by. |
| Tag | Enter the tag you want to filter emails by. |
| Status | Select whether you want to return sent or queued emails. |
| From Date | Filter messages starting from the date specified (inclusive). E.g. 2014-02-01 |
| To Date | Filter messages up to the date specified (inclusive). e.g. 2014-02-01 |
| Limit | Set the maximum number of emails Ibexa Connect will return during one execution cycle. |
Get an Outbound Email's Details
Retrieves outbound message details.
| Email ID | Enter (map) or select the email you want to retrieve details about. |
Send an Email
Sends an email. You can use the template while sending the email.
Default Email or Template |
Select whether you want to send a default email or email using a template. |
Select Template By |
Select if you want to specify template by ID or by Alias. Enter (map) the template ID or template alias in the field below. |
Template Model |
The model to be applied to the specified template to generate Html Body, Text Body, and Subject. This can be done by entering the dynamically retrieved fields or entering the individual key-value pairs or enter a complete JSON. |
Dynamic Template/Template Variables/Template Collection |
Enter the values to the template. |
Inline CSS |
By default, if the specified template contains an HTMLBody, we will apply the style blocks as inline attributes to the rendered HTML content. You may opt-out of this behavior by selecting the No option. |
Email Subject |
Enter the subject of the email. |
HTML Body |
Enter the email body content in HTML format. Either Text Body or HTML Body needs to be filled in. Both are allowed too. |
Text Body |
Enter the email body content in plain text format. Either Text Body or HTML Body needs to be filled in. Both are allowed too. |
From |
Enter the sender's email address. It must have a registered and confirmed Sender Signature. |
To |
Enter the recipient's email address. You can enter up to 50 comma-separated email addresses. |
Cc |
Enter the carbon copy email address. You can enter up to 50 comma-separated email addresses. |
Bcc |
Enter the blind carbon copy email address. You can enter up to 50 comma-separated email addresses. |
Tag |
Enter the tag you want to tag the email with. Email tag allows you to categorize outgoing emails and get detailed statistics. Only one tag can be added to an email. |
Reply To |
Enter the Reply To email address. Overrides the 'Reply To' email address. Defaults to the 'Reply To' set in the sender signature. |
Track Opens |
Select the Yes option to enable tracking of opened emails. |
Track Links |
Select an option to activate link tracking for links in the HTML or Text bodies of this email. Possible options: |
Meta Data |
Enter the key-value pairs to specify the meta data. You can associate up to 10 meta data fields per message. The field name is limited to 20 characters, while the value field is limited to 80 characters. |
Attachments |
Add attachments. Max 10 MB. Please see Postmark Attachment Documentation. Map the file you want to upload from the previous module (e.g. HTTP > Get a File or Dropbox > Get a file), or enter the file name and file data manually. Inline Attachment Content ID To have an inline attachment, fill in the Content ID (CID) used in the HTML. For example if the HTML contains If you are referring to an attached image more than once in your message, it is only required to attach the image one time. Postmark will use the image as often as it is referred to in your HTML markup. This will save bandwidth against the attachment size limit. |
List an Email's Opens
Retrieves details about an email open.
Note
Opens tracking must be enabled. Only HTML emails can be tracked.
If the selected email has not been opened, an error 'This message was not found.' is returned.
| Email ID | Enter (map) or select the email you want to track. |
| Limit | Set the maximum number of opens Ibexa Connect will return during one execution cycle. |
List an Email's Clicks
Retrieves details about an email click.
Note
Click tracking must be enabled. Only HTML emails can be tracked. If the selected email has not been clicked, an error 'This message was not found.' is returned.
| Email ID | Enter (map) or select the email you want to track. |
| Limit | Set the maximum number of clicks Ibexa Connect will return during one execution cycle. |
List Inbound Emails
Retrieves all inbound emails to the server in the last 45 days by the filter settings.
| Recipient | Enter the recipient's email address to filter by the user who was receiving the email. |
| Sender | Enter the email address to filter emails by the sender. |
| Subject | Enter the subject you want to filter emails by. |
| Tag | Enter the tag you want to filter emails by. |
| Mailbox Hash | Filter by mailbox hash. |
| Status | Select whether you want to return sent or queued emails. |
| From Date | Filter messages starting from the date specified (inclusive). E.g. 2014-02-01 |
| To Date | Filter messages up to the date specified (inclusive). e.g. 2014-02-01 |
| Limit | Set the maximum number of emails Ibexa Connect will return during one execution cycle. |
Get an Inbound Email's Details
Retrieves inbound email details.
| Email ID | Enter (map) or select the email message you want to retrieve details about. |
Bounces
List Bounces
Retrieves bounces based on filter settings.
Filter By Type |
Filter returned bounces by type. See the list of types. |
Filter by Inactivity |
Filter by emails that were deactivated by Postmark due to the bounce. Select the Yes option to retrieve the also inactive emails. If this isn’t specified it will return both active and inactive. |
Filter by the 'To' Email Address |
Filter by email address that bounced. |
Filter by Tag |
Enter the tag name you want to filter bounced emails by. |
Filter by Email ID |
Filter ID of the message. |
From Date |
Filter messages starting from the date specified (inclusive). E.g. 2014-02-01. SeeThe list of supported date formats. Time elements will be ignored. |
To Date |
Filter messages up to the date specified (inclusive). E.g. 2020-02-01. See the list of supported date formats. |
Limit |
Set the maximum number of bounces Ibexa Connect will return during one execution cycle. |
Get a Bounce
Retrieves bounce details.
| Bounce ID | Enter (map) or select the bounce you want to retrieve details about. |
Get a Bounce Dump
Retrieves a raw source of the specified bounce.
| Bounce ID | Enter (map) or select the bounce whose dump you want to retrieve details about. |
Activate a Bounce
Reactivates a Bounce
| Bounce ID | Enter (map) or select the bounce you want to activate. |
Statistics
Get Delivery Statistics
Retrieves bounce statistics of the server.
Get Outbound Emails Statistics
Retrieves a brief overview of statistics for all of your outbound emails.
| Tag | Enter the tag to filter results by. |
| From Date | Filter stats starting from the date specified (inclusive). E.g. 2014-02-01. See the list of supported date formats. |
| To Date | Filter stats starting from the date specified (inclusive). E.g. 2020-01-01. See the list of supported date formats. |
Get Sent Emails Statistics
Retrieves the total count of emails you’ve sent out.
| Tag | Enter the tag to filter results by. |
| From Date | Filter stats starting from the date specified (inclusive). E.g. 2014-02-01. See the list of supported date formats. |
| To Date | Filter stats starting from the date specified (inclusive). E.g. 2020-01-01. See the list of supported date formats. |
Get Bounced Emails Statistics
Retrieves total counts of emails you’ve sent out that have been returned as bounced.
| Tag | Enter the tag to filter results by. |
| From Date | Filter stats starting from the date specified (inclusive). E.g. 2014-02-01. See the list of supported date formats. |
| To Date | Filter stats starting from the date specified (inclusive). E.g. 2020-01-01. See the list of supported date formats. |
Get Spam Complaints Statistics
Retrieves a total count of recipients who has marked your email as spam.
| Tag | Enter the tag to filter results by. |
| From Date | Filter stats starting from the date specified (inclusive). E.g. 2014-02-01. See the list of supported date formats. |
| To Date | Filter stats starting from the date specified (inclusive). E.g. 2020-01-01. See the list of supported date formats. |
Get Tracked Emails Statistics
Retrieves a total count of emails you’ve sent with open tracking or link tracking enabled.
| Tag | Enter the tag to filter results by. |
| From Date | Filter stats starting from the date specified (inclusive). E.g. 2014-02-01. See the list of supported date formats. |
| To Date | Filter stats starting from the date specified (inclusive). E.g. 2020-01-01. See the list of supported date formats. |
Get Opened Emails Statistics
Retrieves total counts of recipients who opened your emails. This is only recorded when open tracking is enabled for that email.
| Tag | Enter the tag to filter results by. |
| From Date | Filter stats starting from the date specified (inclusive). E.g. 2014-02-01. See the list of supported date formats. |
| To Date | Filter stats starting from the date specified (inclusive). E.g. 2020-01-01. See the list of supported date formats. |
Get Email Platform Usage Statistics
Retrieves an overview of the platforms used to open your emails. This is only recorded when open tracking is enabled for that email.
| Tag | Enter the tag to filter results by. |
| From Date | Filter stats starting from the date specified (inclusive). E.g. 2014-02-01. See the list of supported date formats. |
| To Date | Filter stats starting from the date specified (inclusive). E.g. 2020-01-01. See the list of supported date formats. |
Get Email Client Usage Statistics
Retrieves an overview of the email clients used to open your emails. This is only recorded when open tracking is enabled for that email.
| Tag | Enter the tag to filter results by. |
| From Date | Filter stats starting from the date specified (inclusive). E.g. 2014-02-01. See the list of supported date formats. |
| To Date | Filter stats starting from the date specified (inclusive). E.g. 2020-01-01. See the list of supported date formats. |
Get Link Clicks Statistics
Retrieves total counts of unique links that were clicked.
| Tag | Enter the tag to filter results by. |
| From Date | Filter stats starting from the date specified (inclusive). E.g. 2014-02-01. See the list of supported date formats. |
| To Date | Filter stats starting from the date specified (inclusive). E.g. 2020-01-01. See the list of supported date formats. |
Get Browser Usage Statistics
Retrieves an overview of the browsers used to open links in your emails. This is only recorded when Link Tracking is enabled for that email.
| Tag | Enter the tag to filter results by. |
| From Date | Filter stats starting from the date specified (inclusive). E.g. 2014-02-01. See the list of supported date formats. |
| To Date | Filter stats starting from the date specified (inclusive). E.g. 2020-01-01. See the list of supported date formats. |
Get Browser Platform Usage Statistics
Retrieves an overview of the browser platforms used to open your emails. This is only recorded when Link Tracking is enabled for that email.
| Tag | Enter the tag to filter results by. |
| From Date | Filter stats starting from the date specified (inclusive). E.g. 2014-02-01. See the list of supported date formats. |
| To Date | Filter stats starting from the date specified (inclusive). E.g. 2020-01-01. See the list of supported date formats. |
Get Click Location Statistics
Retrieves an overview of which part of the email links were clicked from (HTML or Text). This is only recorded when Link Tracking is enabled for that email.
| Tag | Enter the tag to filter results by. |
| From Date | Filter stats starting from the date specified (inclusive). E.g. 2014-02-01. See the list of supported date formats. |
| To Date | Filter stats starting from the date specified (inclusive). E.g. 2020-01-01. See the list of supported date formats. |
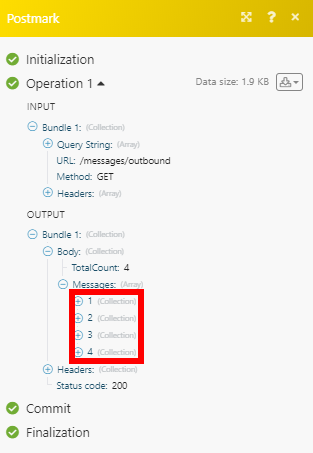
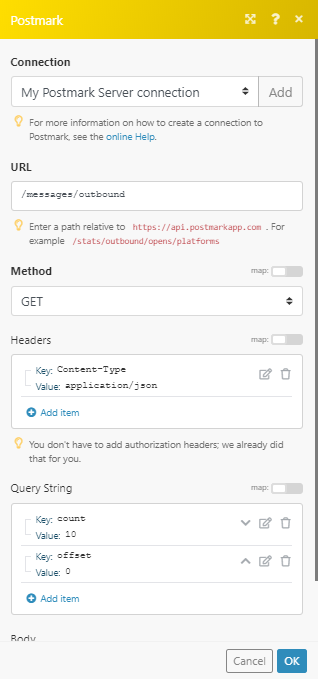
Make an API Call
Allows you to perform a custom API call.
URL |
Enter a path relative to For the list of available endpoints, refer to the Postmark API Documentation. |
Method |
Select the HTTP method you want to use: GET to retrieve information for an entry. POSTto create a new entry. PUT to update/replace an existing entry. PATCHto make a partial entry update. DELETEto delete an entry. |
Headers |
Enter the desired request headers. You don't have to add authorization headers; we already did that for you. |
Query String |
Enter the request query string. |
Body |
Enter the body content for your API call. |
Example of Use - List Outbound Messages
The following API call returns outbound emails in your Postmark account:
URL: /messages/outbound
Method: GET
Query String:
Key: count Value: 10
Key: offset Value: 0
The result can be found in the module's Output under Bundle > Body > Messages. In our example, 4 messages were returned: