JIRA Cloud Platform
Getting Started with JIRA
Prerequisites
- A JIRA account
In order to use JIRA with Ibexa Connect, it is necessary to have a JIRA account. If you do not have one, you can create a JIRA account on the Atlassian website.
Connecting JIRA to Ibexa Connect
To connect JIRA to Ibexa Connect, you must create an API token and insert it together with your Service URL and Username to the Create a connection field in Ibexa Connect.
To do so, follow these steps:
1. Go to https://id.atlassian.com/manage/api-tokens and log in.
2. Click Create API token.
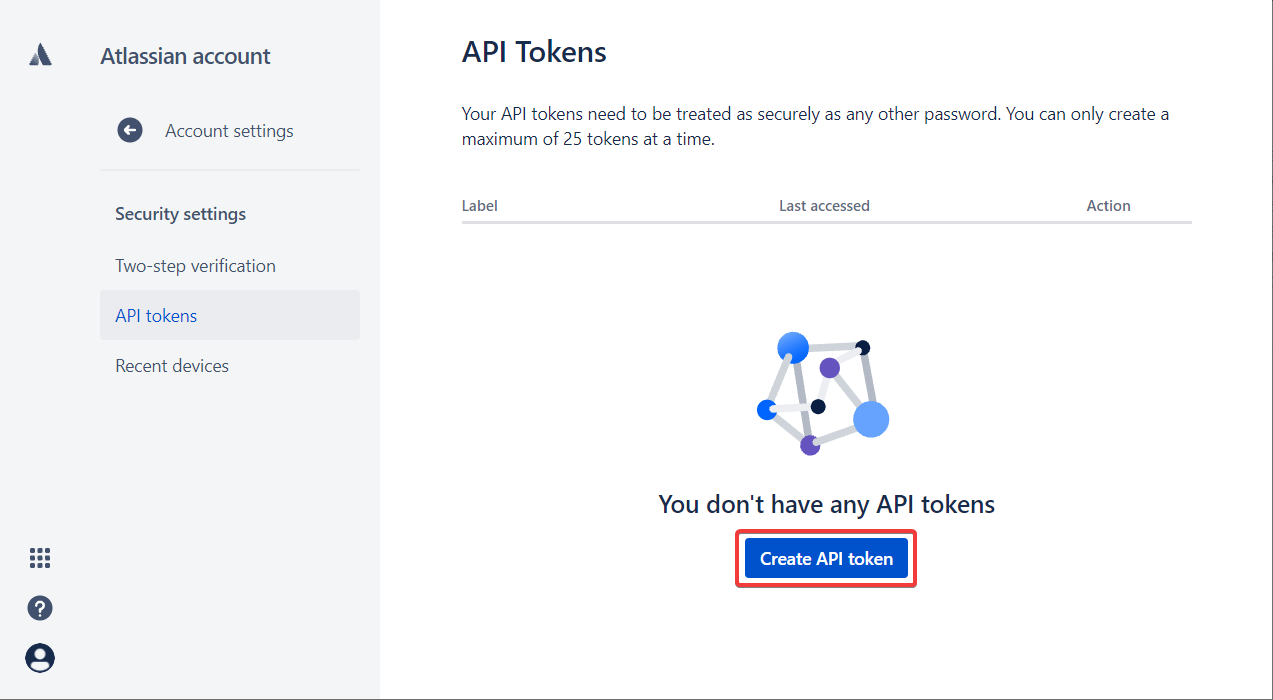
3. Enter a name for the API token and click Create.
4. Click Copy to copy the token to your clipboard.
You will not be able to view the token again after closing this dialog.
Store the generated token in a safe place.
5. Open Ibexa Connect and create a scenario. Add the JIRA Cloud Platform app to the scenario.
6. In the Connection field, click Add.
7. Fill in the Service URL, Username, and API Token fields with corresponding values.
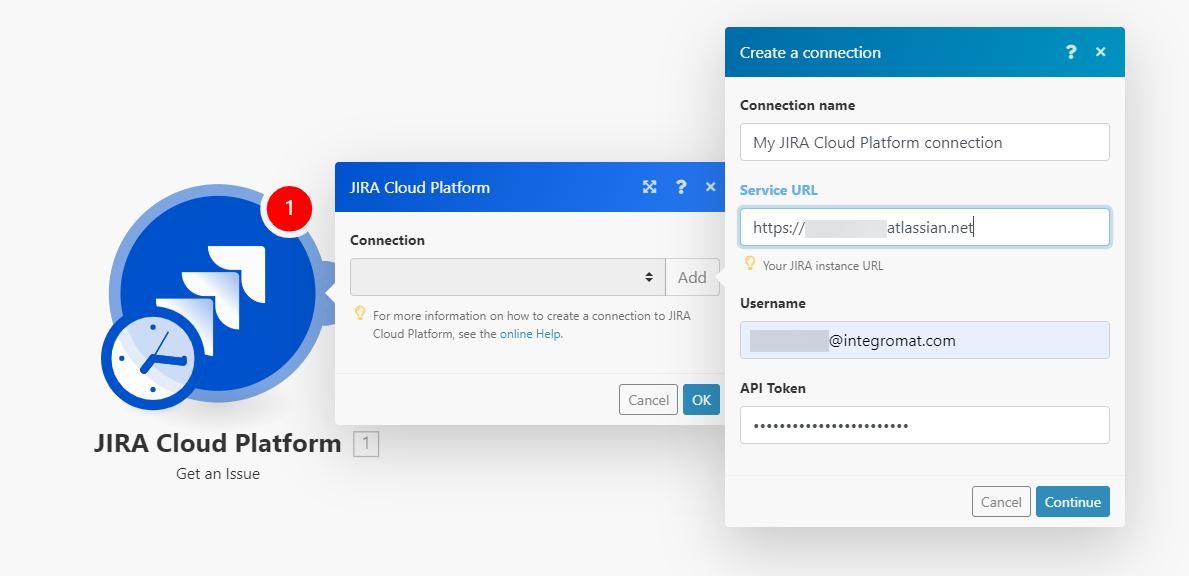
The connection is now established.
Triggers
Watch Issues
The module is triggered when there is a change in an issue. This module is an instant webhook.
Webhook name |
Enter the webhook name. |
Hook type |
Issue Triggers when an issue is created, updated, deleted, or the worklog has been changed (select the desired event in the Events field). Comment Triggers when an issue comment is created, updated, or deleted (select the desired event in the Events field). |
JQL filter |
You can use Jira Query Language (JQL) to filter items. For example, you can use |
Watch Issues (manual webhook registration)
This module is similar to the Watch Issues module above.
You need to register the Ibexa Connect webhook to JIRA manually.
This is useful when you have no JIRA administrator rights. The JIRA administrator can register the webhook for you.
Webhook name |
Enter the webhook name. |
Hook type |
Issue Triggers the event you have set in JIRA for the provided webhook. Comment Triggers the event you have set in JIRA for the provided webhook. |
Please use only the same type of events when creating this webhook in JIRA.
-
Fill in the Add a hook dialog and click the Save button.
-
Copy the provided webhook URL to the clipboard.
-
Create a webhook in JIRA using the provided webhook URL.
Caution
The scenario will not work until you register the provided webhook in JIRA.
Actions
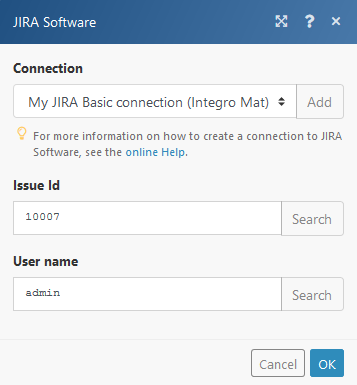
Assign Issue
Assigns an issue to a user. Use this module when the user does not have the Edit Issues permission but has the Assign issue permission for the project that the issue is in.
Issue ID |
Enter the ID of the issue you want to assign the user to. You can search for the Issue ID using the Search button. |
User name |
Enter the user name of the assignee. If the user name is set to If the user name field is left empty then the issue is set to unassigned. The ID can be retrieved, for instance, using the JIRA Server > Search Issues module. |
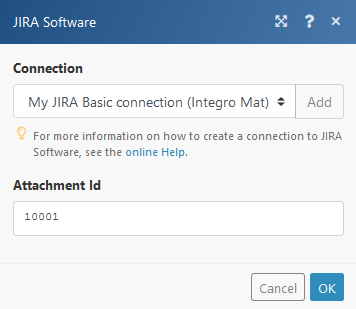
Remove Attachment
Removes specified issue attachment.
| Attachment ID | Enter the Attachment ID. The ID can be retrieved, for example, using the Search Issues module. |
Delete Comment
| Issue ID | Enter the ID of the issue you want to delete the comment from. |
| Comment ID | Enter the ID of the comment you want to delete. The ID can be retrieved using the Search Issues module. |
Update Comment
Allows you to edit the content of a selected comment.
| Issue ID | Enter the ID of the issue you want to update a comment in. |
| Comment ID | Enter the ID of the comment you want to delete. The ID can be retrieved using the Search Issues module. |
| New text | Enter the new comment content. |
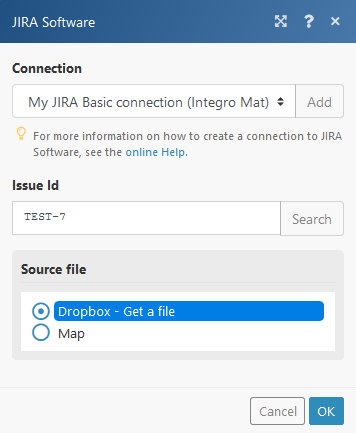
Add Attachment
| Issue ID | Enter the ID of the issue you want to attach a file to. |
| Source file | Select (map) the file you want to add as an attachment. For example, it can be done with the Dropbox > Get a file module. |
Add Comment
| Issue ID | Enter the ID of the issue where you want to enter the comment. |
| Text | Enter the new comment. |
Transition Issue
Changes the status of the issue.
Issue ID |
Enter the ID of the issue. |
Transition ID |
Enter the transition ID. E.g. 
|
Get Attachment
Retrieves attachment information.
| Attachment Id | Enter the Attachment ID. |
Get Issue
Retrieves information about an issue.
| Issue Id or Key | Enter the Issue ID, e.g. 10007 or key, e.g. TEST-7. The issue is identified by its ID or key, however, if the identifier doesn't match an issue, a case-insensitive search and check for moved issues is performed. |
Delete Issue
Deletes an issue.
An issue cannot be deleted if it has one or more sub-tasks. To delete an issue with sub-tasks, enable the option Delete subtasks.
| Issue Id or Key | Enter the Issue ID, e.g. 10007 or key, e.g. TEST-7. |
| Delete subtasks | Enable this option to delete the issue that contains subtasks. |
Create/Update Issue
Creates a new issue (when no Issue ID or key is defined) or updates an existing issue.
Project |
Select the project you want to create the issue in. |
Issue type |
Select the type of issue from the drop-down menu. |
Issue Id or Key |
Enter the Issue ID, e.g. Fill this field only if you want to update an existing issue! |
Summary |
Enter the summary of the issue. This field is mandatory when creating a new issue. |
Issue type |
Select the type of issue. This field is mandatory when creating a new issue. |
Description |
Enter a description for the new/updated issue. |
Project |
Select (or map) the project you want to create the issue in. This field is mandatory when creating a new issue. |
Fix Version/s |
N/A |
Priority |
Set the desired issue priority. |
Epic link |
Enter the epic link. Use the issue key (e.g. |
Labels |
Add labels if needed. |
Environment |
Enter the environment for the issue. For example, operating system, software platform, and/or hardware specifications (include as appropriate for the issue). |
Affects Version/s |
N/A |
Assignee |
Enter the assignee's name. E.g. |
Create Issue
Creates an issue.
| Project | Select the project you want to create an issue in. |
| Issue type | Select the type of issue from the drop-down menu. |
| Summary | Enter the summary of the issue. |
| Issue type | Select the type of issue. |
| Description | Enter a description for the new/updated issue. |
| Project | Select (or map) the project you want to create the issue in. |
| Fix Version/s | N/A |
| Priority | Set the desired issue priority. |
| Epic link | Enter the epic link. Use the issue key (e.g. TEST-6), as JIRA doesn't have a way to convert from the name. |
| Labels | Add labels if needed. |
| Environment | Enter the environment for the issue. For example, operating system, software platform, and/or hardware specifications (include as appropriate for the issue). |
| Affects Version/s | N/A |
| Assignee | Enter the assignee name. E.g. admin |
Update Issue
| Project | Select the project you want to update the issue in. |
| Issue type | Select the type of issue from the drop-down menu. |
| Issue Id or Key | Enter the Issue ID, e.g. 10007 or the issue key, e.g. TEST-7. |
| Summary | Enter the summary of the issue. |
| Issue type | Select the type of issue. |
| Description | Enter a description for the new/updated issue. |
| Project | Select (or map) the project you want to create the issue in. |
| Fix Version/s | N/A |
| Assignee | Enter the assignee's name. E.g. admin |
| Priority | Set the desired issue priority. |
| Epic link | Enter the epic link. Use the issue key (e.g. TEST-6), as JIRA doesn't have a way to convert from the name. |
| Labels | Add labels if needed. |
| Environment | Enter the environment for the issue. For example, use operating system, software platform, and/or hardware specifications (include as appropriate for the issue). |
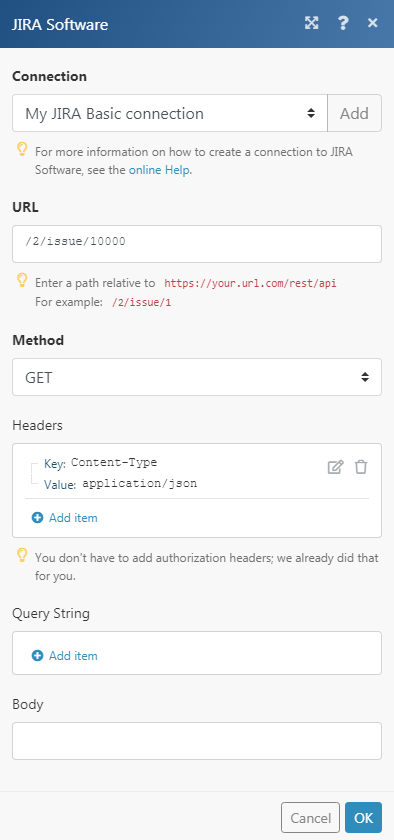
Make an API Call
Allows you to perform a custom API call.
URL |
Enter a path relative to For the list of available endpoints, refer to the Jira Server REST API Documentation. |
Method |
Select the HTTP method you want to use:
|
Headers |
Enter the desired request headers. You don't have to add authorization headers; we already did that for you. |
Query String |
Enter the request query string. |
Body |
Enter the body content for your API call. |
Example of Use - Get Issue
The following API call returns the issue with ID 10000 in your Jira account:
Matches of the search can be found in the module's Output under Bundle > Body:

Searches
Get Issue Comments
Retrieves details of a comment.
| Issue Id | Enter or select the Issue ID. Click the Search button. If the JQL field is left empty then all issues will be listed. |
| Max results | Set the maximum number of retrieved comments. |
Search Issues
JQL |
You can use Jira Query Language (JQL) to search for issues. E.g. The example searches for bugs created by John Smith yesterday in the Pipeline project. |
Max results |
Set the maximum number of retrieved comments. |
Custom fields
When retrieving issues from JIRA via webhooks or Get Actions, you have some basic sample data from the general JIRA installation available. In order to get your custom fields, you need to have at least one issue available in JIRA so that Ibexa Connect can retrieve it and remember your custom fields. You just have to run your scenario (or run a single JIRA module) and the fields should be available to you. These custom fields will be available on your computer only, as they are saved in your browser, so if you access Ibexa Connect from another computer, you have to repeat the process. ueType = Bug and createdDate >= -1d
The example searches for bugs created by John Smith yesterday in the Pipeline project.
Search JIRA like a boss with JQL.
Max results
Set the maximum number of retrieved comments.
Custom fields
When retrieving issues from JIRA via webhooks or Get Actions, you have some basic sample data from the general JIRA installation available. In order to get your custom fields, you need to have at least one issue available in JIRA so that Ibexa Connect can retrieve it and remember your custom fields. You just have to run your scenario (or run a single JIRA module) and the fields should be available to you. These custom fields will be available on your computer only, as they are saved in your browser, so if you access Ibexa Connect from another computer, you have to repeat the process.