RepairShopr
The RepairShopr modules allow you to create, update, list, and delete the customers, leads, and tickets in your RepairShopr account.
Getting Started with RepairShopr
Prerequisites
- A RepairShopr account
In order to use RepairShopr with Ibexa Connect, it is necessary to have a RepairShopr account. You can create a RepairShopr account at admin.repairshopr.com/accounts/start.
Note
The module dialog fields that are displayed in bold (in the Ibexa Connect scenario, not in this documentation article) are mandatory!
Connecting RepairShopr to Ibexa Connect
To connect your RepairShopr account to Ibexa Connect you need to obtain the API Key from your RepairShopr account and insert it in the Create a connection dialog in the Ibexa Connect module.
1. Log in to your RepairShopr account.
2. In the top menu, select the More > Admin > API Tokens > New Token.
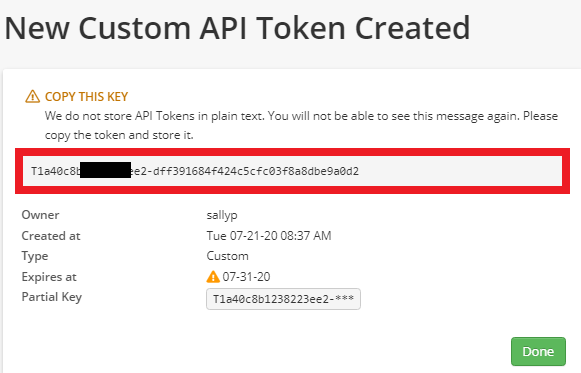
3. Click Custom Permissions, enter a name for the token, select the expiry date of the token, select the permissions, and click Create API Token.
4. Copy the API Key to your clipboard.
5. Go to Ibexa Connect and open the RepairShopr module's Create a connection dialog.
6. In the Connection name field, enter a name for the connection.
7. In the API Key field, enter the API key copied in step 4.
8. In the Subdomain field, enter your subdomain details. If your website address of RepairShopr's account is www.xyz.repairshopr.com then your subdomain name is xyz. Click Continue.
The connection has been established.
Customer
Watch Customers (Instant)
Triggers when a new customer is created.
| Webhook Name | Enter a name for the webhook. |
See Setting Up RepairShopr Webhook to add the webhook to your RepairShopr account.
Watch Customers
Triggers when a new customer is created.
| Limit | Set the number of returned customers Ibexa Connect will return during one execution cycle. |
Get a Customer
Retrieves information about a customer.
| Customer | Select the customers whose details you want to retrieve. |
Search a Customer
Finds a customer.
| Limit | Set the number of returned customers Ibexa Connect will return during one execution cycle. |
| First Name | Enter the first name of the customer whose details you are searching for. |
| Last Name | Enter the last name of the customer whose details you are searching for. |
| Business Name | Enter the business name of the customer you are searching for. |
| Enter the email address of the customer you are searching for. | |
| Sort | Enter the order in which you want to sort the customers. For example ASC or DESC. |
| Query | Enter a keyword or a phrase to search the customers based on specified criteria. |
| Include IDs | Select the Customer IDs that you want to include in the search list. |
| Not Include IDs | Select the Customer IDs which you do not want to include in the search list. |
| Include Disabled | Select whether or not to include the customers who are disabled. |
Create a Customer
Creates a new customer.
Business Name |
Enter the business name of the customer. |
First Name |
Enter the first name of the customer. |
Last Name |
Enter the last name of the customer. |
Enter the email address of the customer. |
|
Phone |
Enter the phone number of the customer. |
Mobile Number |
Enter the mobile number of the customer. |
Address Line 1 |
Enter the street address of the customer. |
Address Line 2 |
Enter the street address of the customer. |
City |
Enter the city name to which the customer belongs. |
State |
Enter the state name to which the customer belongs. |
Zip |
Enter the area zip code. |
Notes |
Enter any additional information about the customer. |
Get SMS |
Select whether the customer can receive SMS:
|
Opt Out |
Select whether the customer has op-out from SMS or emails:
|
No Email |
Select whether the customer has no email address:
|
Ref Customer ID |
Enter the Customer ID who referred the customer. |
Referred ID |
Select the Referred ID of the customer:
|
Tax Rate ID |
Select the Tax Rate ID of the customer:
|
Notification Email |
Enter the email address to which the customer will receive the notifications. |
Invoice CC Emails |
Enter the invoice cc email address of the customer. |
Invoice Term ID |
Enter the Invoice Term ID of the customer. |
Properties |
Enter the properties of the customer. |
Consent |
Enter the consent details of the customer. |
Update a Customer
Updates an existing customer by ID.
Customer ID |
Select the Customer ID whose details you want to update. |
Business Name |
Enter the business name of the customer. |
First Name |
Enter the first name of the customer. |
Last Name |
Enter the last name of the customer. |
Enter the email address of the customer. |
|
Phone |
Enter the phone number of the customer. |
Mobile Number |
Enter the mobile number of the customer. |
Address Line 1 |
Enter the street address of the customer. |
Address Line 2 |
Enter the street address of the customer. |
City |
Enter the city name to which the customer belongs. |
State |
Enter the state name to which the customer belongs. |
Zip |
Enter the area zip code. |
Notes |
Enter any additional information about the customer. |
Get SMS |
Select whether the customer can receive SMS:
|
Opt Out |
Select whether the customer has op-out from SMS or emails:
|
No Email |
Select whether the customer has no email address:
|
Ref Customer ID |
Enter the Customer ID who referred the customer. |
Referred ID |
Select the Referred ID of the customer:
|
Tax Rate ID |
Select the Tax Rate ID of the customer:
|
Notification Email |
Enter the email address to which the customer will receive the notifications. |
Invoice CC Emails |
Enter the email address to be added as CC in the invoice emails of the customer. |
Invoice Term ID |
Enter the Invoice Term ID of the customer. |
Properties |
Enter the properties of the customer. |
Consent |
Enter the consent details of the customer. |
Delete a Customer
Deletes an existing customer.
| Customer | Select the customer whom you want to delete. |
Ticket
Watch Ticket
Triggers when a new ticket is created.
| Limit | Set the number of returned tickets Ibexa Connect will return during one execution cycle. |
Watch Ticket (Instant)
Triggers when a ticket is created.
| Webhook Name | Enter a name for the webhook. |
See the Setting Up RepairShopr Webhook to add the webhook to your RepairShopr account.
Watch Resolved Tickets
Triggers when a ticket is marked as "resolved".
| Webhook Name | Enter a name for the webhook. |
See the Setting Up RepairShopr Webhook to add the webhook in your RepairShopr account.
Get a Ticket
Retrieves information about a ticket.
| Ticket ID | Select the Ticket ID whose details you want to retrieve. |
Search a Ticket
Finds a ticket.
Customer ID |
Select the Customer ID whose ticket details you want to search. |
Ticket Number |
Enter the ticket number you are searching for. |
Resolved After |
Enter the date to search for the tickets resolved on or after the specified date. |
Since Updated at |
Enter the date to search for the tickets updated on or after the specified date. |
Status |
Select the status of the tickets you were searching:
|
Query |
Enter a keyword or a phrase to search the tickets based on specified criteria. |
User ID |
Enter the User ID to search the tickets assigned to the user. |
Mine |
Select whether you want to search the tickets assigned to the current user:
|
Limit |
Set the number of returned tickets Ibexa Connect will return during one execution cycle. |
Create a Ticket
Creates a new ticket.
Customer ID |
Select the Customer ID whose ticket you want to create. |
Subject |
Enter the subject line of the ticket. |
Problem Type |
Select the problem type:
|
Comments Attribute |
Add the comment attributes: Subject Enter the subject line of the comment. Body Enter the comment text. Hidden Select whether you want to hide the comment:
SMS Body Enter the message text. Do Not Email Select whether to send the emails to the customer about the ticket:
Tech Enter the technology details of the ticket. |
Ticket Type ID |
Enter the Ticket Type ID. |
Number |
Enter the ticket number. |
Due date |
Enter the date by when the ticket must be resolved. |
Start at |
Enter the date when the work on the ticket begins. |
Ends at |
Enter the date when the work on the ticket Ends. |
Location ID |
Enter the Location ID from where the ticket has been raised. |
Status |
Select the status of the ticket:
|
User ID |
Enter the User ID to whom the ticket has been assigned. |
Properties |
Enter the properties of the ticket. |
Asset IDs |
Add the Asset IDs for the ticket. |
Signature Name |
Enter the signature name on the ticket. |
Signature Data |
Enter the signature data details on the ticket. |
SLA ID |
Enter the SLA ID of the ticket. |
Contact ID |
Enter the Contact ID for the ticket. |
Priority |
Enter the priority of the ticket. For example, |
Outtake Form Data |
Enter the details of the outtake form. |
Outtake Form Date |
Enter the date on the outtake form. |
Outtake Form Name |
Enter the name on the outtake form. |
Update a Ticket
Updates an existing ticket.
Ticket ID |
Select the Ticket ID whose details you want to update. |
Customer ID |
Select the Customer ID whose ticket details you are updating. |
Subject |
Enter the subject line of the ticket. |
Problem Type |
Select the problem type:
|
Comments Attribute |
Add the comment attributes: Subject Enter the subject line of the comment. Body Enter the comment text. Hidden Select whether you want to hide the comment:
SMS Body Enter the message text. Do Not Email Select whether to send the emails to the customer about the ticket:
Tech Enter the technology details of the ticket. |
Ticket Type ID |
Enter the Ticket Type ID. |
Number |
Enter the ticket number. |
Due date |
Enter the date by when the ticket must be resolved. |
Start at |
Enter the date when the work on the ticket begins. |
Ends at |
Enter the date when the work on the ticket Ends. |
Location ID |
Enter the Location ID from where the ticket has been raised. |
Status |
Select the status of the ticket:
|
User ID |
Enter the User ID to whom the ticket has been assigned. |
Properties |
Enter the properties of the ticket. |
Asset IDs |
Add the Asset IDs for the ticket. |
Signature Name |
Enter the signature name on the ticket. |
Signature Data |
Enter the signature data details on the ticket. |
SLA ID |
Enter the SLA ID of the ticket. |
Contact ID |
Enter the Contact ID for the ticket. |
Priority |
Enter the priority of the ticket. For example, |
Outtake Form Data |
Enter the details of the outtake form. |
Outtake Form Date |
Enter the date on the outtake form. |
Outtake Form Name |
Enter the name on the outtake form. |
Delete a Ticket
Deletes an existing ticket.
| Ticket ID | Select the Ticket ID you want to delete. |
Lead
Watch Leads
Triggers when a new lead is created.
| Limit | Set the number of returned leads Ibexa Connect will return during one execution cycle. |
Get a Lead
Retrieves information about a lead.
| Ticket ID | Select the Lead ID whose details you want to retrieve. |
Search a Lead
Finds a lead.
Statuses |
Select the status of the lead you are searching for:
|
User IDs |
Enter the User IDs separated by a comma whose leads you are searching for. |
Mailbox IDs |
Add the Mailbox IDs to search the leads for the specified IDs. |
Query |
Enter a keyword or a phrase to search the leads based on specified criteria. |
Has Ticket |
Select whether to search the leads with tickets:
|
Create a Lead
Creates a new lead.
Ticket Description |
Enter the ticket details for which you are creating the lead. |
Ticket Subject |
Enter the ticket subject line. |
Ticket Problem Type |
Select the problem type:
|
Address |
Enter the address of the lead. |
Business Name |
Enter the business name of the lead. |
City |
Enter the city name of the lead. |
Zip |
Enter the area zip code. |
Converted |
Select whether the lead is converted to a customer:
|
Message Read |
Select whether the message is read by the lead:
|
Disabled |
Select whether the lead is disabled:
|
Enter the email address of the lead. |
|
First Name |
Enter the first name of the lead. |
Last Name |
Enter the last name of the lead. |
Mobile |
Enter the mobile number of the lead. |
Phone |
Enter the phone number of the lead. |
State |
Enter the state name. |
Location ID |
Enter the Location ID where the lead belongs to. |
From Check-In |
Select whether the lead is distributed with a check-in:
|
Customer ID |
Select the Customer ID associated with the lead. |
Ticket ID |
Select the Ticket ID associated with the lead. |
Hidden Notes |
Enter any additional information about the lead that is not visible to others. |
Contact ID |
Enter the Contact ID of the lead. |
Appointment Time |
Enter the meeting time scheduled with the lead. |
Status |
Select the status of the lead:
|
User ID |
Enter the User ID to whom the lead is assigned. |
Ticket Type ID |
Enter the Ticket Type ID of the lead. |
Mailbox ID |
Enter the Mailbox ID of the lead. |
Opportunity Start Date |
Enter the date when the opportunity with the lead begins. |
Opportunity Amount Dollars |
Enter the amount expected from the lead. |
Likelihood |
Enter the likelihood details of the lead. |
Properties |
Enter the details of the opportunity. |
Ticket Properties |
Enter the properties of the ticket. |
Customer Purchase ID |
Enter the customer Purchase ID made by the lead. |
Signature Date |
Enter the date on the signature. |
Signature Name |
Enter the name on the signature. |
Signature Data |
Enter the details of the signature data. |
Appointment Type ID |
Enter the Appointment Type ID. |
Update a Lead
Updates an existing lead.
Lead ID |
Select the Lead ID whose details you want to update. |
Ticket Description |
Enter the ticket details for which you are creating the lead. |
Ticket Subject |
Enter the ticket subject line. |
Ticket Problem Type |
Select the problem type:
|
Address |
Enter the address of the lead. |
Business Name |
Enter the business name of the lead. |
City |
Enter the city name of the lead. |
Zip |
Enter the area zip code. |
Converted |
Select whether the lead is converted to a customer:
|
Message Read |
Select whether the message is read by the lead:
|
Disabled |
Select whether the lead is disabled:
|
Enter the email address of the lead. |
|
First Name |
Enter the first name of the lead. |
Last Name |
Enter the last name of the lead. |
Mobile |
Enter the mobile number of the lead. |
Phone |
Enter the phone number of the lead. |
State |
Enter the state name. |
Location ID |
Enter the Location ID where the lead belongs to. |
From Check-In |
Select whether the lead is distributed with a check-in:
|
Customer ID |
Select the Customer ID associated with the lead. |
Ticket ID |
Select the Ticket ID associated with the lead. |
Hidden Notes |
Enter any additional information about the lead that not visible to others. |
Contact ID |
Enter the Contact ID of the lead. |
Appointment Time |
Enter the meeting time scheduled with the lead. |
Status |
Select the status of the lead:
|
User ID |
Enter the User ID to whom the lead is assigned. |
Ticket Type ID |
Enter the Ticket Type ID of the lead. |
Mailbox ID |
Enter the Mailbox ID of the lead. |
Opportunity Start Date |
Enter the date when the opportunity with the lead begins. |
Opportunity Amount Dollars |
Enter the amount expected from the lead. |
Likelihood |
Enter the likelihood details of the lead. |
Properties |
Enter the details of the opportunity. |
Ticket Properties |
Enter the properties of the ticket. |
Customer Purchase ID |
Enter the customer Purchase ID made by the lead. |
Signature Date |
Enter the date on the signature. |
Signature Name |
Enter the name on the signature. |
Signature Data |
Enter the details of the signature data. |
Appointment Type ID |
Enter the Appointment Type ID. |
Other
Watch Invoices
Triggers when a new invoice is created.
| Webhook Name | Enter a name for the webhook. |
See the Setting Up RepairShopr Webhook to add the webhook to your RepairShopr account.
Watch Payments
Triggers when a payment is made.
| Webhook Name | Enter a name for the webhook. |
See the Setting Up RepairShopr Webhook to add the webhook to your RepairShopr account.
Watch Ticket Status
Triggers when a ticket status is changed.
| Webhook Name | Enter a name for the webhook. |
See the Setting Up RepairShopr Webhook to add the webhook to your RepairShopr account.
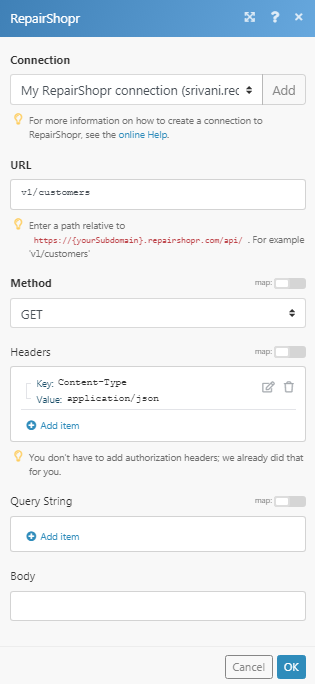
Make an API Call
Performs an arbitrary authorized API call.
URL |
Enter a path relative to | For the list of available endpoints, refer to the RepairShopr API Documentation. |
Method
Select the HTTP method you want to use:
GET to retrieve information for an entry.
POST to create a new entry.
PUT to update/replace an existing entry.
PATCH to make a partial entry update.
DELETE to delete an entry.
Headers
Enter the desired request headers. You don't have to add authorization headers; we already did that for you.
Query String
Enter the request query string.
Body
Enter the body content for your API call.
Example of Use - List Customers
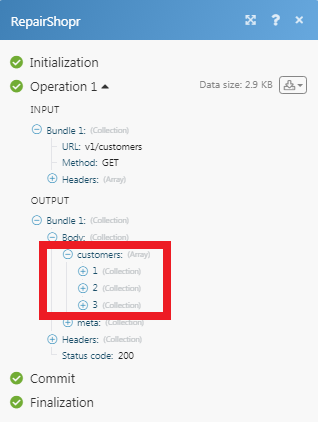
The following API call returns all the customers from your RepairShopr account:
URL: v1/customers
Method: GET
Matches of the search can be found in the module's Output under Bundle > Body > customers. In our example, 3 customers were returned:
Setting Up RepairShopr Webhooks
1. Open any Webhook module, enter the details as mentioned in the respective module description, and copy the address to your clipboard.
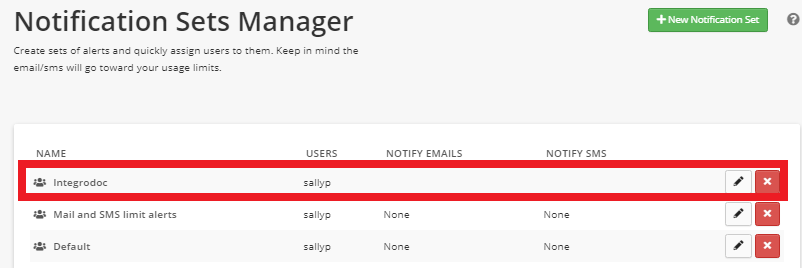
2. Log in to your RepairShopr account. From the top menu, click More > Admin > Notification Center > New Notification Set.
| Name | Enter a name for the webhook. |
| Notify these Users | Select the users to send notification |
| Additional Emails to Notify | (Optional) Enter the email address of the members who are not the users. |
| Additional SMS Notify (local format) | (Optional) Enter an additional message to send along with the notification. |
| Webhook URL | Enter the webhook URL address copied in step 1. |
| Event | Select the events for which you want to receive the notifications. |
3. Click Create Notification Set.
The webhook is added successfully.