Using Airtable with Ibexa Connect
Airtable is one of the most popular apps Ibexa Connect customers use. Airtable is a low-code platform for creating and sharing relational databases. You can use Airtable to store your data as you would in a spreadsheet like Google sheets. Airtable can store data about your contacts, appointments, or tasks.
The difference between Airtable and a spreadsheet is that Airtable can accommodate high data traffic and you can connect data in multiple tables to form logical relations between them.
This tutorial guides you through the steps to set up Airtable to work with Ibexa Connect. We will cover the following use cases:
-
Trigger a scenario by creating or modifying records in Airtable.
-
Create or update a record in Airtable with data from another app.
Use case 1: Trigger a scenario by creating or modifying records in Airtable
In this workflow, imagine that we’re working at an NGO company and we use Airtable to manage several projects. Some of those projects require external collaboration. We will use Asana to coordinate with collaborators outside of our firm. Ibexa Connect will help us organize and sync up with our imaginary external collaborators.
Steps to follow:
Choose a trigger module
The first step in any automation is choosing what will kick off the process. In Ibexa Connect, the first component of your scenario is a trigger module.
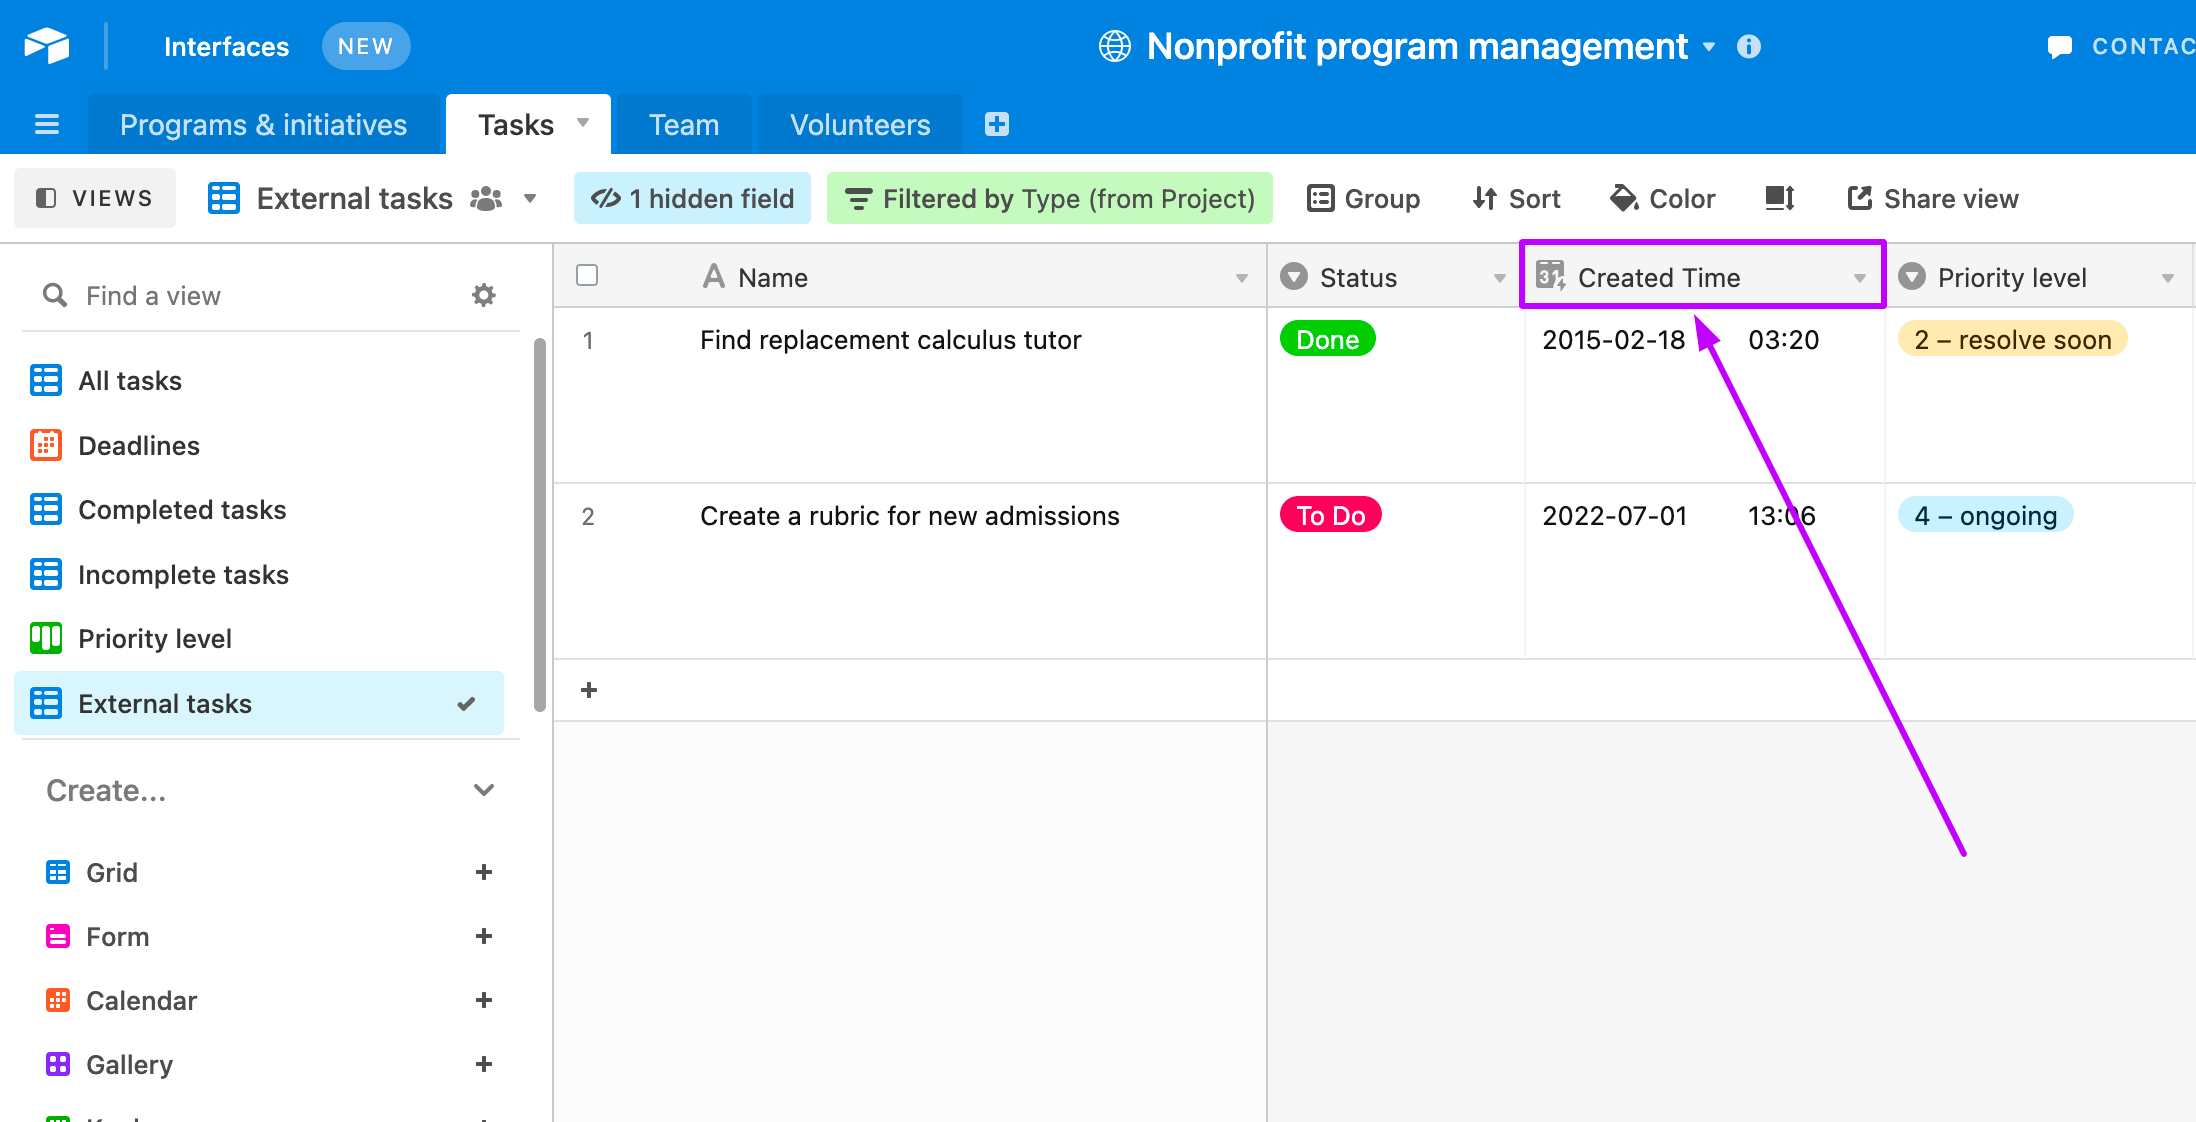
The trigger module for our scenario is the Airtable Watch Records module. The Watch Records module checks the Created Time field in your table for new records. If the module finds a new record, it retrieves the record data.
This Ibexa Connect integration allows you to transfer information from Airtable to Asana automatically:
-
Skip this step if you already have the Airtable database that you want to use. Create a new database in Airtable. Check out the official Airtable help for tips on how to navigate in Airtable.
-
Skip this step if you have an appropriate table in your Airtable database already. Create a new table in your Airtable database.
Note
Your table has to have a field with the field type set to Created time. This field contains the timestamp of the moment when the record was created. You can set any label to the field.
-
Navigate to the Ibexa Connect Scenario editor.
-
Click the big plus icon. At the bottom of the pop-up window use the search field to find the "Airtable" app.
-
Click on the Airtable app field. In the next selection, choose the Watch Records module.
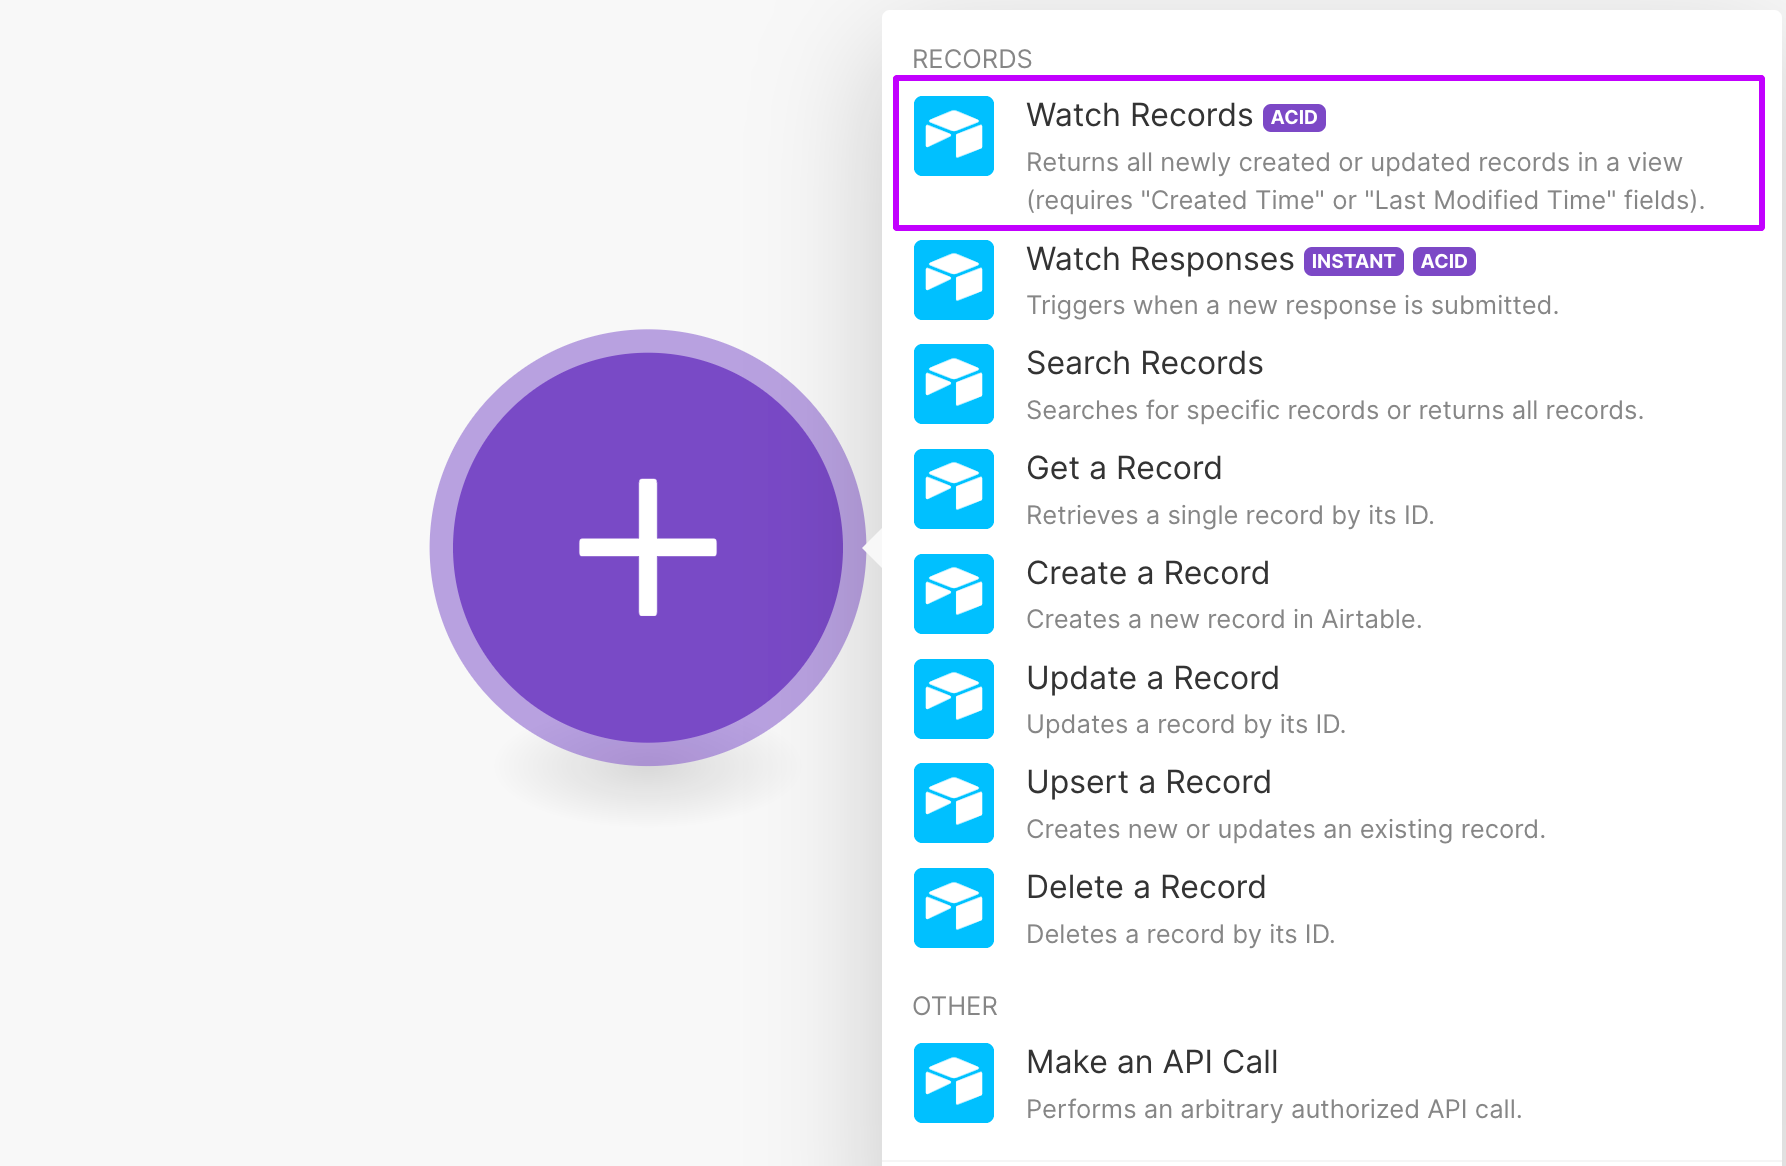
You have added the Airtable Watch Records module. This module acts as the trigger module in your scenario.
Configure the trigger module
The trigger module Watch Records checks your table for new records. If the module finds a new record it retrieves the record data.
-
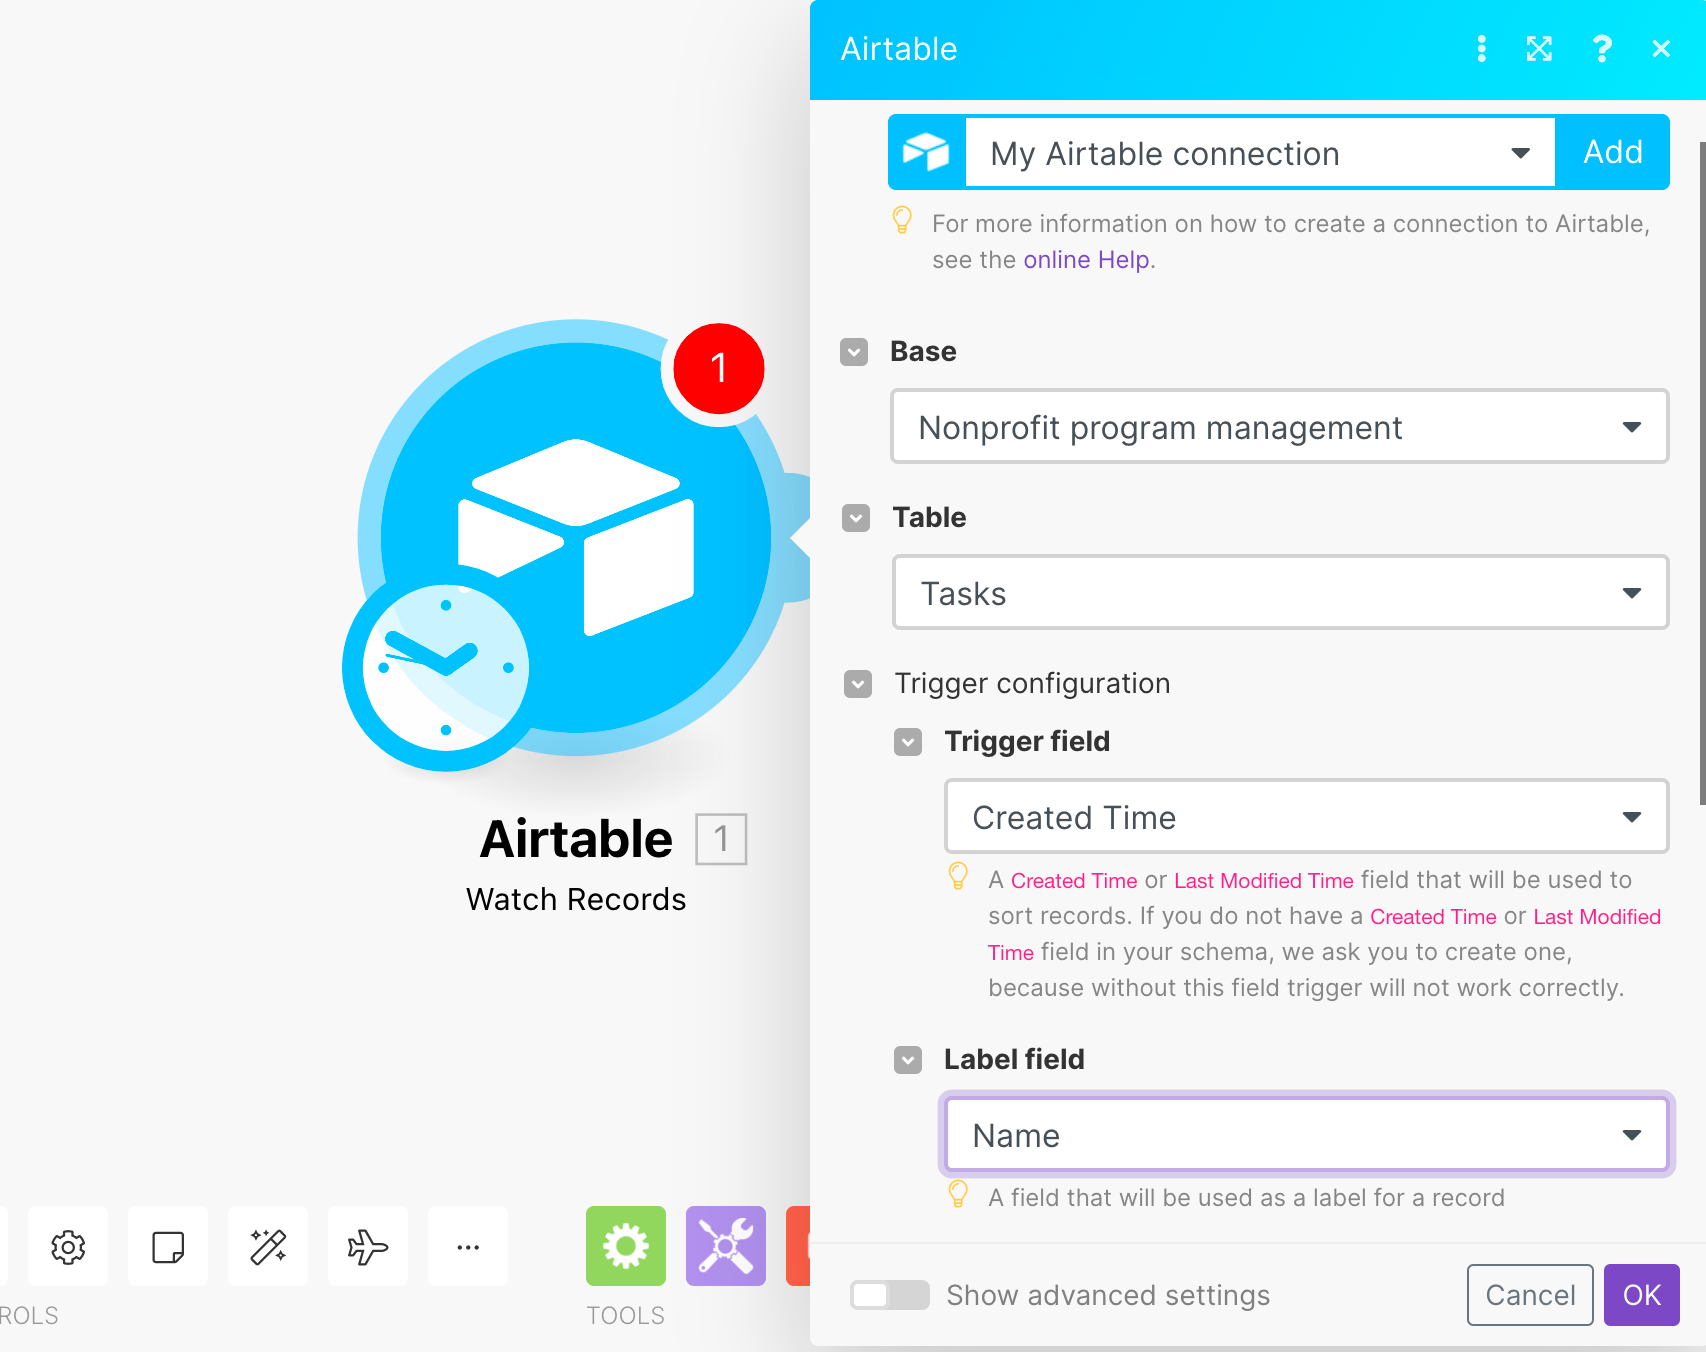
Choose your Airtable connection in the Connection drop-down field.
If you don't have an Airtable connection set up, refer to the Connect Airtable to Ibexa Connect page.
-
In the Base field, choose your Airtable database. In the Table drop-down, select the table that contains the Created Time field. In the View drop-down field, leave the default Grid view.
-
In the Trigger Field drop-down, select the table field with the type Created Time .
-
Choose the Label field. The Label field value should identify the record for you. Choose a descriptive field for the Label. For example, the task name.
You have set up the trigger module for your synchronization scenario.
Create a new task in Asana
Asana is a team and project management web application. In this guide, you will use the Asana Create a Task or Subtask module to create new tasks using data from your Airtable database. All of this will happen automatically, every time you add a new record to Airtable.
-
Hover over the Watch Records module and click Add another module. Add the Asana Create a Task or Subtask module to your scenario.
-
In the module settings Connection field, choose your Asana connection. If you don't have an Asana connection yet follow this guide.
-
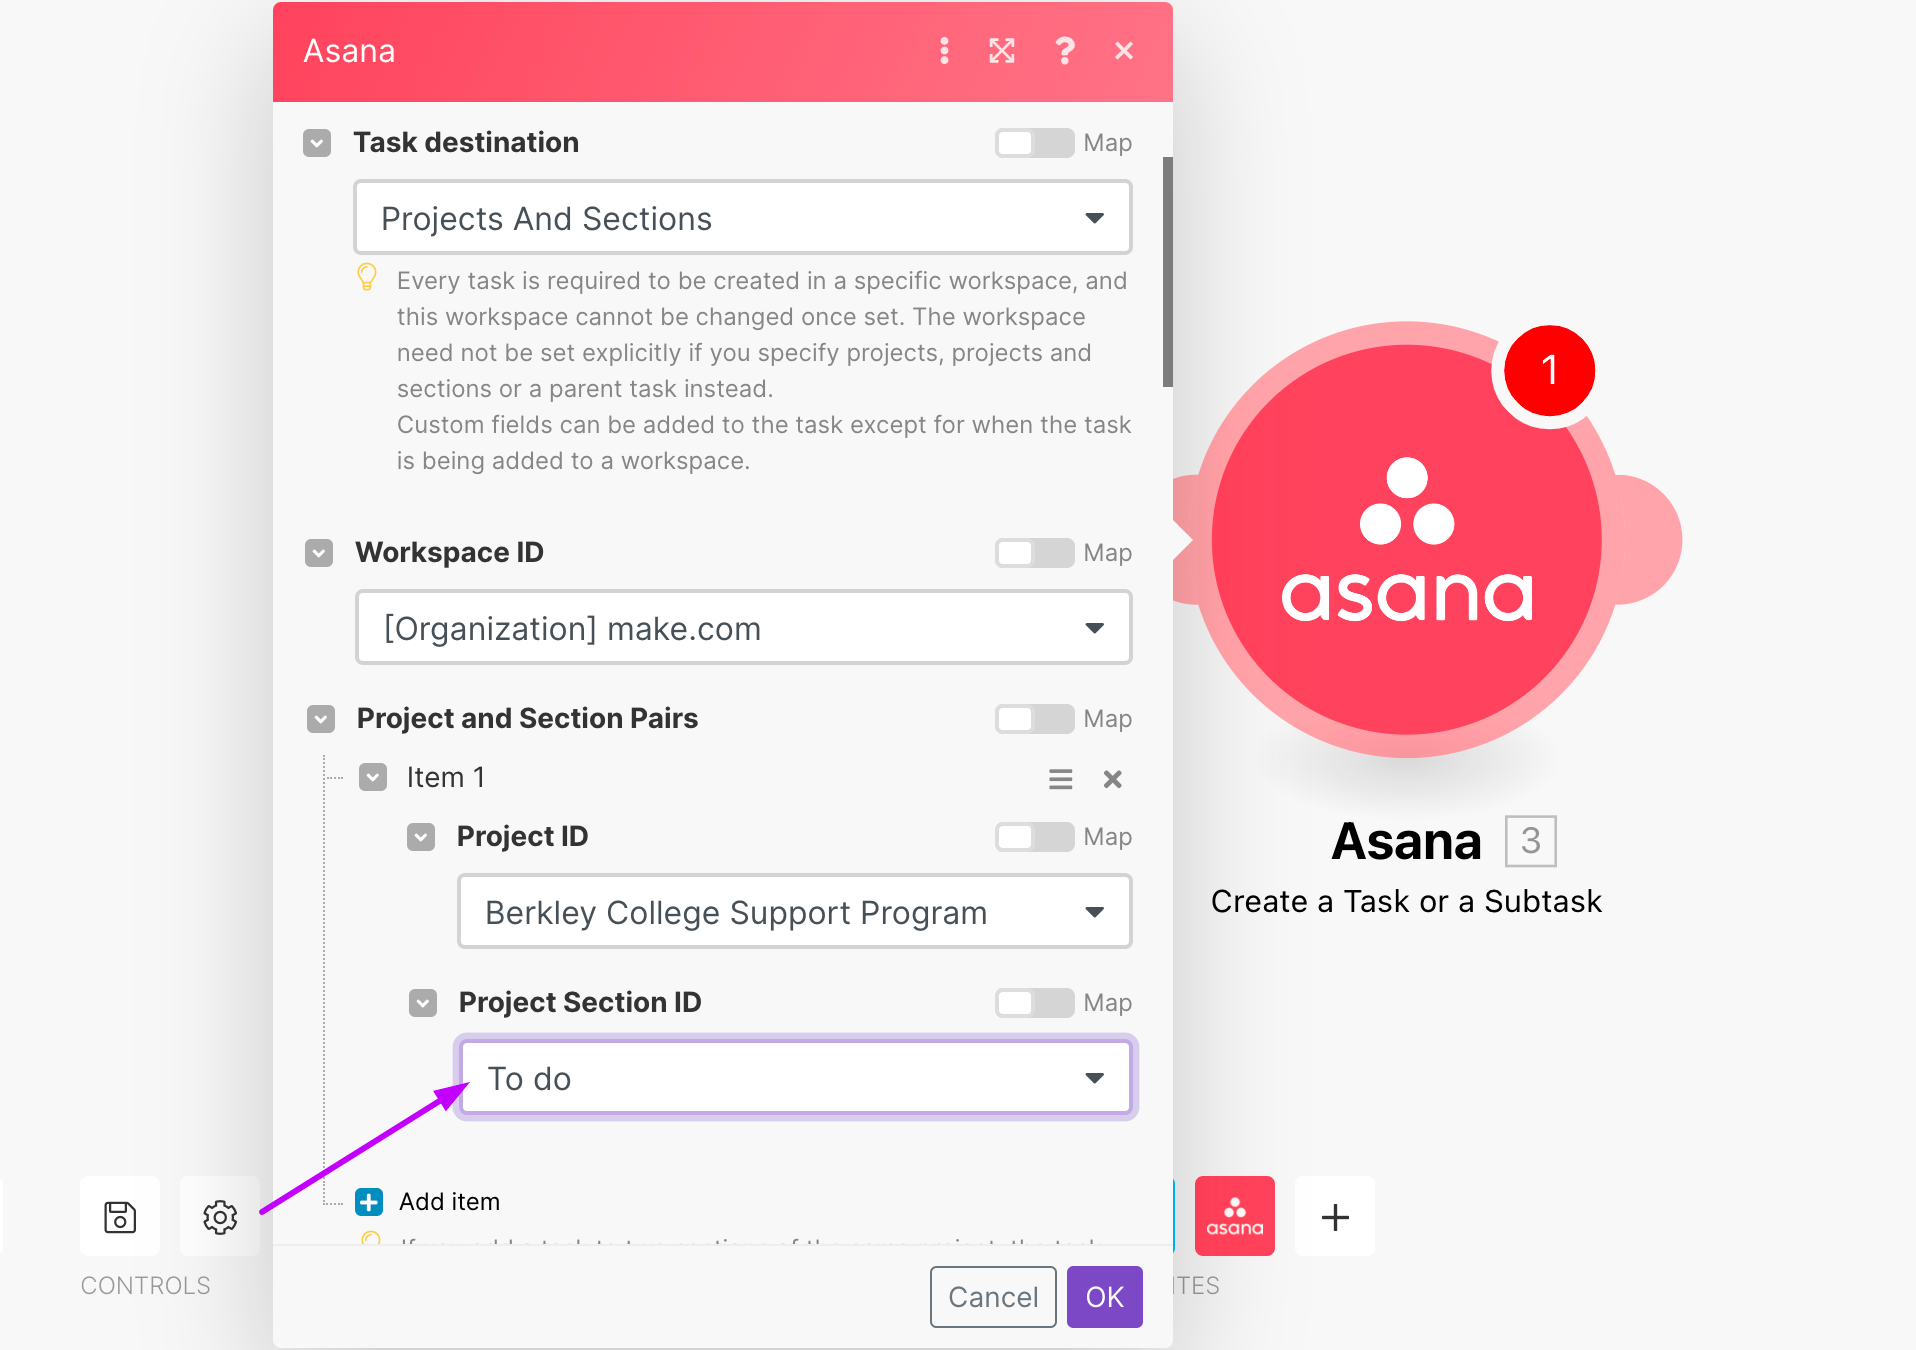
In the Task destination drop-down field, select Projects and Sections. In the Workspace ID field, choose your Asana workspace.
-
In the Project and sections field, click Add item. Choose the project and section name in the Project ID and Project Section ID drop-down fields.
-
Map the task Name from Airtable to the Task Name field. Read more about mapping.
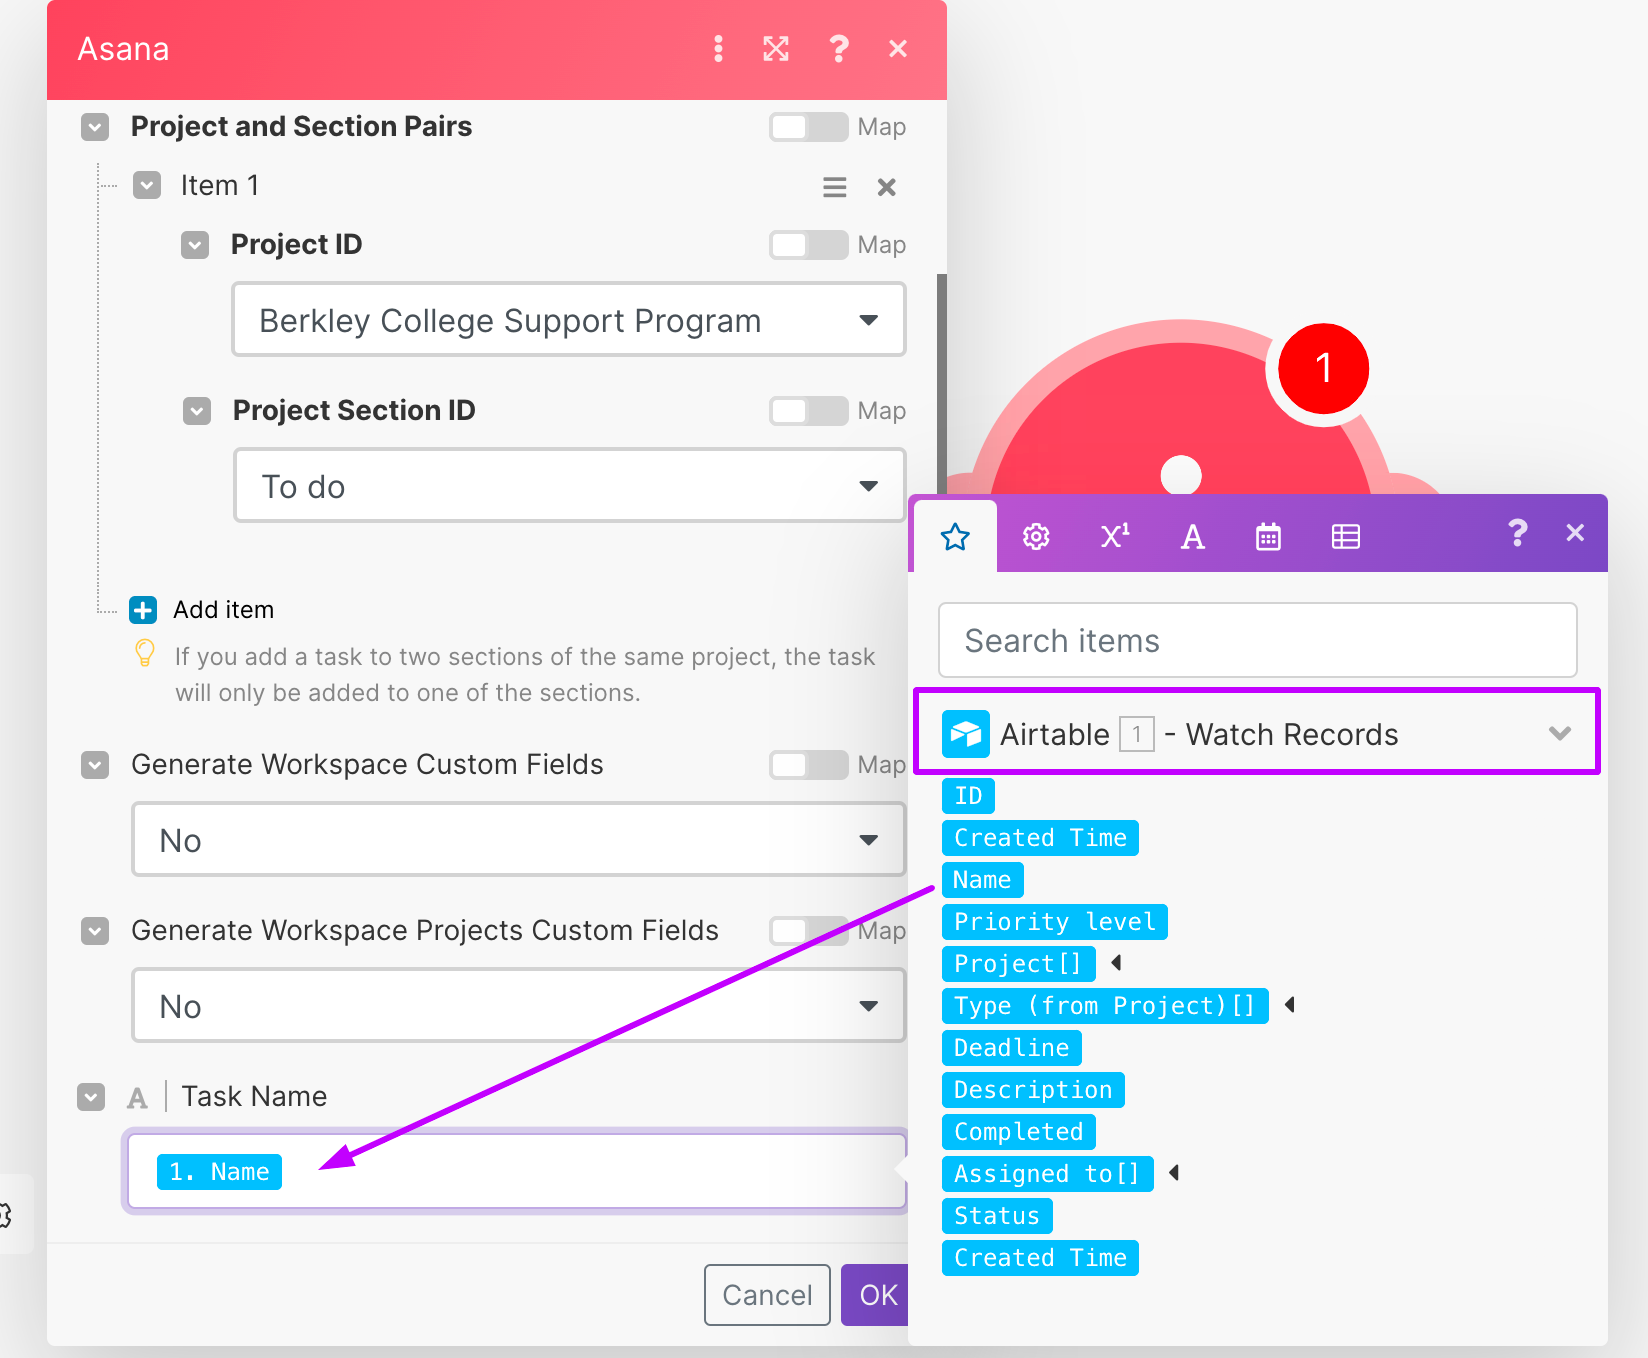
When you run the scenario, the task in Asana will have the same name as in Airtable.
You have setup the Asana Create a Task or a Subtask module. This module automatically transfers data from your Airtable database to your Asana project.
Test and schedule your scenario
When you are finished with designing a scenario, you should test it. Ibexa Connect enables you to just run the scenario once and see if it works. If the scenario works the way you imagined, you can schedule the scenario to run automatically. Read more about scheduling a scenario.
When you start the scenario manually to test it, the scenario waits for data. This happens because we use a watch module as the scenario trigger. That means you have to create a test record in your Airtable database after you execute the scenario.
Follow these steps to test the scenario:
-
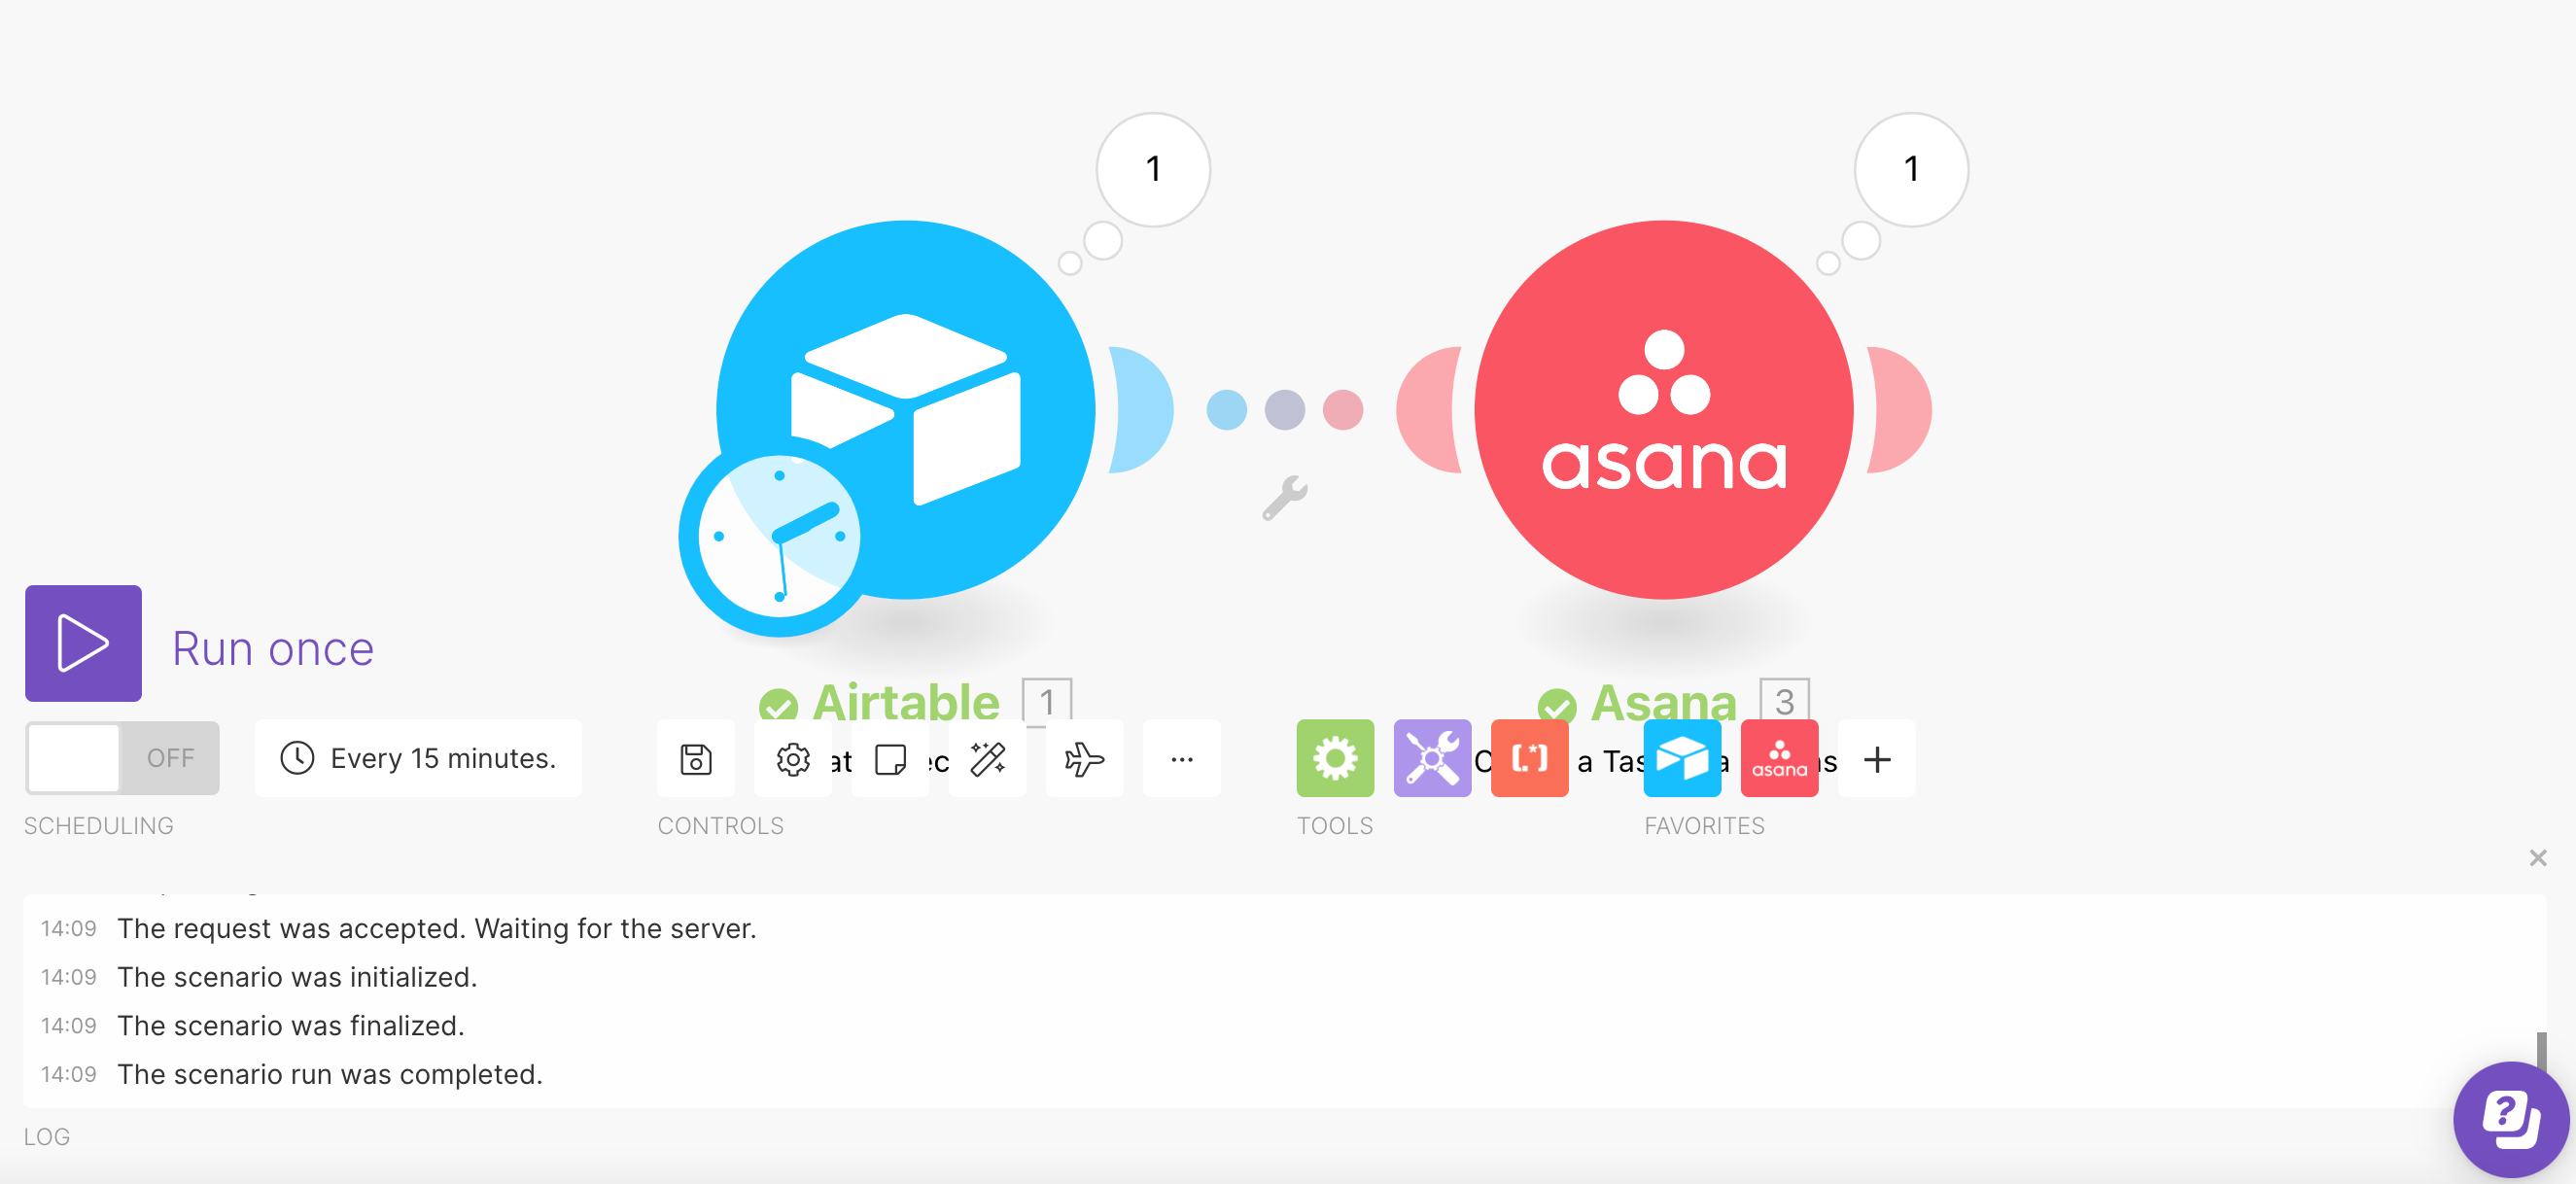
Click the Run once button run to execute the scenario. The Watch Records module now waits for new data.
-
Create a new record in the Airtable database.
-
Check your waiting scenario. If everything went well, the scenario should have already finished. When the scenario finishes, the Run Once button is active again and the modules in the scenario have bubbles with numbers above them.
-
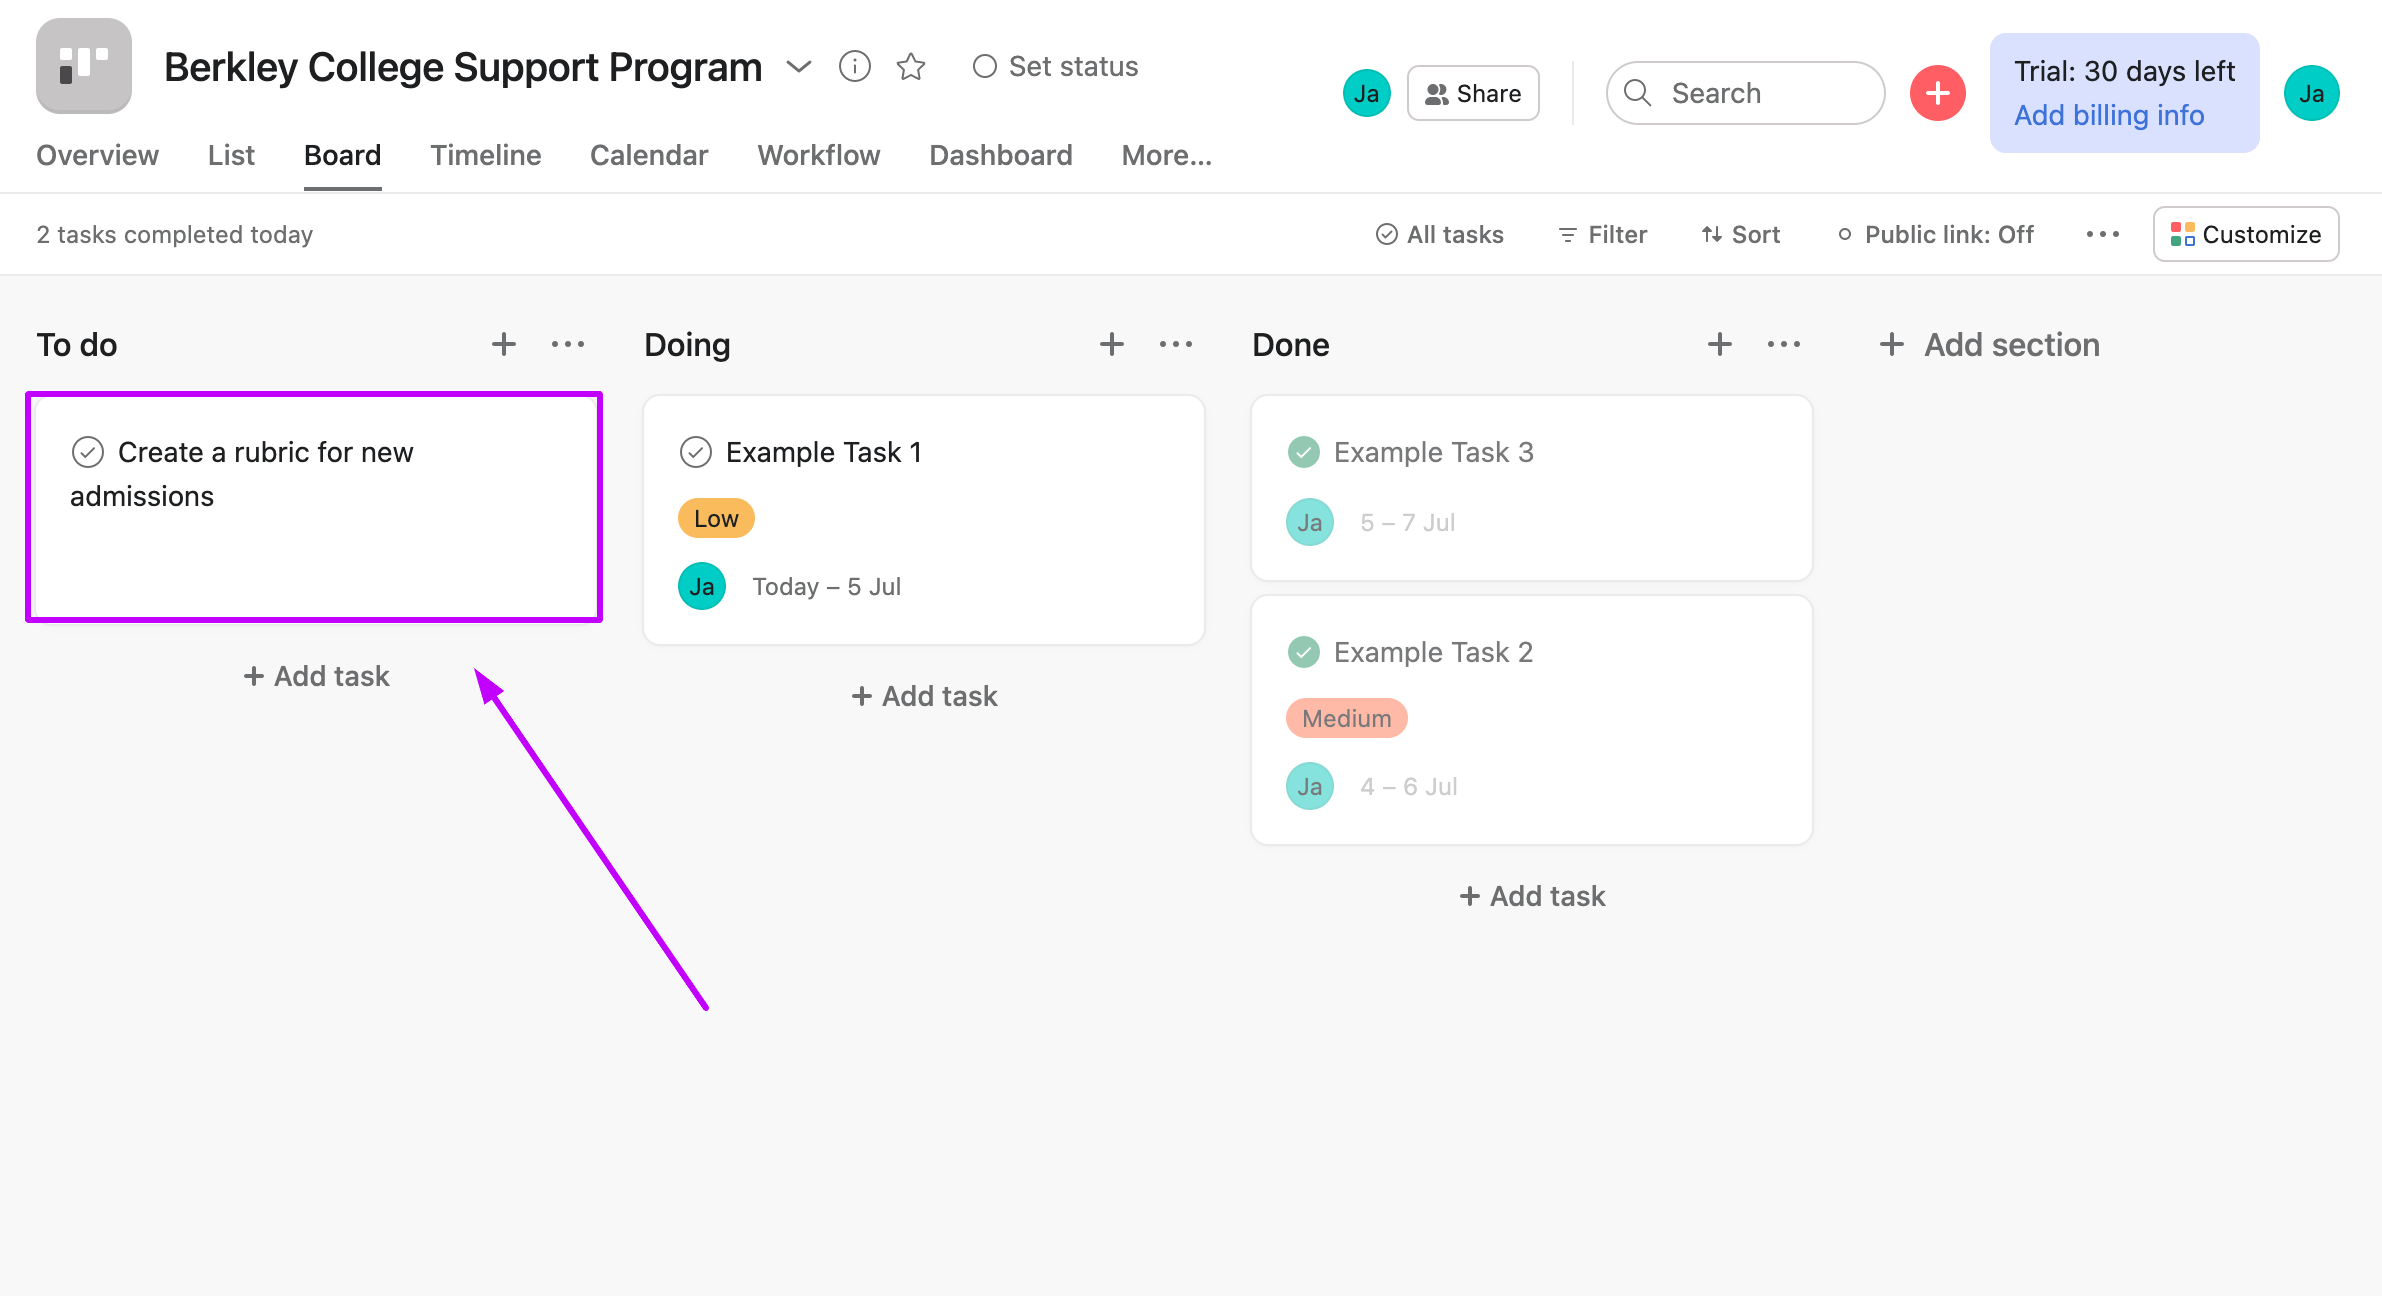
Check your Asana project board. There should be a new task created based on the data you added to your Airtable database.
After successful testing you can turn on the scenario scheduling with the Scheduling On/Off button and set how often should Ibexa Connect execute the scenario. Read more about scenario scheduling.
Use case 2: Create or update a record in Airtable with data from another app
In the next example, we will create a workflow that stores booking information to Airtable when a new event is created in Calendly. Calendly is a scheduling platform that simplifies scheduling meetings between different organizations. You can read more about Calendly on the Calendly homepage.
Your database in Airtable will have two tables: Contacts and Touchpoints. The Contacts table will contain information about the people you meet. The Toupoints table will contain information about your meetings. Together, these tables will form a relational database.
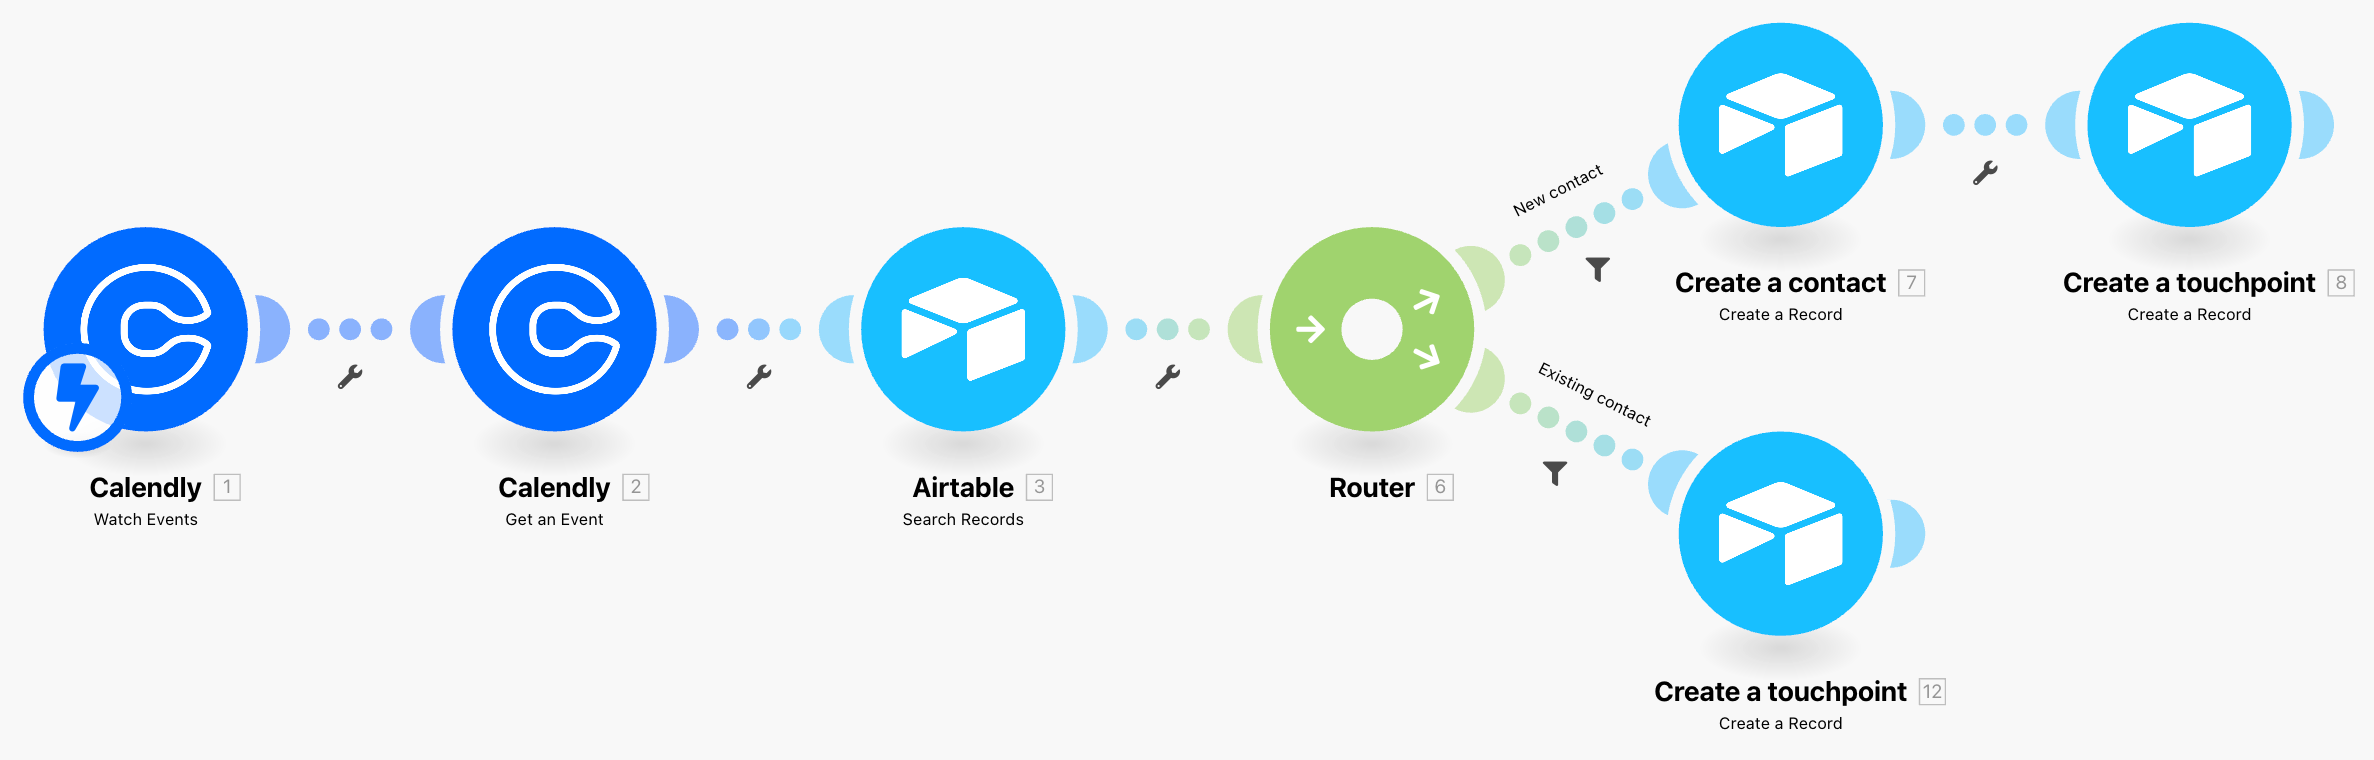
The scenario workflow consists of these steps:
-
Set up the trigger module
-
Get event info
-
Read data from Airtable
-
Split the scenario flow with the Router module
-
Create a new contact
-
Create a new touchpoint
-
Test and schedule your scenario
You can use this scenario as part of your process to manage appointments with your clients.
Set up the trigger module
The trigger module is the first module in the scenario flow. The trigger module starts according to the scenario scheduling. The next modules in the scenario flow use the output data from the trigger module.
You will set up the Calendly Watch events module. This module retrieves the Calendly event identification link for every new or updated Calendly event.
Note
Calendly creates an event after you invite at least one participant to the event.
Note
You will need to have the Calendly account plan Professional or higher to be able to connect it with Ibexa Connect. Check the Calendly pricing page.
-
Click Create a new scenario in your Ibexa Connect account dashboard.
-
Click the big plus icon. At the bottom of the pop-up window use the search field to find the "Calendly" app.
-
Click on the Calendly app field. In the next selection, choose the Watch Events module.
-
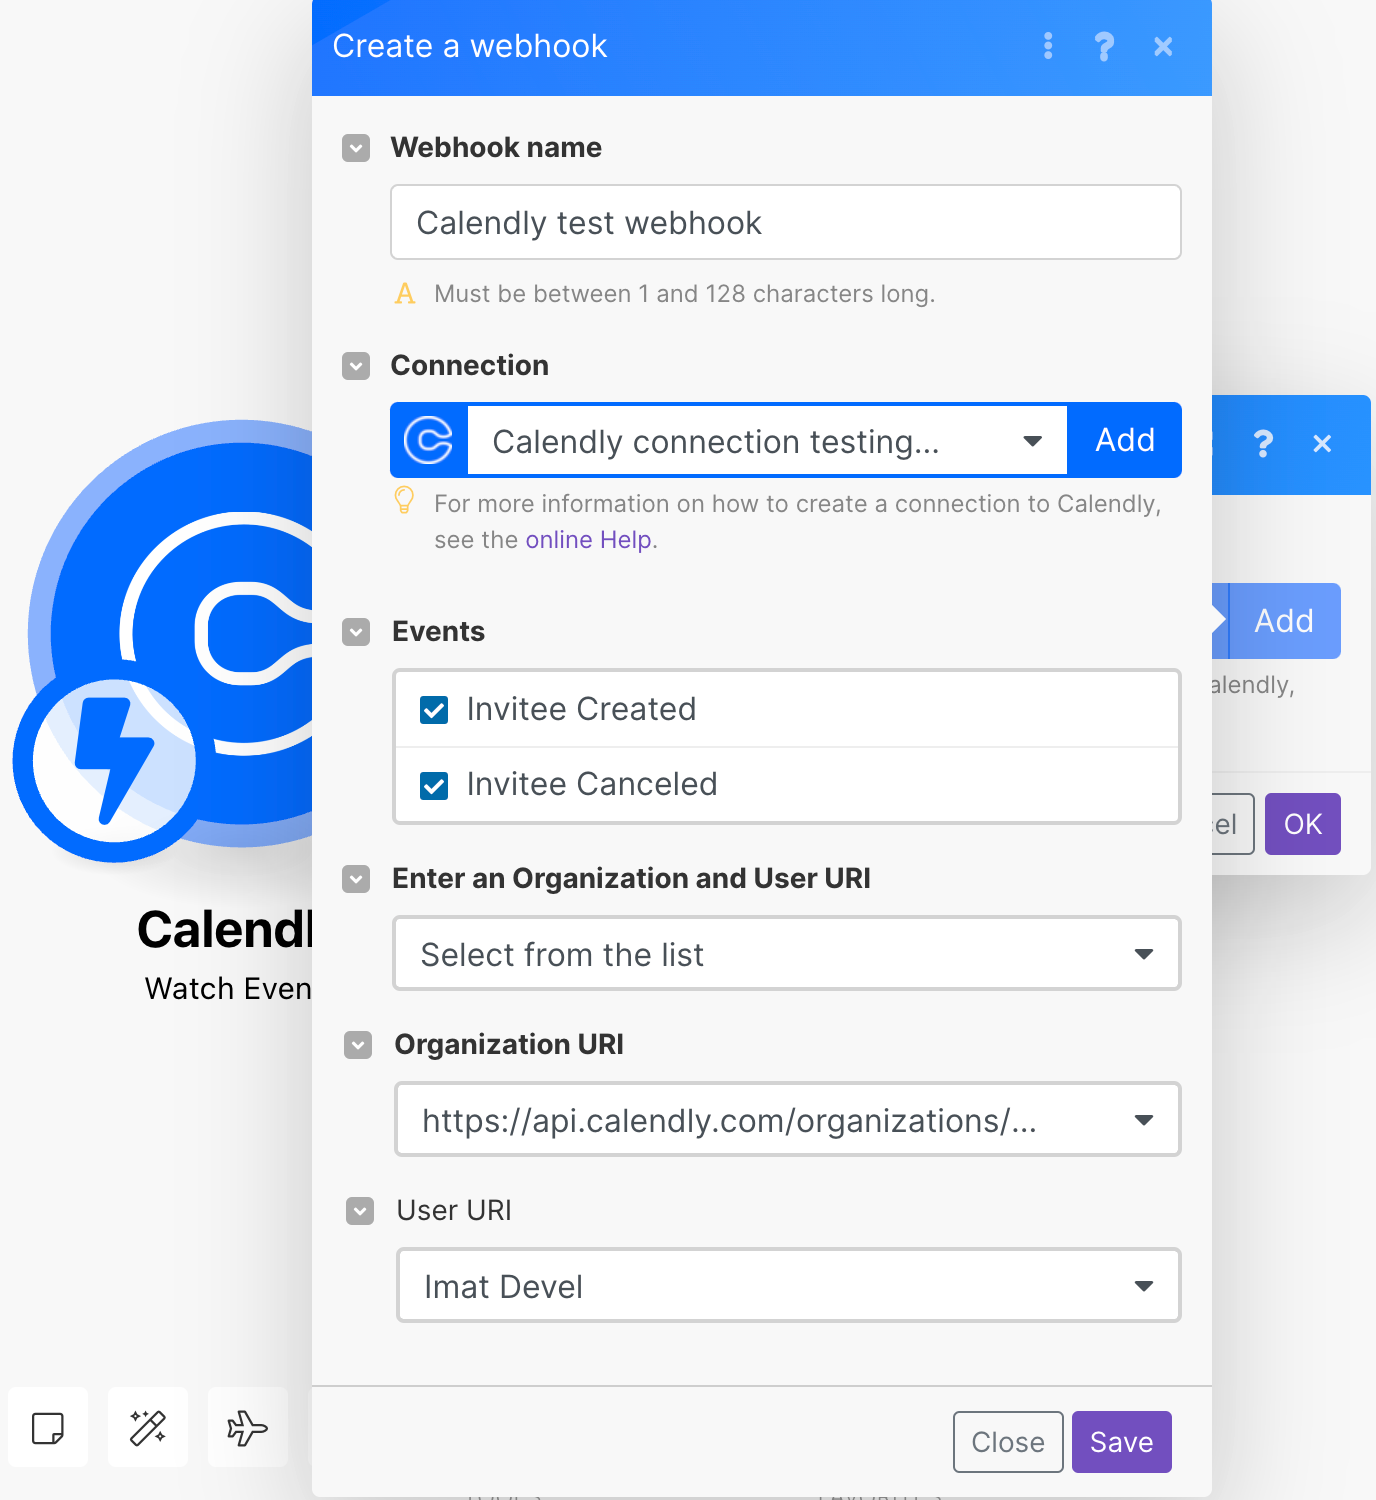
Click the Add button to add a webhook to the Watch events module. The Watch Events module needs a webhook to trigger every time when an appointment is added or modified. Read more about triggers.

Note
The blue lightning icon on top of the Calendly app indicates that this module is an instant trigger.
-
In the next pop-up window fill in the Webhook name and choose a Calendly connection. If don't have a Calendly connection follow the steps in the Connecting Calendly to Ibexa Connect section.
-
Fill in the rest of the Watch Events webhook settings.
-
Check the events you want to watch in the Events selection box.
-
In the drop-down Enter an Organization and User URI, choose the Select from the list option.
-
In the Organization URI drop-down, select your organization.
-
in the User URI drop-down, select your user name.
-
-
Click the Save button to finish the webhook settings. Click the OK button to confirm the settings of the Watch Events module.
You have set up the Calendly Watch Events trigger module. This module watches events in your Calendly account to keep your CRM up to date.
Scenario progress:
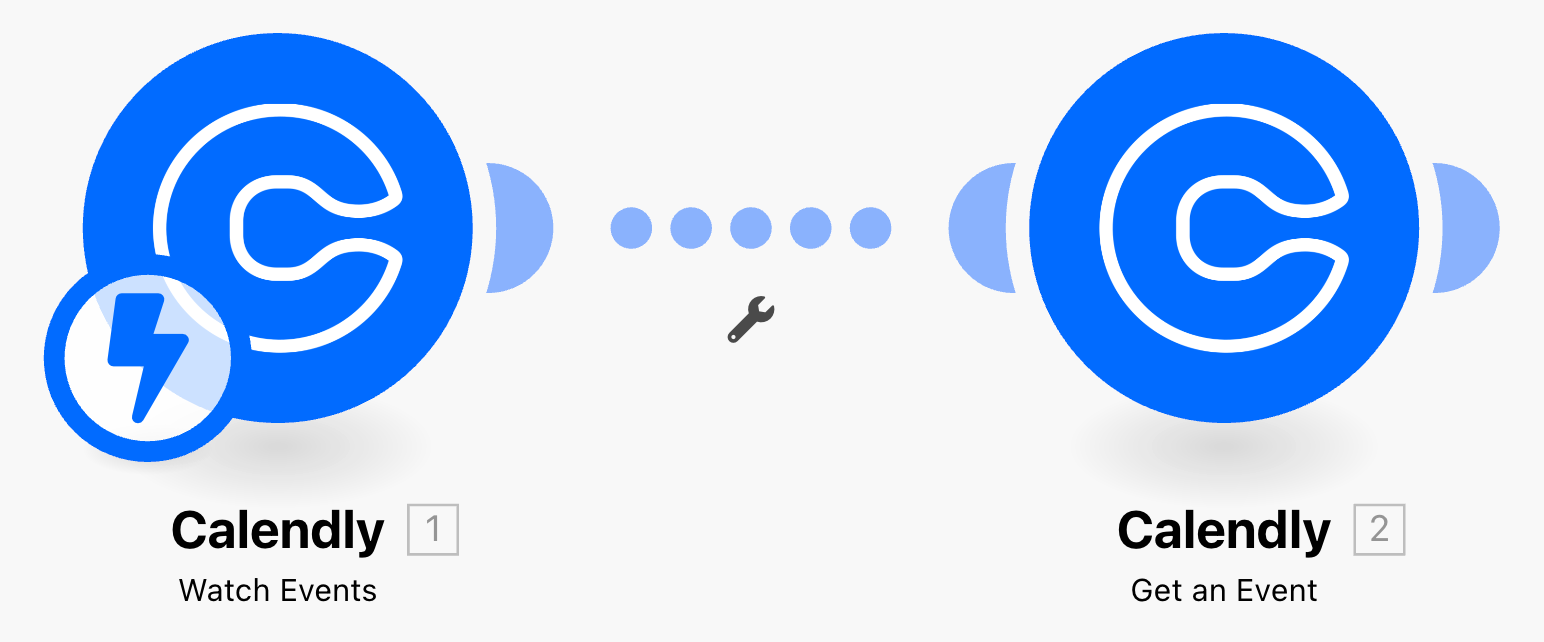
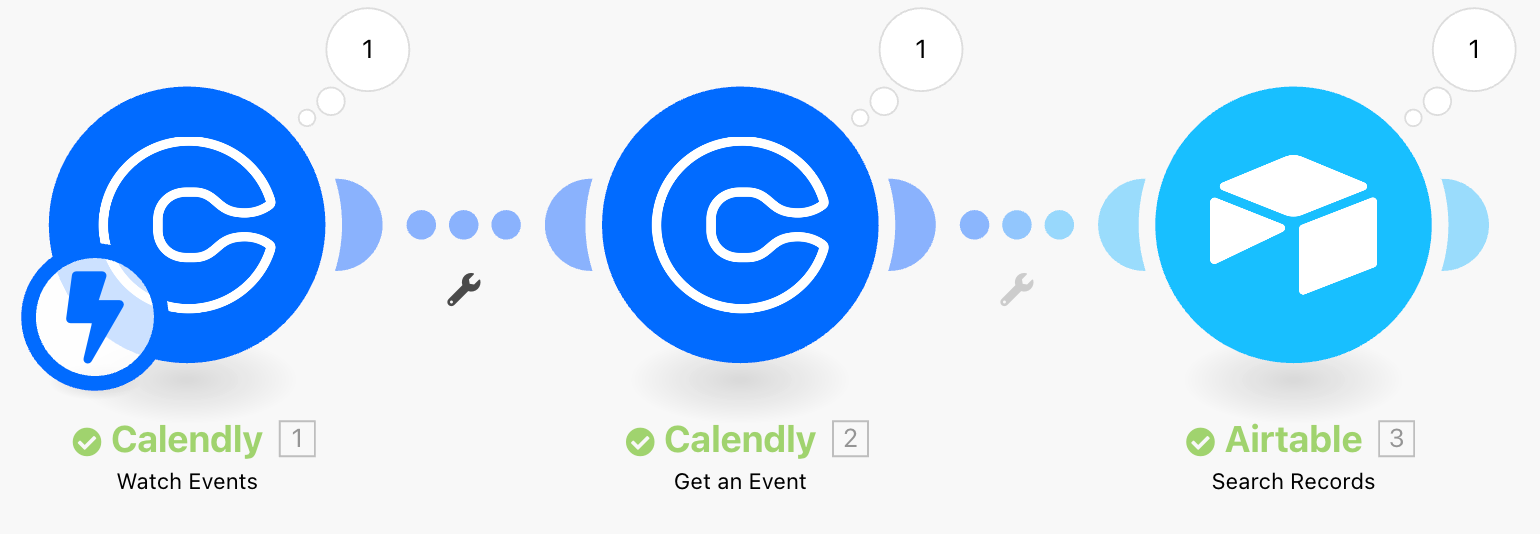
Get event info
The next module in the scenario workflow is the Calendly module Get an Event. This module retrieves additional information about an event, such as the start time and end time of the event, and contact information of the event participants.
The trigger module outputs the event link. You will use this link in the Get an Event module.
-
Hover over the Watch events module and click Add another module.
-
Choose Calendly app and then Get an Event module.
-
in the module settings Connection field, choose your Calendly connection.
-
Map the Event variable to the Event field.
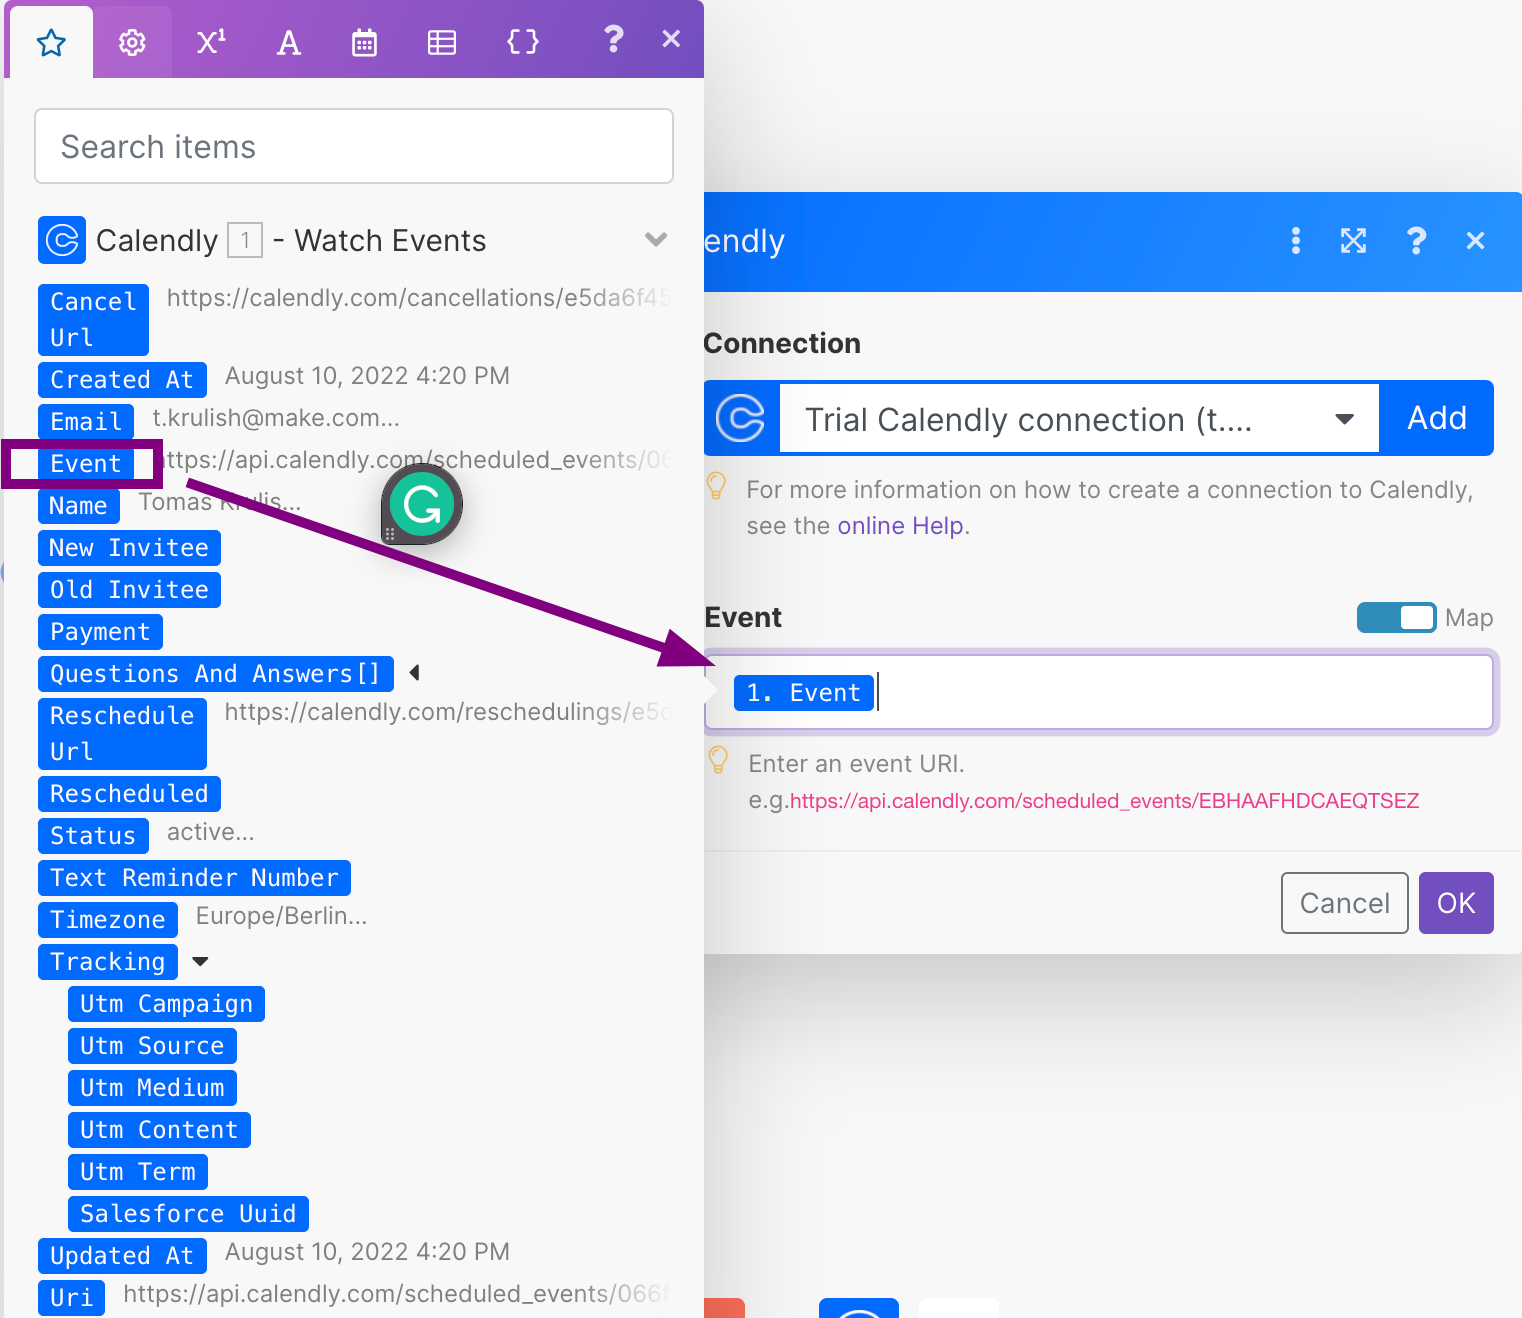
You can read more about mapping on the Mapping page.
-
Click the OK button to save the module settings.
You have set up the Calendly Get an event module. The Get an event module retrieves information about an event. You will store the additional information in Airtable in the following steps.
Scenario progress:
Read data from Airtable
Now we can start working with the Airtable app. The next steps guide you through creating a new database in Airtable. The database will store data about your contacts and meetings.
Next, you add the first Airtable app module to your scenario. The Airtable app module Search Records reads data from a table, then outputs the data that fit the search criteria.
You will use data output from this module to determine whether the meeting is with a new contact, or with a contact that you already have.
Note
This guide suggests a specific Airtable database and table layout. If you want to use your already existing database adapt the steps accordingly.
-
Create a new database in Airtable called Meetings. Check out the official Airtable help for tips on how to navigate in Airtable.
-
Setup the Contacts and Touchpoints tables in Airtable.
The Contacts table with the columns:
Field name Field type Description Email Single line text The contact email Name Single line text The contact name Touchpoints Linked field Displays data from the Touchpoints table The Touchpoints table with the columns:
Field name Field type Description Event name Single line text The name of the event Start time Date Date and time when the event starts Source Single select The source of the event Contacts Linked field Displays the corresponding contact name from the Contacts table -
Add the Airtable app module Search Records to the scenario.
-
In the Connection drop-down field, choose your Airtable connection. If you don't have an Airtable connection set up, refer to the Connect Airtable to Ibexa Connect page.
-
In the Base drop-down, choose the Meetings database. In the Table drop-down field, choose the Contacts table. Select the default Grid view in the View drop-down field.
-
Fill in the Formula field as in the screenshot. The
{Email}is the name of the field in the Contacts table, and the variable in the quotation marks is mapped from the output of the Watch Events module.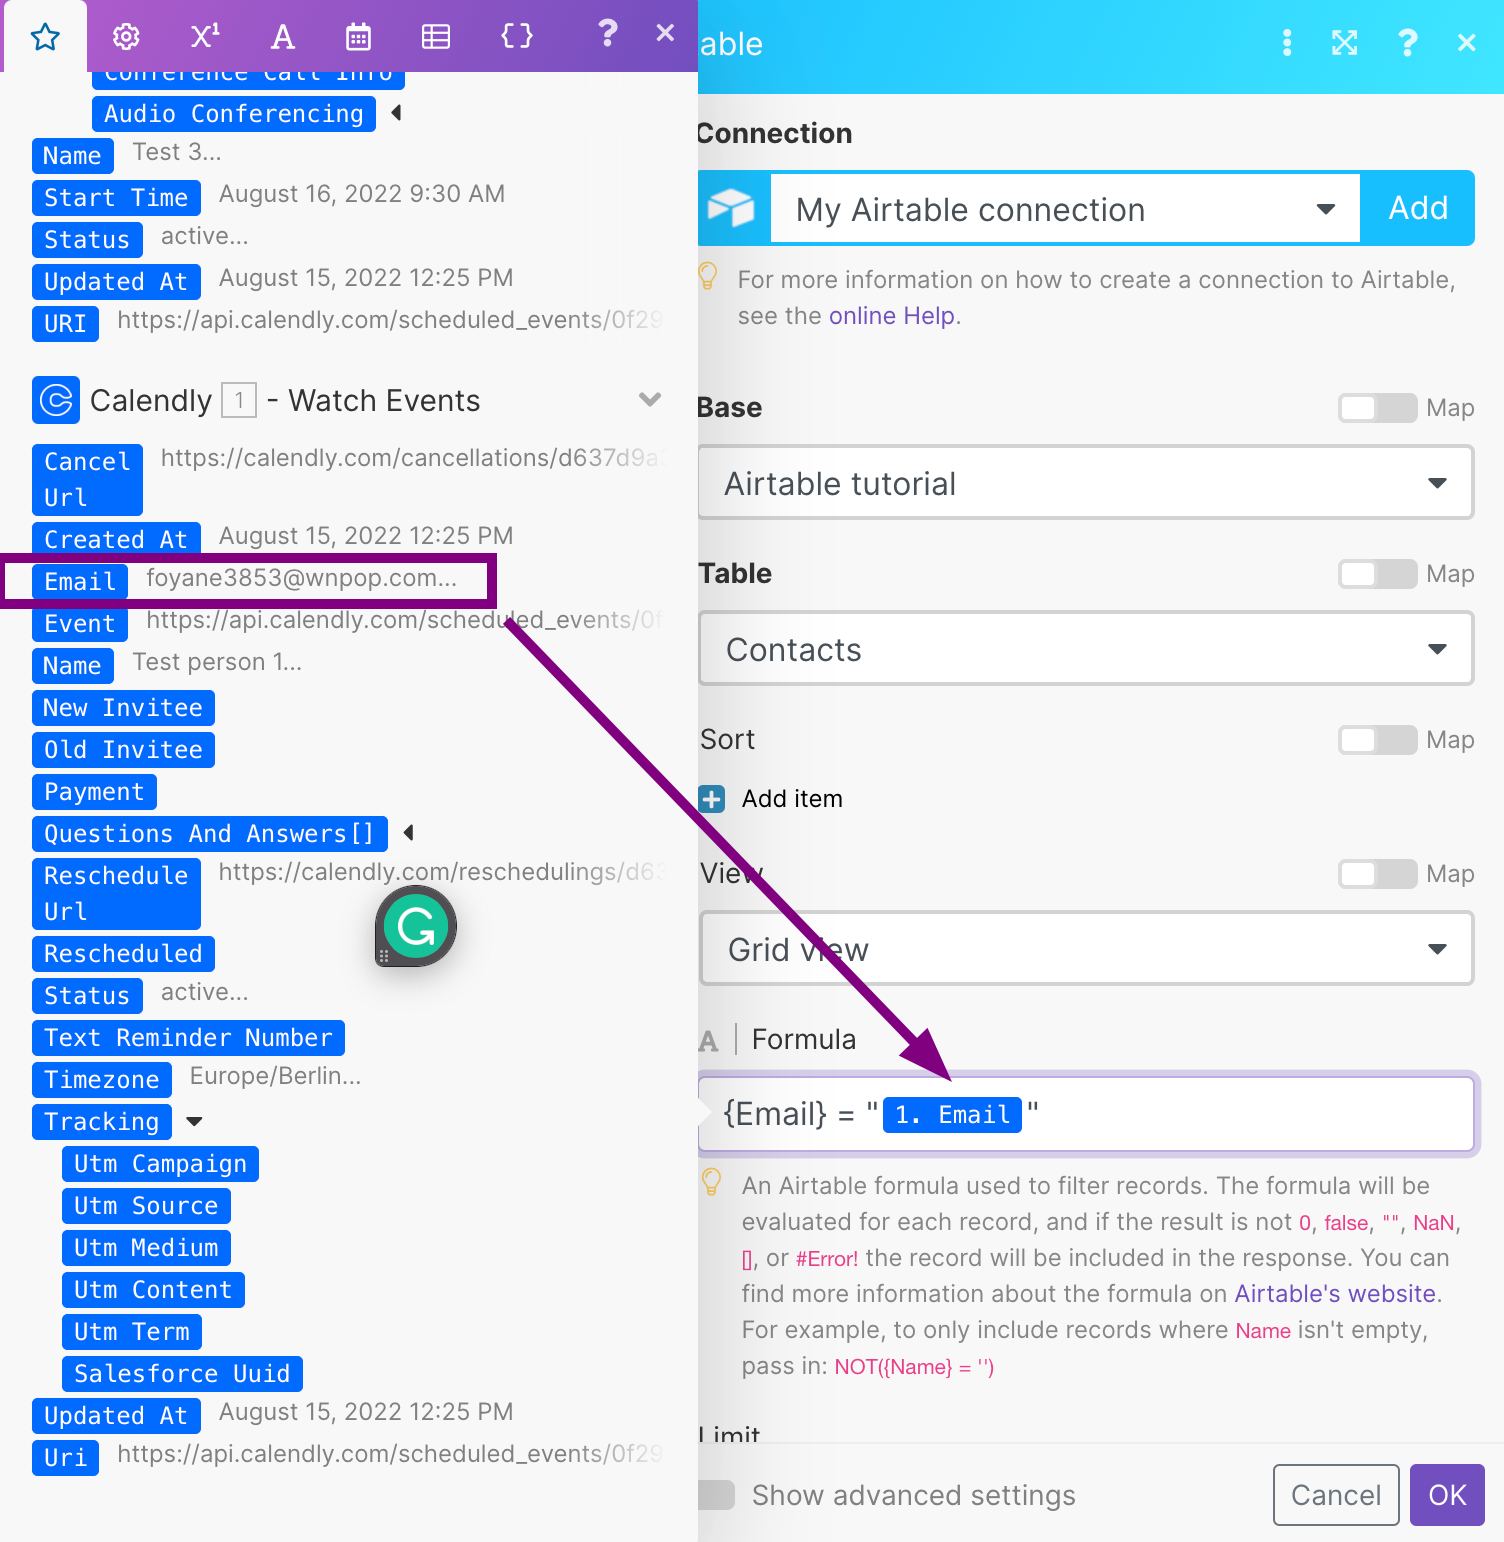
-
Click the OK button to confirm the module settings.
You have set up the Airtable Search Records module. The Search Records module reads data in the Airtable Contacts table. We will process the data in the next steps.
Scenario progress:
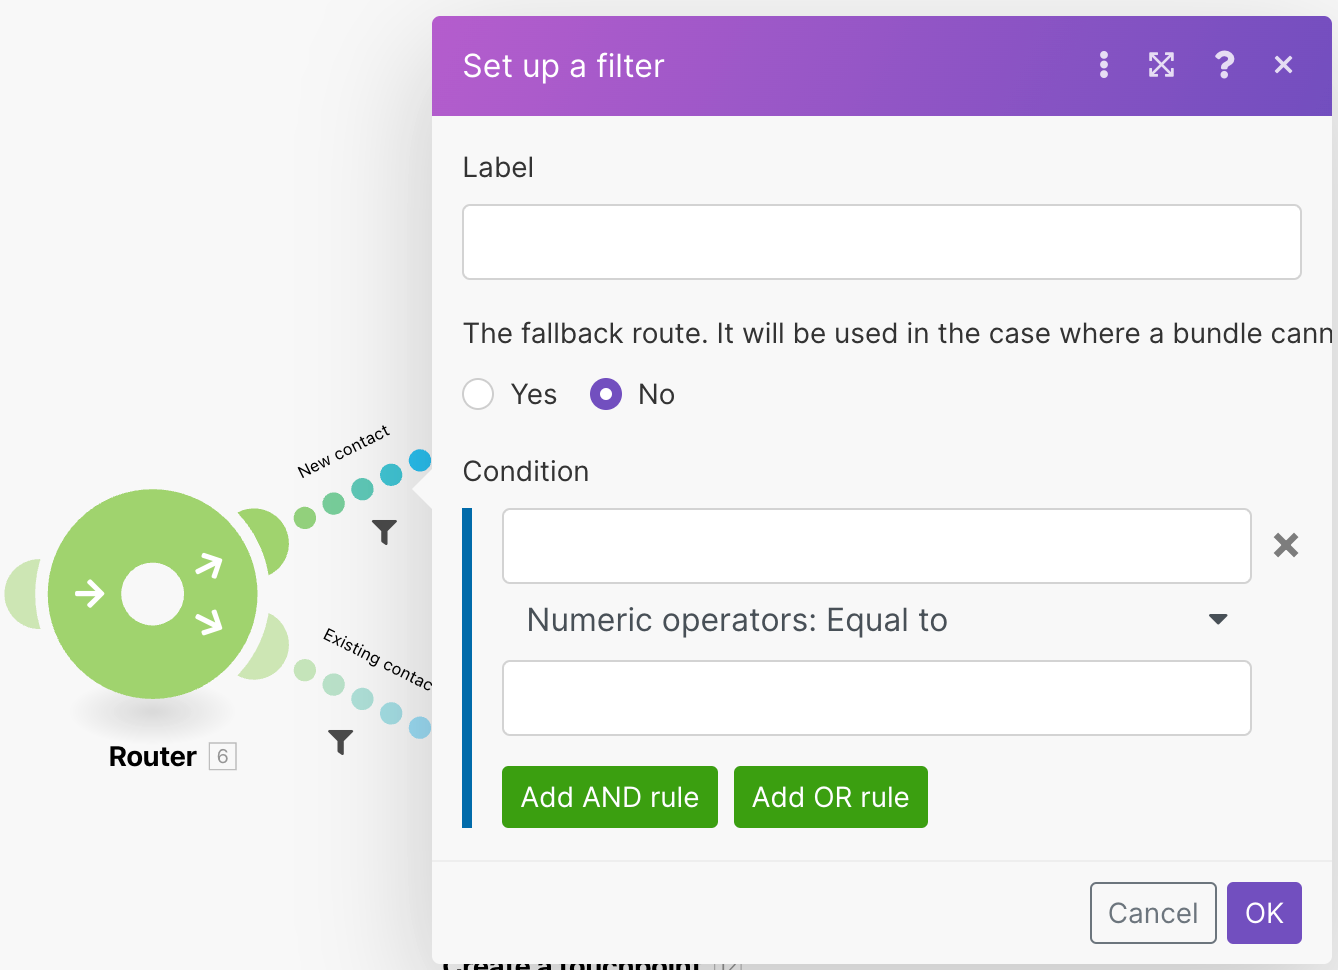
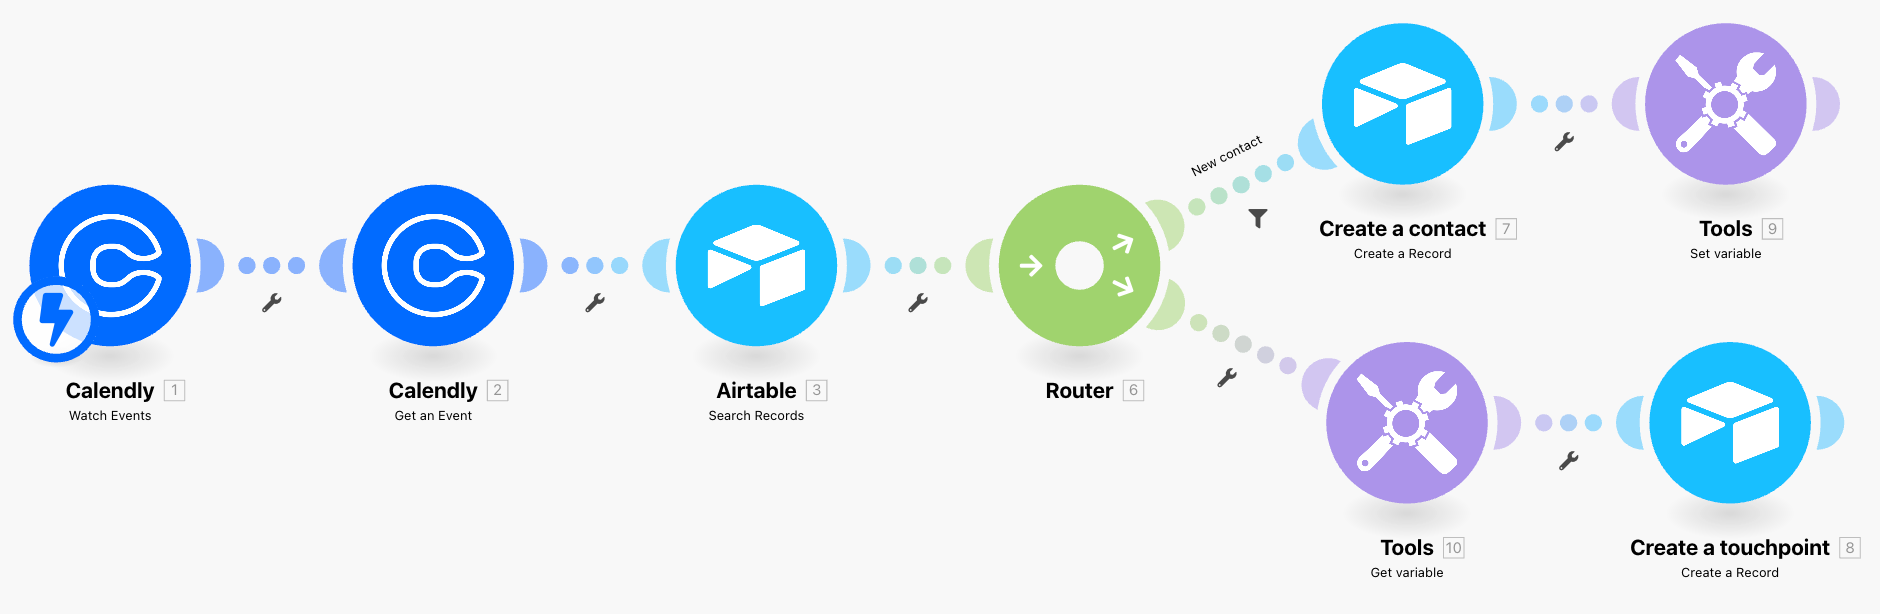
Split the scenario flow with the Router module
The Router module divides the data flow through your scenario into multiple paths -- routes. Router sends each piece of data it receives to each route. The routes are processed one by one in the same order that they were connected to the Router.
Read more about Router and scenario data flow in Ibexa Connect.
We will design the Router routes so that the first route creates a new contact and a new Calendly event with the new contact. The second route will create just a new event with an existing contact.
We will use the data output from the Search Records module to decide which route will be active.
-
Add the Router module to the scenario flow. It will create two new routes for you.
Note
You can add more routes by clicking the Router module.
-
Click the top dotted line from the router to the new module. A filter pop-up form appears.
-
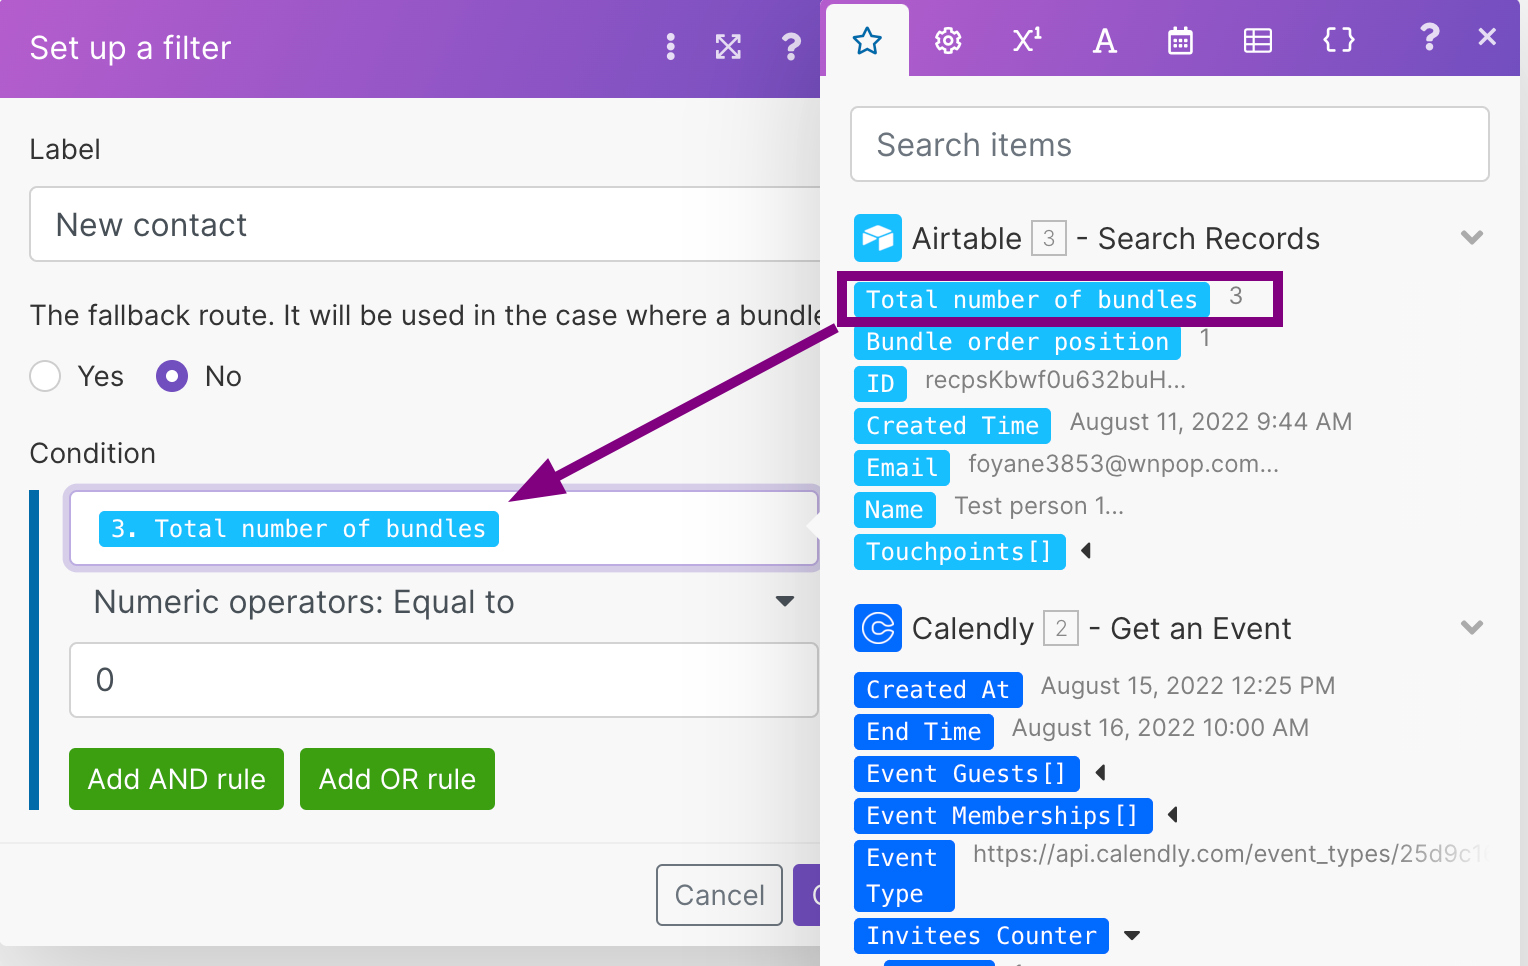
Fill in the label for the filter. We will label the filter as New contact.
-
Set the filter condition to the Total number of bundles of the Airtable Search records module. In the operator drop-down, select Numeric operators: Equal to. Fill in zero in the last text field.
-
Click the OK button to confirm the filter settings.
You have added a Router module and set up a Filter to the first split route to create a new contact. If the contact mail is not found in the Contacts table, a new contact will be created.
Scenario progress:
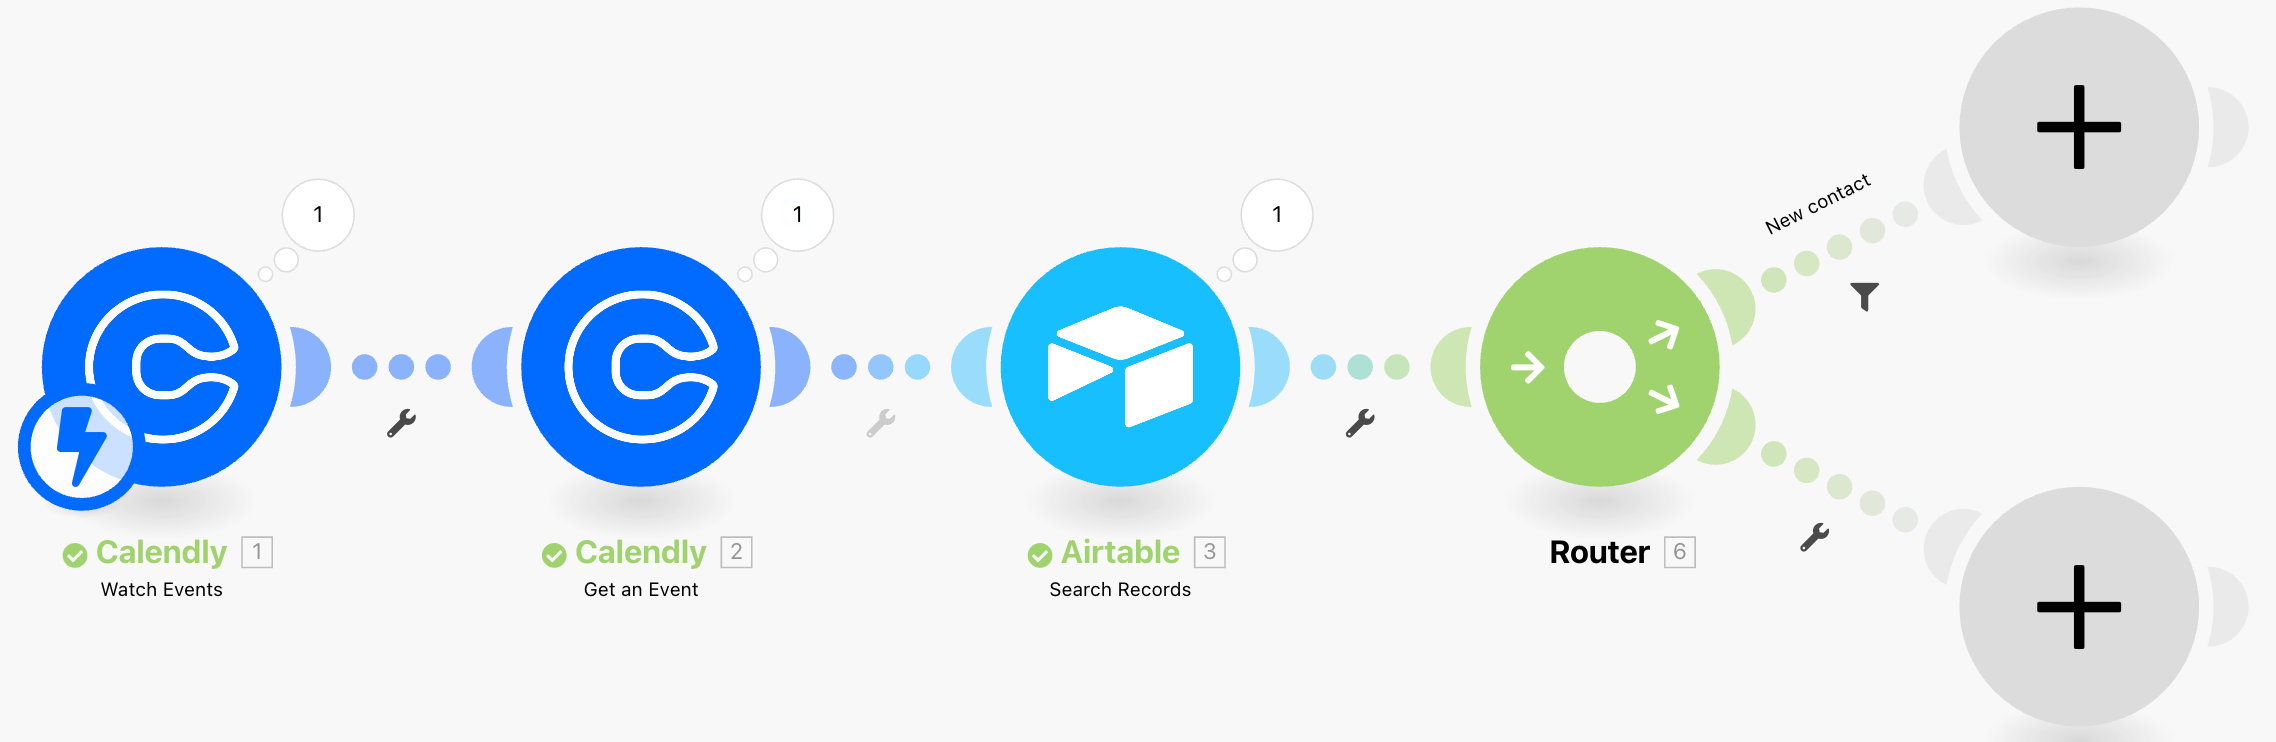
Create a new contact
In this step, we will work on the first route from the Router module. We will add the Airtable Create a record module to create a new contact in the Contacts table if the meeting contact is not in the Contacts table.
-
Add the Airtable Create a Record module instead of the plus in the top scenario route.
-
Right-click the Create a Record module. Choose the Rename action in the menu. Rename the module to Create a contact.
-
In the Connection drop-down, sSelect your Airtable connection. in the Base drop-down, select the Meetings database. In the Table drop-down field, select the Contacts table.
-
Map the
EmailandNamevariables from the Watch Events module to the Email and Name fields: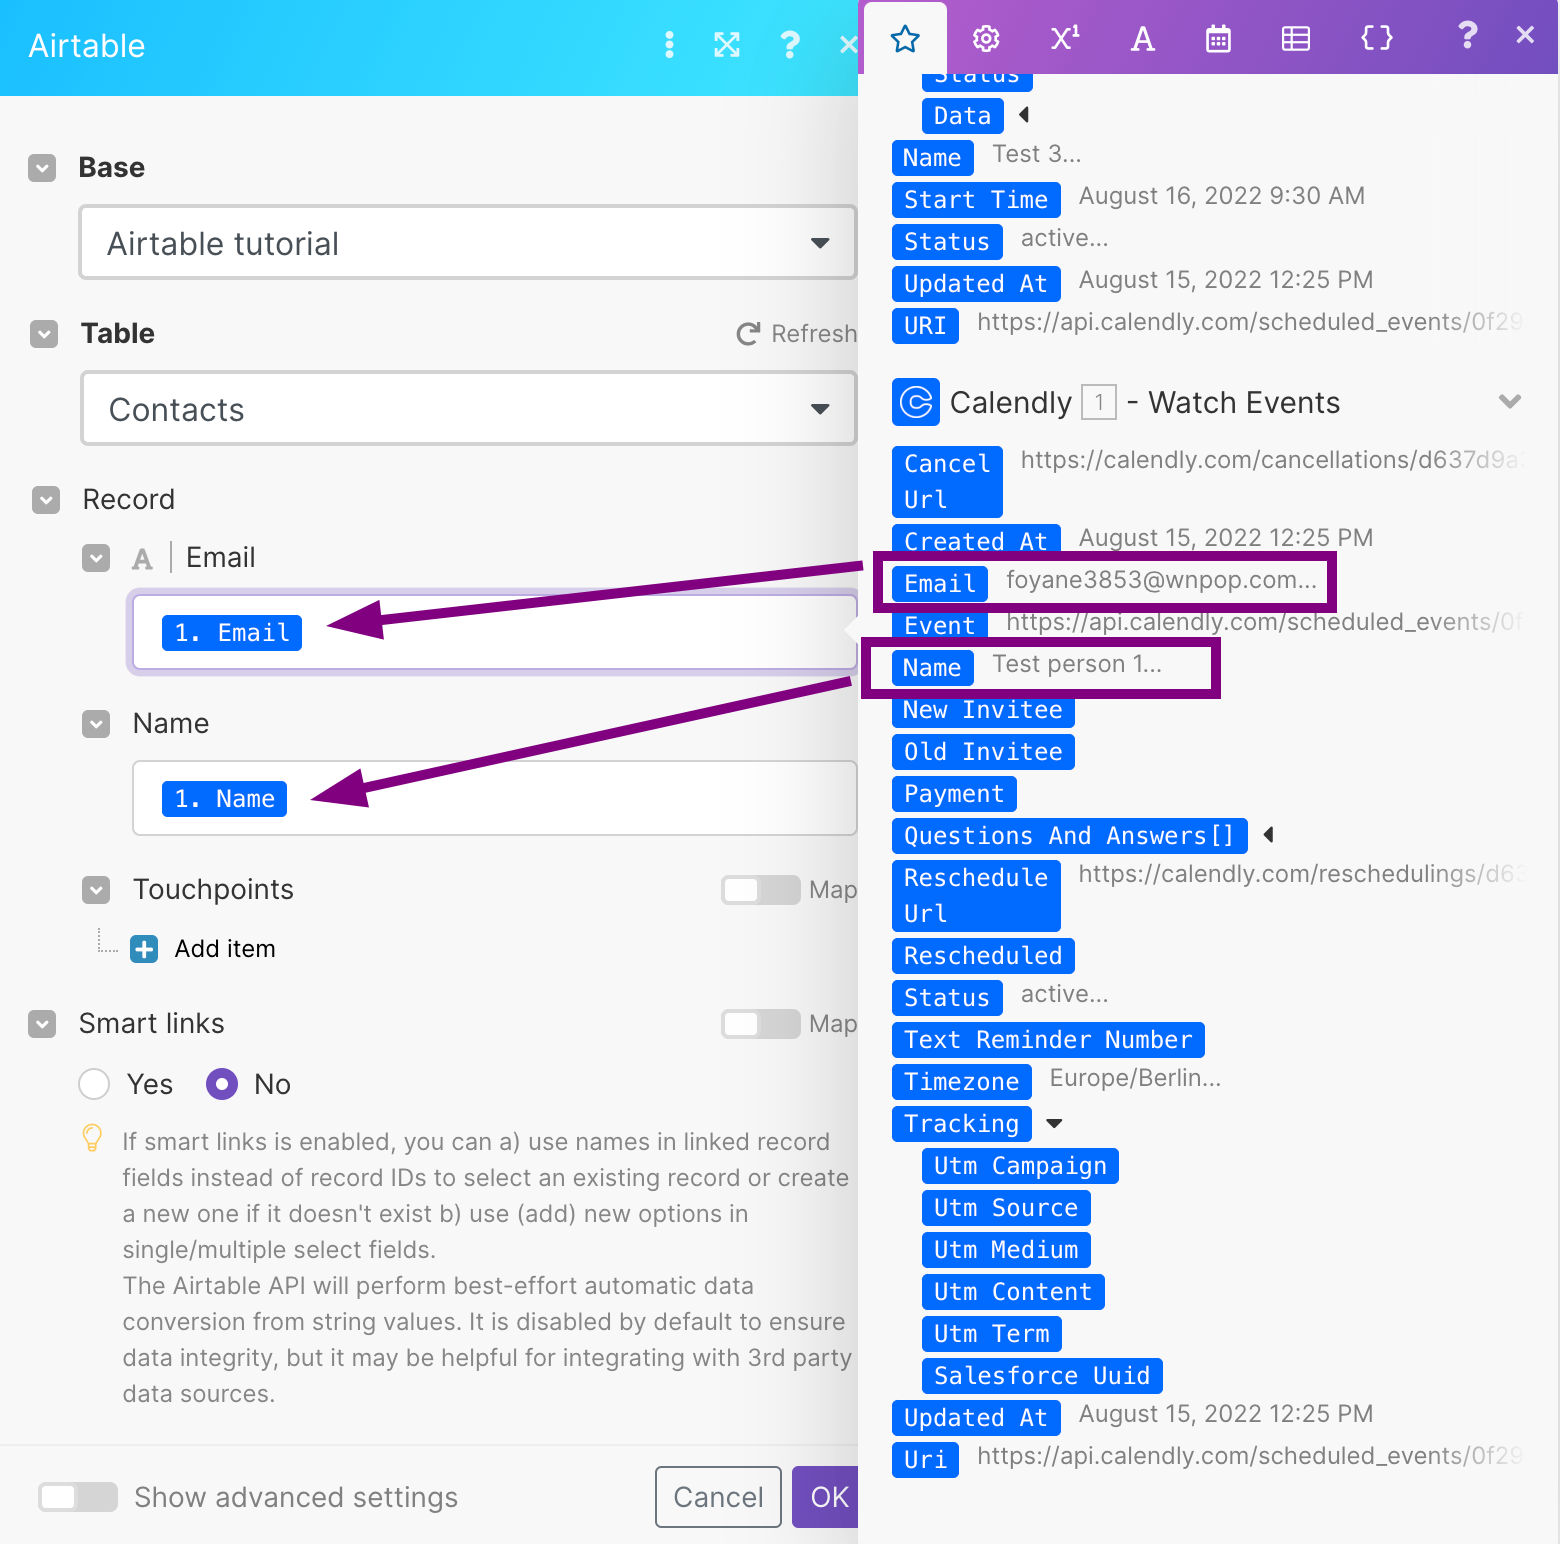
-
Click the OK button to confirm the module settings.
You have set up the Airtable Create a contact module. The Create a contact module creates a new record in the Contacts table when you create a new event with a contact that is not recorded in the Contacts table.
Scenario progress:
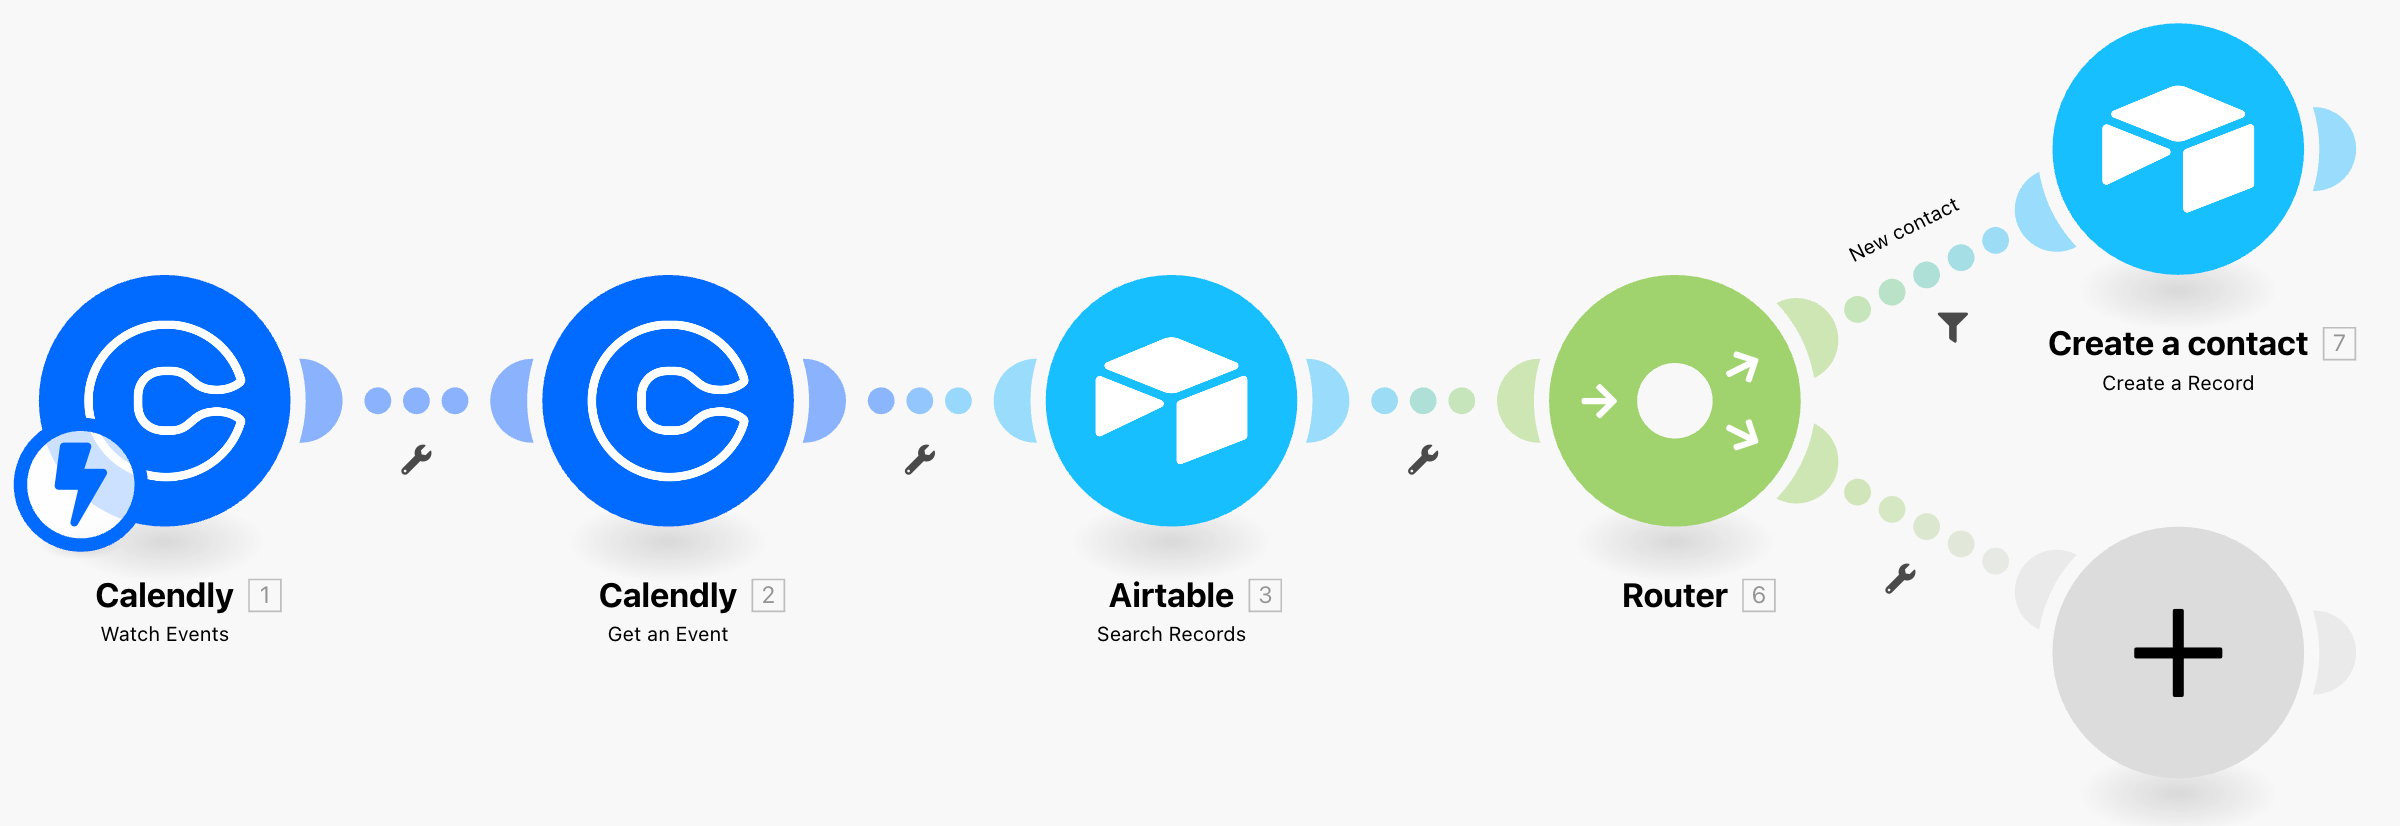
Create a new touchpoint
In this step you will use the Airtable Create a record module to create new meetings in the Touchpoints table. You will then clone the module to use it in both of the scenario routes.
-
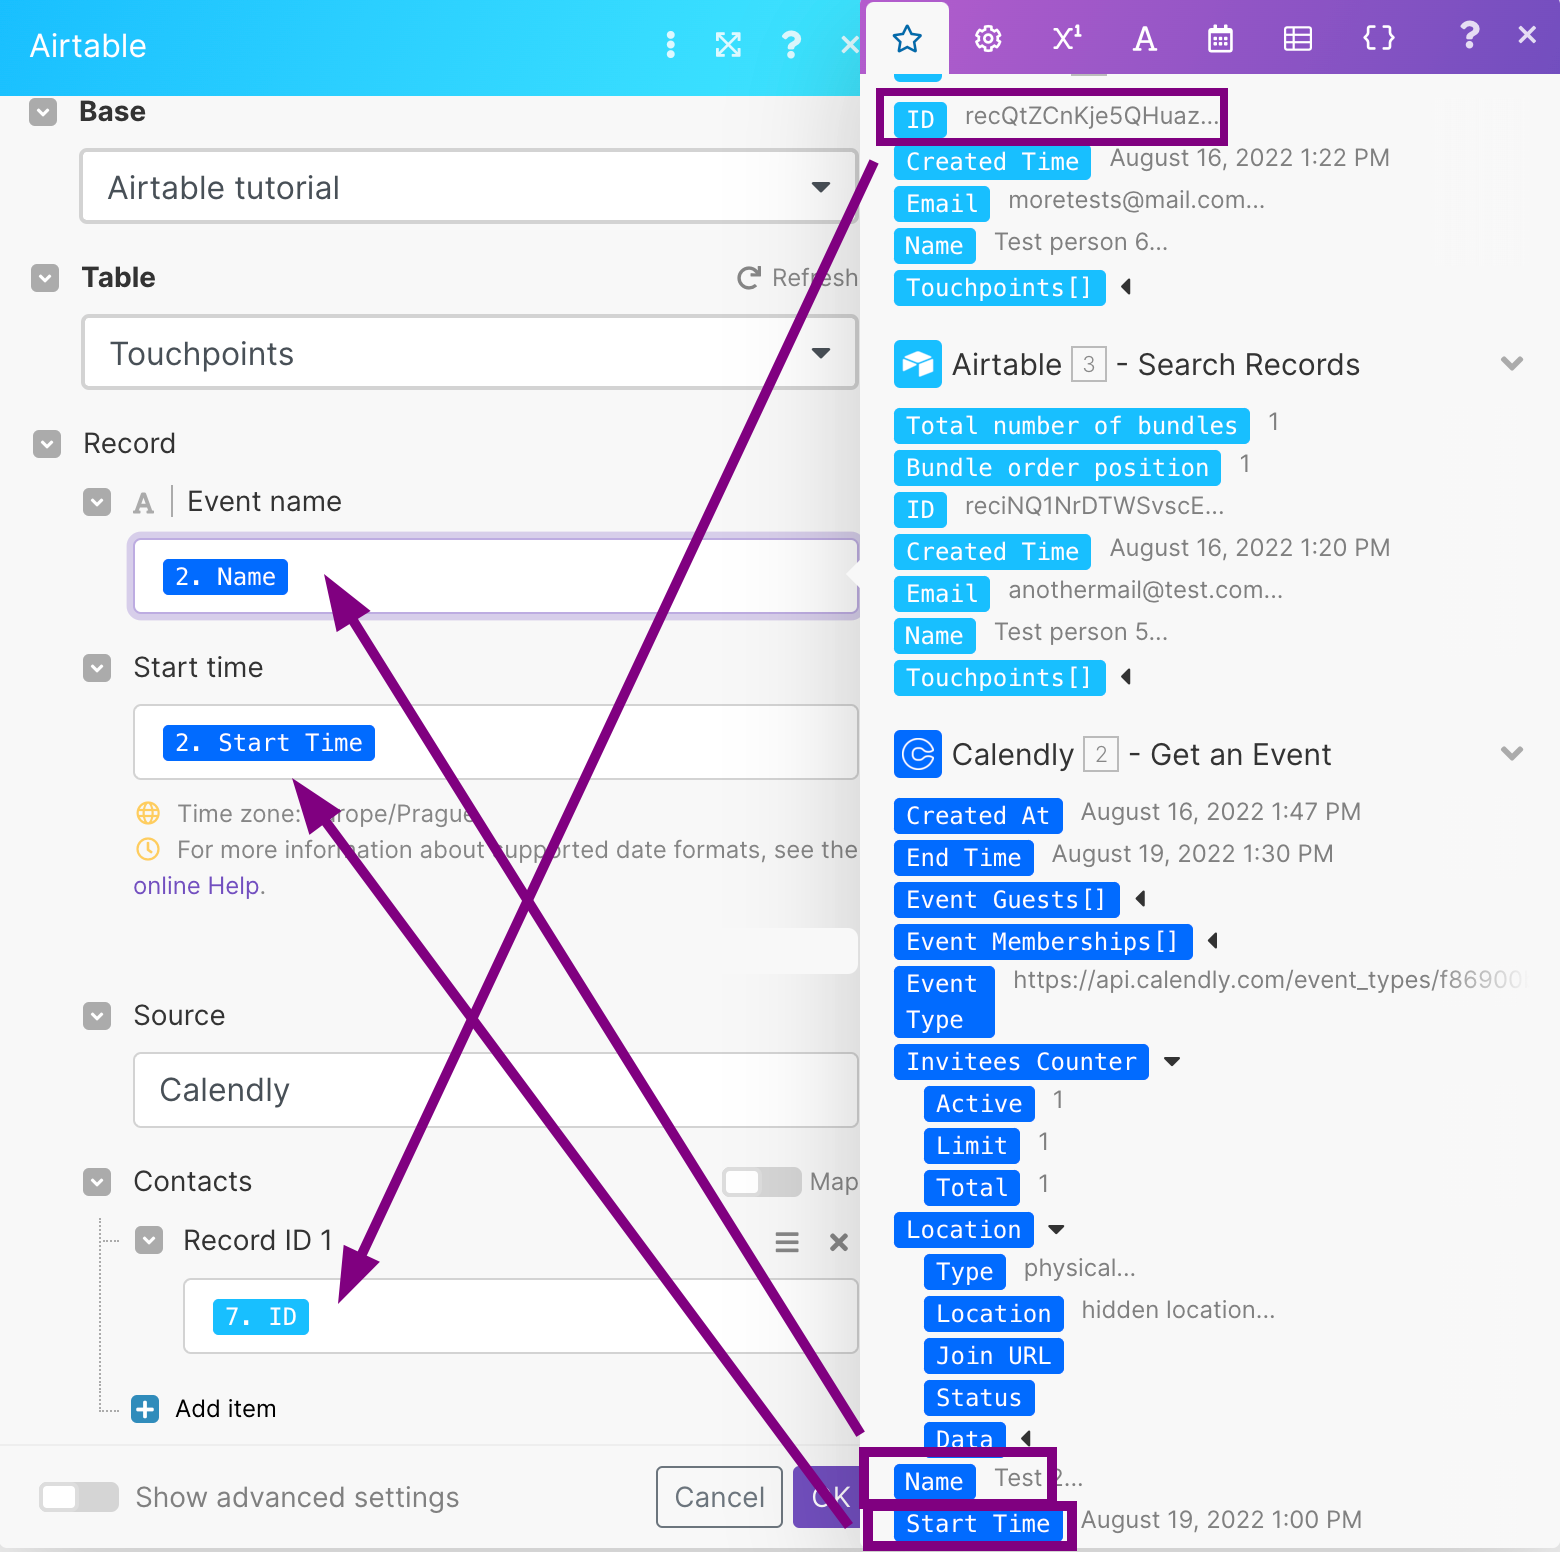
Add the Airtable Create a Record module after the Create a contact module.
-
In the Connection drop-down, select your Airtable connection. In the Base drop-down, choose the Meetings database. In the Table drop-down field select the Touchpoints table.
-
Map the output of the previous modules to the Create a Record module input:
-
Map the Name value to the Event name field.
-
Map the Start time value to the Start time field.
-
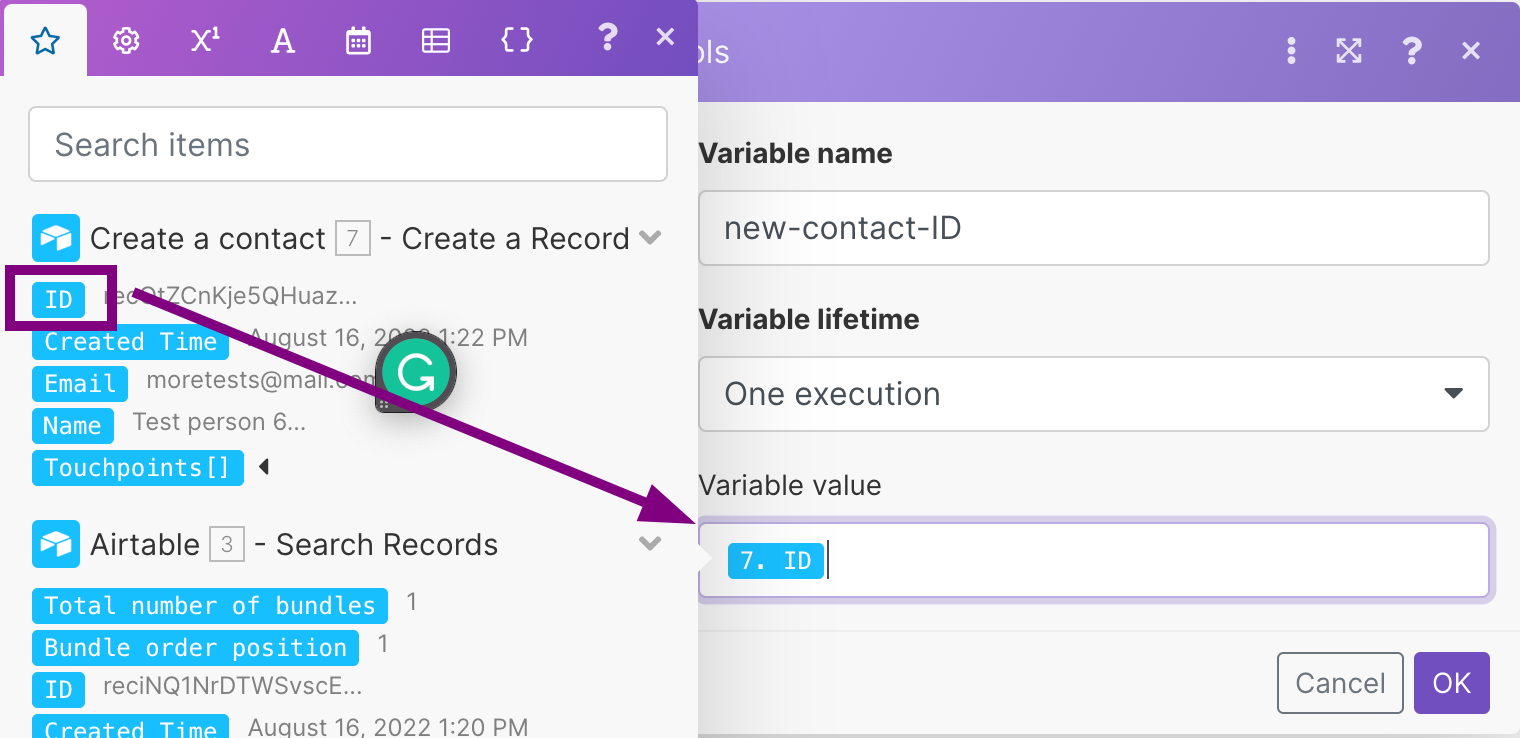
Map the ID value from the Create a contact module to the Contacts > Record ID 1 field.
-
-
Click the OK button to confirm the module settings.
-
Right-click the Create a Record module. Choose the Rename action in the menu. Rename the module to Create a touchpoint.
-
Right-click the Create a touchpoint module and choose Clone in the actions menu. Another Create a touchpoint module pops out that is the exact copy of the original Create a touchpoint module.
-
Connect the cloned module to the Router module. That way, you create a new route in the scenario flow.
-
Check the cloned Create a touchpoint module settings. Update the Contact > Record ID 1 mapping to use the ID variable from the Search Records module. Click the OK button to save the updated module settings.
-
Click the dotted line that connects the Router module and the cloned Create a touchpoint module to create a filter. A form to set up a filter pops up:
-
Fill in the filter Label.
-
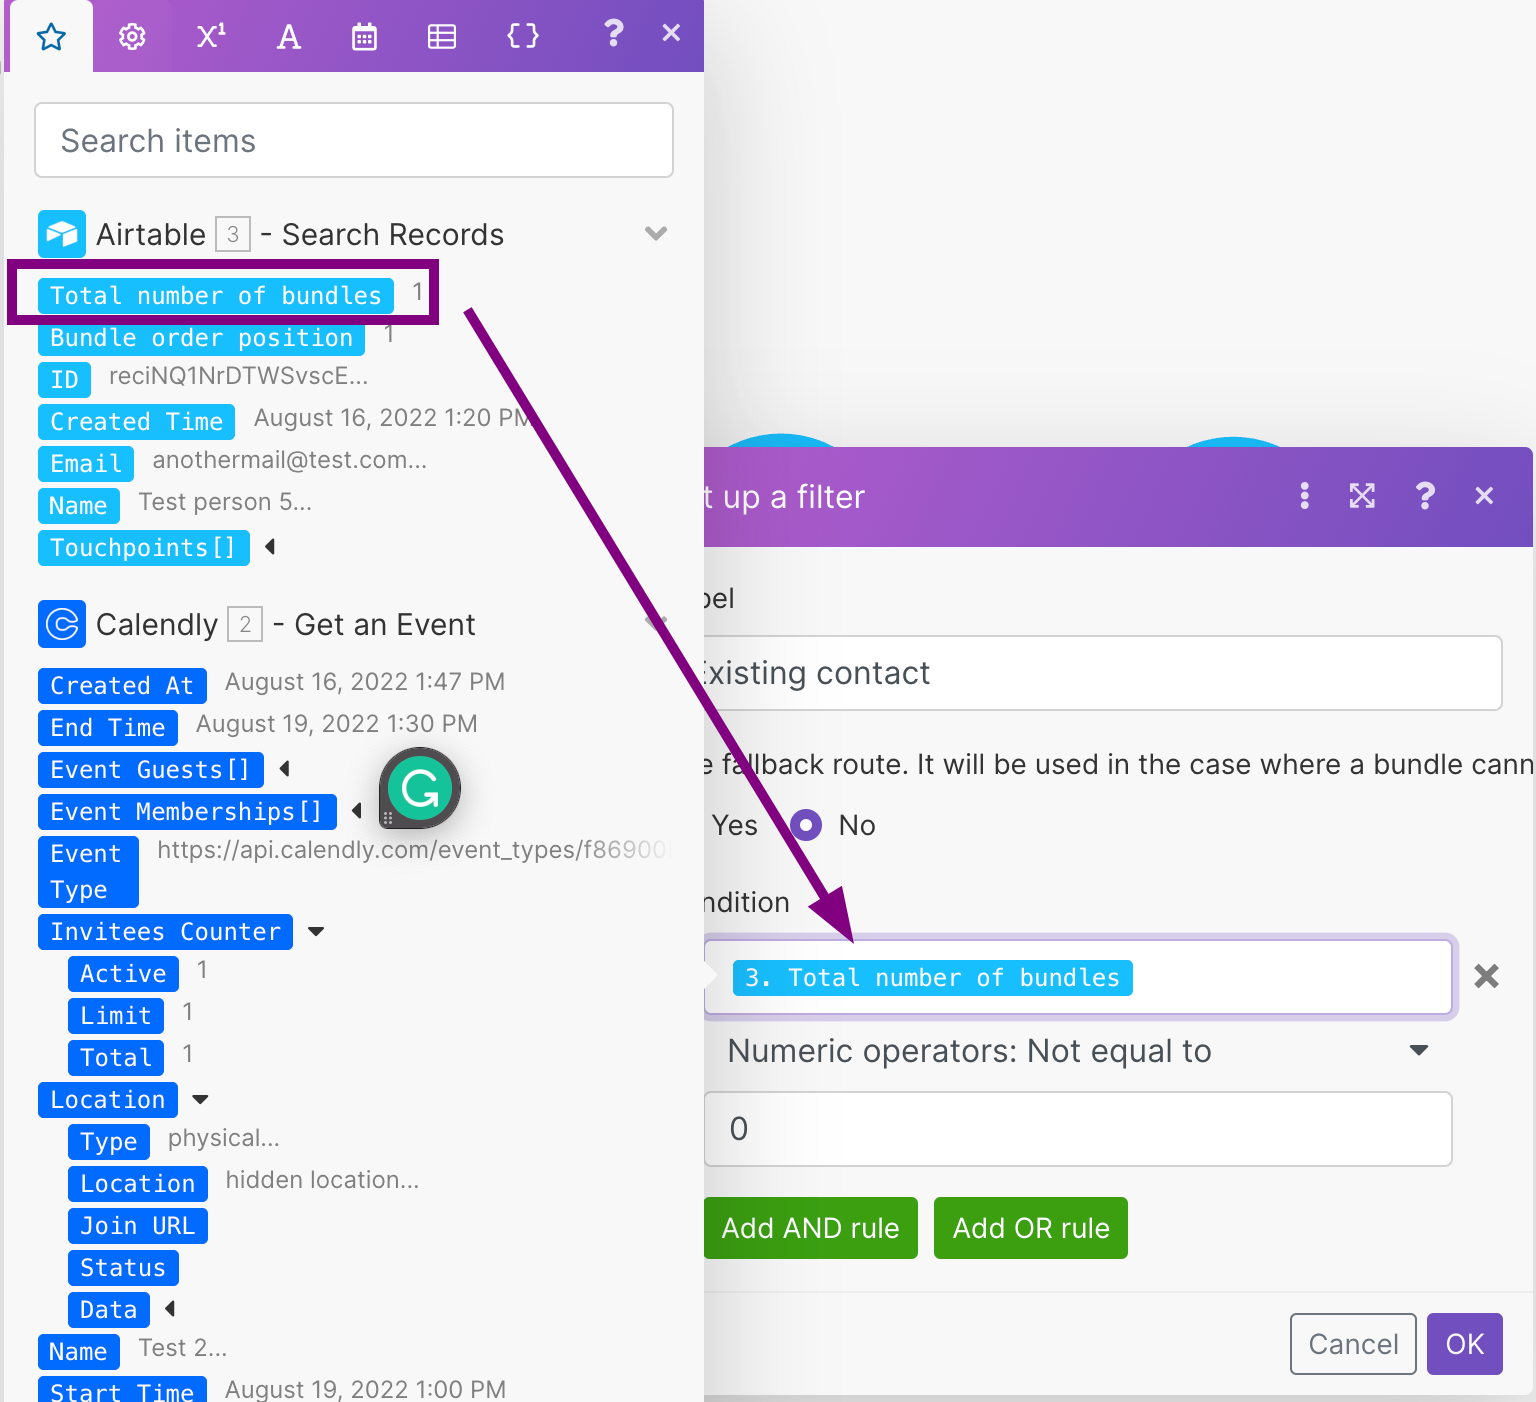
Set the filter condition to the Total number of bundles of the Airtable Search records module.
-
Select Numeric operators: Not equal to in the operator drop-down.
-
Fill in zero in the last text field.
-
You have setup the Create a touchpoint modules. The Create a touchpoint modules create a new record in the Touchpoints table when you create a new event in Calendly.
Scenario progress:
Test and schedule your scenario
When you are finished with designing a scenario, you should test it. Ibexa Connect enables you to just run the scenario once and see if it works. If the scenario works the way you imagined, you can schedule the scenario to run automatically. Read more about scheduling a scenario.
When you start the scenario manually to test it, the scenario waits for data. This happens because we use a watch module as the scenario trigger. That means you have to create the test event in Calendly after you execute the scenario.
Follow these steps to test the scenario:
-
Click the Run once button to execute the scenario. The Watch Events module now waits for new data.
-
Schedule a new event in Calendly. Check the Calendly help on how to create a new event.
-
Check your waiting scenario. If everything went well, the scenario should have already finished. When the scenario finishes, the Run Once button is active again and the modules in the scenario have bubbles with numbers above them.
-
Check the tables in your Meetings Airtable database. They should contain the data you provided in the event you created in Calendly.
After successful testing you can turn on the scenario scheduling with the Scheduling On/Off slider and set how often should Ibexa Connect execute the scenario. Read more about scenario scheduling.
Use case 2: Create or update a record in Airtable with data from another app -- advanced
This guide builds on top of the guide in the previous section. The following points improve on the previous use case.
When you store information about a meeting, you might need information about the meeting duration. Also, in the previous workflow, you clone the Create a touchpoint module. This makes the scenario harder to maintain because if you change something in the Touchpoints table, you have to update two modules.
This improved workflow adds information about the duration of the meeting to the Touchpoints table and prevents module duplication.
To do that, this tutorial uses some of the advanced Ibexa Connect features.
Remove module duplication
You have created a clone of the Create a touchpoint module in the previous workflow. This approach is fast but has the downside of checking and maintaining two almost identical modules, which is error-prone.
When you create a contact in the Contacts table, the Create a contact module outputs the ID of the new contact. This is the only information that you need to transfer to the second scenario route where you create a new touchpoint.
Instead of having another Create a touchpoint module, you can store the ID value in a variable with the Set variable module and retrieve it with the Get variable module.
The following steps describe how to change the scenario design to avoid having two duplicate modules:
-
In the top Router path, remove the Create a touchpoint module. After the Create a contact module, add the Set variable module.
-
Fill in the Variable name. For example new-contact-ID. Set the Variable lifetime to One execution. Map the Variable value to the ID value output from the Create a contact module.
-
Click the OK button to confirm the module settings.
-
Remove the filter in the bottom scenario route. The bottom scenario route will be always active in the new scenario design.
-
Right-click the dotted line between the Router and Create a touchpoint modules. Choose Add a module from the actions menu. Select the Get variable module.
-
Fill in the same variable name in the Variable name field as you used in the Set variable module.
-
Change the mapping in the Create a touchpoint module in the Contacts > Record ID 1 field. Map the Record ID 1 field to ID OR new-contact-ID.
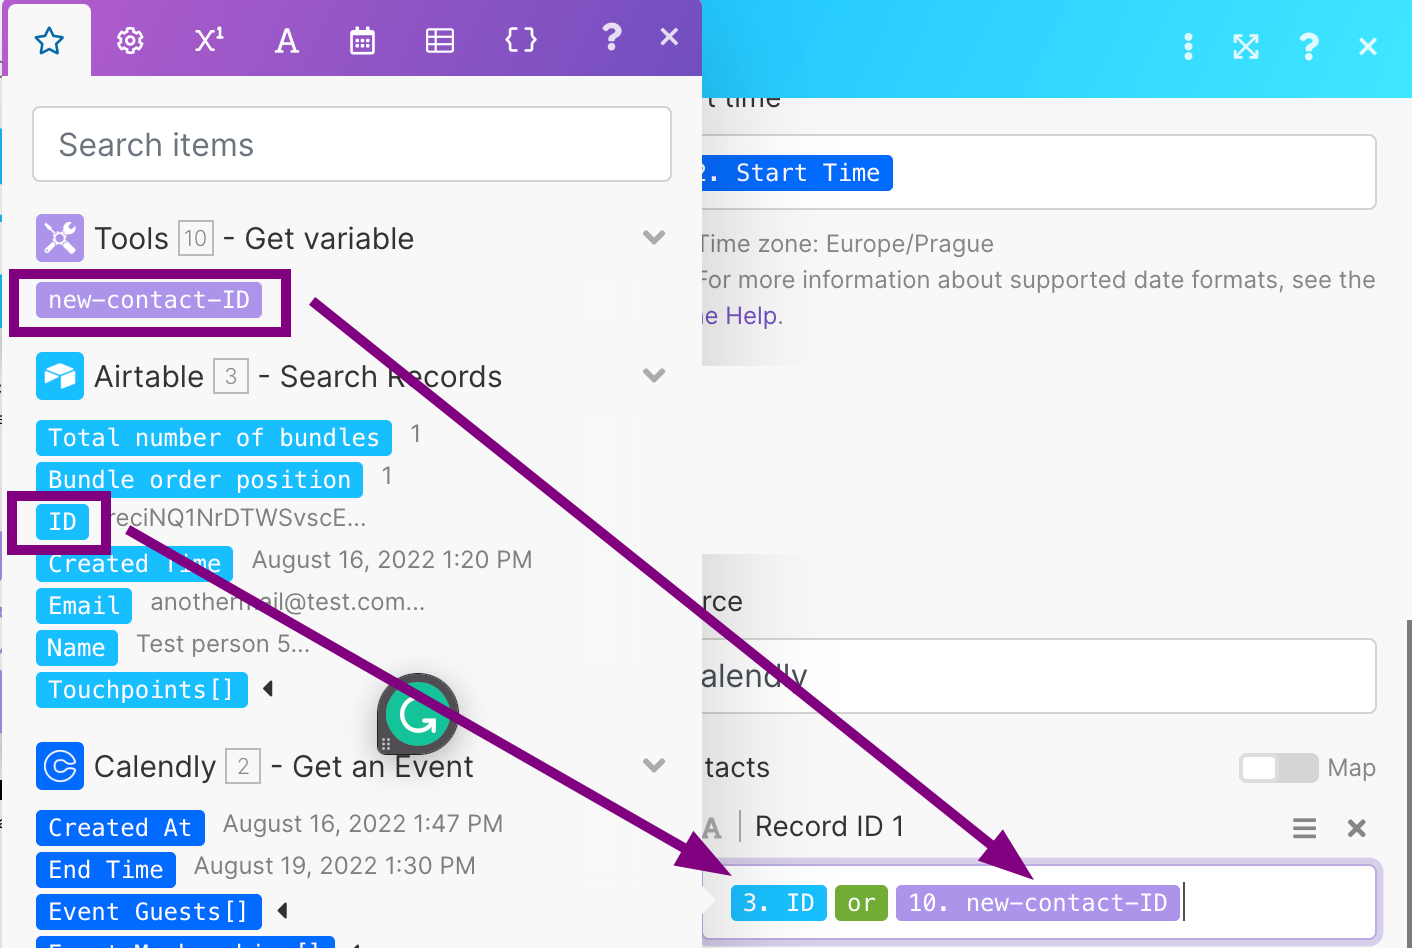
Caution
Pick the OR operator from the General functions > Logical operators menu.
You have removed the duplicate Create a touchpoint module. Instead, you are using the Set variable and Get variable modules to store and retrieve the ID value of the new contact in the Contacts table.
Scenario progress:
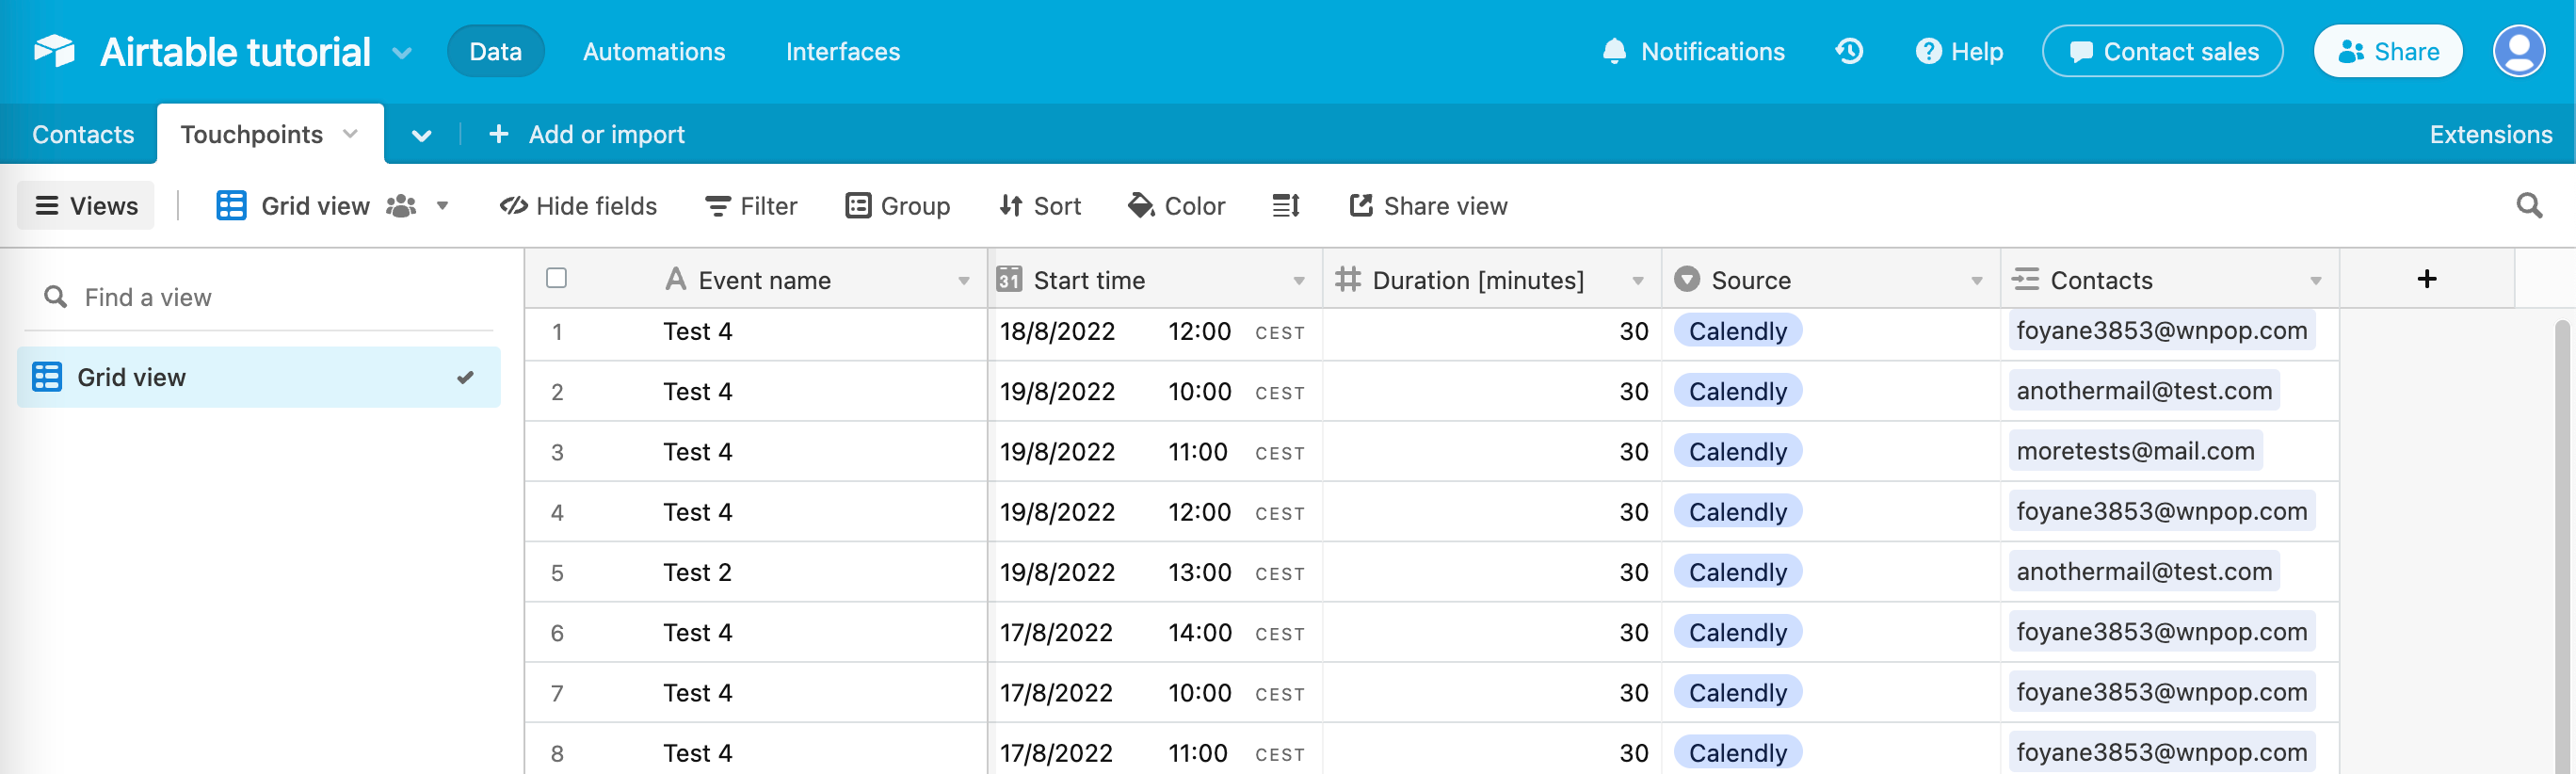
Edit the Touchpoints table
The next step is to add the meeting duration to the Touchpoints table. Add the Duration [minutes] column to the Touchpoints table in your Meetings Airtable database.
The updated Touchpoints table will have the columns:
| Field name | Field type | Description |
|---|---|---|
| Event name | Single line text | The name of the event |
| Start time | Date | Date and time when the event starts |
| Duration [minutes] | Number | Duration of the event in minutes |
| Source | Single select | The source of the event |
| Contacts | Linked field | Displays the corresponding contact name from the "Contacts" table |
And will look like this:
Calculate the meeting duration
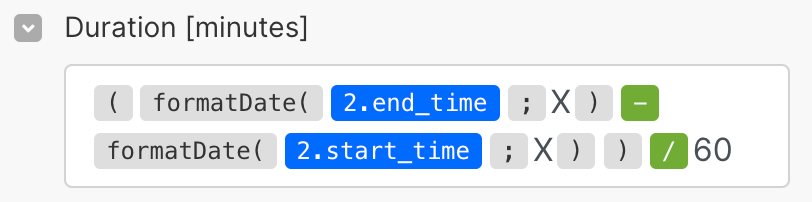
Your Touchpoints table already contains the Start time of the meetings. The duration of the meeting is the information that would give you the whole picture of the event. However, Calendly Get an Event module returns only the Start time and End time values. You can use Ibexa Connect to calculate the event duration from those values.
The Get an Event module returns the Start time and End time values in the Date data type. You cannot subtract directly two Date values. You have to convert the Date to a Number. You can do that with the formatDate function.
Read more about the data types and Date & time functions in Ibexa Connect.
-
Click the Create a touchpoint module to open the module settings. Scroll the module settings to the Duration [minutes] field.
-
Fill in the formula in the Duration [minutes] field:
-
Go to General functions tab and insert a pair of parentheses (). This is required because just writing parentheses in the mapping field won't work.
-
Insert the formatDate function from the Date and time functions tab in the parentheses. Map the End time value from the Get an Event module as the first argument of the formatDate function. Fill in X as the second argument. This converts the
Datevalue to a UNIX timestamp. -
Insert the - (minus) sign from the Math functions tab after the formatDate function. Insert another formatDate function next to the minus sign. Map the Start time value from the Get an Event module as the first argument of the formatDate function. Fill in X as the second argument.
-
So far, the result of the formula would give you the duration of the event in seconds. To convert seconds to minutes, move your cursor out of the parentheses and insert the division operator / from the Math functions tab after the parentheses.
-
Insert 60 after the division operator to convert seconds to minutes.
The final formula should look like this:
-
The scenario now inserts the meeting duration into the Touchpoints table.