Shopify
Getting Started with Shopify
Shopify modules allow you to monitor, create, update, delete, and search orders, products, product variants, product images, customers, articles, pages, refunds, inventory, abandoned checkouts, and transactions on your Shopify account.
Prerequisites
- A Shopify account
In order to use Shopify with Ibexa Connect, it is necessary to have a Shopify account. If you do not have one, you can create a Shopify account at www.shopify.com/signup
Note
The module dialog fields that are displayed in bold (in the Ibexa Connect scenario, not in this documentation article) are mandatory!
Connecting Shopify to Ibexa Connect
To connect your Shopify account to Ibexa Connect, follow these steps:
1. Open the desired module, and Create a connection dialog via the Add button.
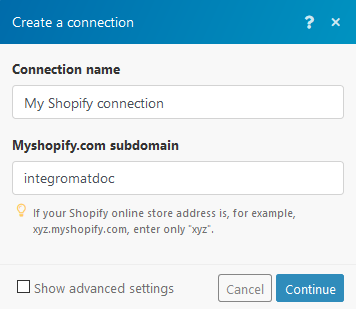
2. Enter the connection name and myshopify.com subdomain
If the address is, for example, https://makedoc.myshopify.com/, then the Myshopify subdomain field is makedoc.
After you click the Continue button, Ibexa Connect will redirect you to the Shopify website, where you will be prompted to install the Ibexa Connect app.
3. Install the Ibexa Connect app by clicking on the Install unlisted app button.
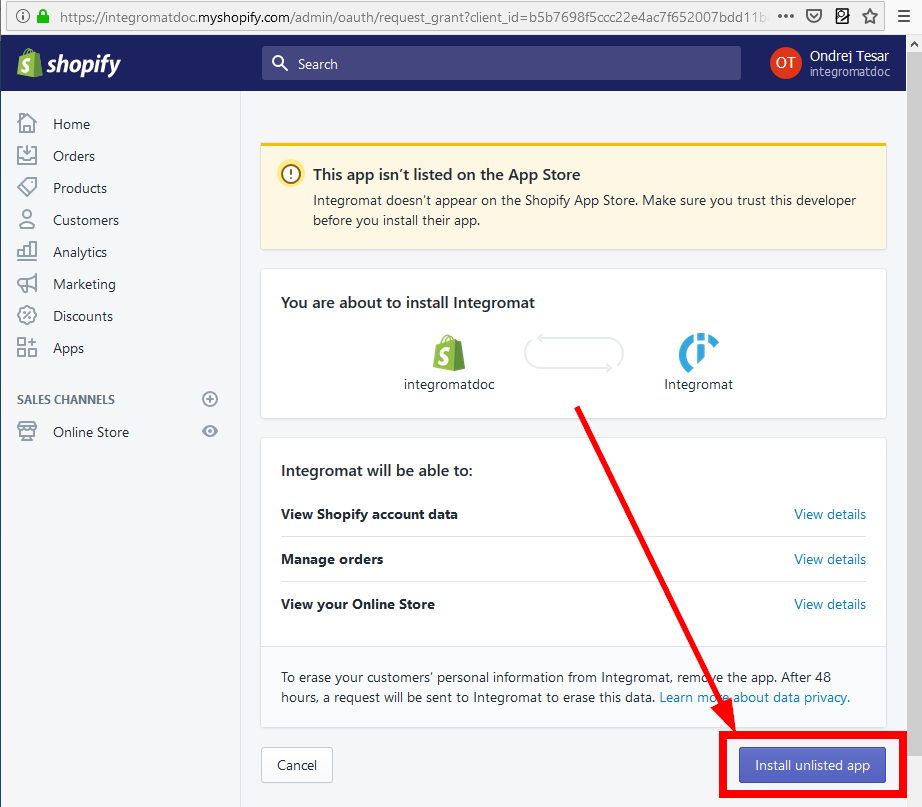
The connection to your Shopify account is now established.
Creating Fulfillment Using Ibexa Connect
To create a fulfillment, you'll need to identify line items in an order and retrieve the line item's variant and inventory level.
Add the following modules to your scenario to create the fulfillment:
1. Get an Order - to retrieve all line items of the order that you want to create fulfillment for.
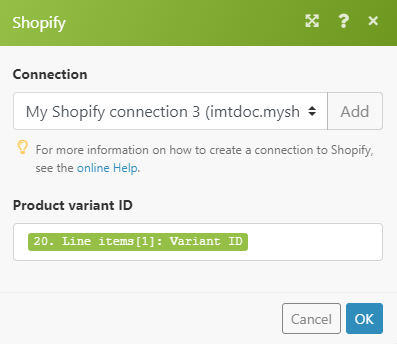
2. Get Product Variant - to find the specific variants that are associated with the inventory item that you want to fulfill. You can find the Inventory item ID in the module's output.
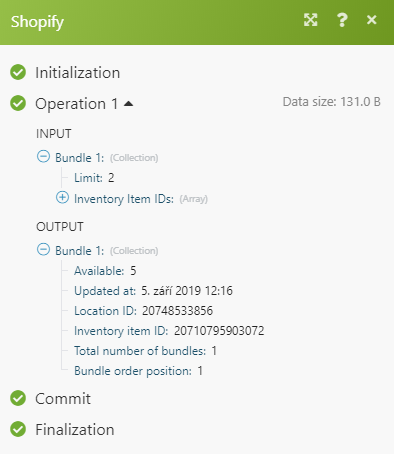
- Search for Inventory Levels - to retrieve the inventory level for that item and the location where it's stocked.
You can see in the module's output that the variant is stocked at one location. The next step shows how to create a fulfillment from the 20748533856 location.
4. Create a Fulfillment - to create the fulfillment.
Orders
(Reference: help.shopify.com/en/api/reference)
Create an Order
Line items |
Product ID The ID of the product that the line item belongs to. Variant ID The ID of the product variant. Title The title of the product. Quantity The number of items that were purchased. Price The price of the item before discounts have been applied in the shop currency. Sku The item's SKU (stock keeping unit). Tax lines A list of tax line objects, each of which details a tax applied to the item.A list of tax line objects, each of which details a tax applied to the item.
Gift card Whether the item is a gift card or not. If enabled, then the item is not taxed or considered for shipping charges. Grams The weight of the item in grams. Requires shipping Select whether the item requires shipping. Vendor The name of the item's supplier. |
Customer ID |
Enter (map) the customer ID. |
The customer's email address. |
|
Location |
Select the physical location where the order was processed. |
Billing Address |
|
Shipping Address |
|
Shipping Lines |
Details of the shipping method used. Each object has the following properties:
|
Financial Status |
Select the status of payments associated with the order. Can only be set when the order is created.
|
Fulfillment status |
The order's status in terms of fulfilled line items:
|
Discount codes |
A list of discount codes to apply to the order:
|
Tags |
Tags attached to the order, formatted as a string of comma-separated values. Tags are additional short descriptors, commonly used for filtering and searching. Each individual tag is limited to 40 characters in length. |
Note |
An optional note that a shop owner can attach to the order. |
Note attributes |
Extra information that is added to the order. Appears in the Additional details section of an order details page. Each array entry must contain a hash with |
Buyer accepts marketing |
Select whether the customer consented to receive email updates from the shop. |
Currency |
The three-letter code (ISO 4217 format) for the shop currency. E.g., |
Inventory behavior |
The behavior to use when updating inventory:
|
Send receipt |
Select whether or not to send an order confirmation to the customer. |
Send fulfillment receipt |
Select whether or not to send a shipping confirmation to the customer. |
Update an Order
Updates a selected order.
| Order ID | Enter the ID of the order you want to update/change. |
Please refer to the Create an Order section of this article for the Update an Order module fields description.
Delete an Order
Deletes a selected order.
| Order ID | Enter the ID of the order you want to delete. |
Get an Order
Retrieves the order details.
| Order ID | Enter the ID of the order you want to retrieve information about. |
Watch Orders
Retrieves order details when a new order is created.
Status |
Filter orders by their status:
|
Financial status |
Filter orders by their financial status:
|
Fulfillment status |
Filter orders by their fulfillment status:
|
Limit |
The maximum number of orders Ibexa Connect will work with during one cycle. |
Products
Create a Product
Title |
The name of the product. |
Product type |
A categorization for the product used for filtering and searching products. |
Body HTML |
A description of the product. Supports HTML formatting. |
Vendor |
The name of the product's vendor. |
Tags |
A string of comma-separated tags that are used for filtering and search. A product can have up to 250 tags. Each tag can have up to 255 characters. |
Published |
Select whether the product is published or not. |
Published at |
The date and time (ISO 8601 format) when the product was published. Leave empty to have the product unpublished from the Online Store channel. Please check the list of supported date formats. |
Published scope |
Whether the product is published to the Point of Sale channel. Valid values:
|
Handle |
A unique, human-friendly string for the product. Automatically generated from the product's |
Options |
The custom product property names like |
Variants |
A list of product variants, each representing a different version of the product. To retrieve the |
Images |
A list of product images, each one representing an image associated with the product. |
Template suffix |
The suffix of the Liquid template used for the product page. If this property is specified, then the product page uses a template called "product.suffix.liquid", where "suffix" is the value of this property. If this property is empty, then the product page uses the default template "product.liquid". (default: empty) |
Metafields global title tag |
The name of the product used for SEO purposes. Generally added to the |
Metafields global description tag |
A description of the product used for SEO purposes. Generally added to the |
Update a Product
| Product ID | Enter the ID of the product you want to update/change. |
Please refer to the Create a Product section of this article for the Update a Product module fields description.
Delete a Product
| Product ID | Enter the ID of the product you want to delete. |
Get a Product
Retrieves details about a product.
| Product ID | Enter the ID of the product you want to retrieve the information about. |
Search for Products
Title |
Filter results by product title. |
Vendor |
Filter results by the product vendor. |
Handle |
Filter results by product handle. |
Product type |
Filter results by product type. |
Status |
Return products by their published status:
|
Limit |
The maximum number of products Ibexa Connect will work with during one cycle. |
Create a Product Variant
A variant can be added to a Product Resource to represent one version of a product with several options. The Product Resource will have a variant for every possible combination of its options. Each product can have a maximum of three options and a maximum of 100 variants.
Product ID |
Enter (map) the product ID. |
Price |
The price of the product variant. |
Option |
The custom properties that a shop owner uses to define product variants. You can define three options for a product: |
SKU |
A unique identifier for the product variant in the shop. Required in order to connect to a FulfillmentService. |
Barcode |
Enter the barcode, UPC, or ISBN number for the product. |
Fulfillment service |
The fulfillment service associated with the product variant. It represents a third-party warehousing service that prepares and ships orders on behalf of the store owner. Each fulfillment service is associated with its own location. When you create a fulfillment service, a new location is automatically created and associated with it. Valid values: |
Inventory management |
The fulfillment service that tracks the number of items in stock for the product variant. If you track the inventory yourself using the admin, then set the value to "shopify". Valid values: |
Inventory policy |
Select whether customers are allowed to place an order for the product variant when it's out of stock. Valid values:
|
Grams |
The weight of the product variant is in grams. |
Compare at price |
The original price of the item before an adjustment or a sale. |
Presentment prices |
A list of the variant's presentment prices and compare-at prices in each of the shop's enabled presentment currencies. Each price object has the following properties:
Requires the header |
Position |
The order of the product variant in the list of product variants. The first position in the list is |
Image ID |
The unique numeric identifier for a product's image. The image must be associated with the same product as the variant. |
Taxable |
Whether a tax is charged when the product variant is sold or not. |
Tax code |
This parameter applies only to the stores that have the Avalara AvaTax app installed. Specifies the Avalara tax code for the product variant. |
Requires shipping |
Whether a customer needs to provide a shipping address when placing an order for the product variant. |
Weight |
The weight of the product variant in the unit system specified with |
Weight unit |
The unit of measurement that applies to the product variant's weight. If you don't specify a value for |
Update a Product Variant
| Product ID | Enter the ID of the product whose variant you want to update/change. |
| Product Variant ID | Enter the ID of the product variant you want to update/change. |
Please refer to the Create a Product Variant section of this article for the Update a Product Variant module fields description.
Delete a Product Variant
| Product ID | Enter the ID of the product whose variant you want to delete. |
| Product Variant ID | Enter the ID of the product variant you want to delete. |
List Product Variants
Returns all variants.
| Product ID | Enter the ID of the product whose variant you want to retrieve. |
Get a Product Variant
Returns a product variant's details.
| Product Variant ID | Enter the ID of the product variant you want to retrieve the information about. |
Product Images
Upload a product image
| Product ID | The ID of the product associated with the image. |
| Data | Map the image file data. |
| Alternate text | Enter the alt tag content. |
| Position | The order of the product image in the list. The first product image is at position 1 and is the "main" image for the product. |
Delete a Product Image
| Product ID | The ID of the product associated with the image you want to delete. |
| Product image ID | The ID of the product image you want to delete. |
List Product Images
Returns all product images of the product.
| Product ID | The ID of the product whose images you want to retrieve. |
Customers
Create a Customer
Creates a customer.
Required Permissions: write_customers
First name |
The customer's first name. |
Last name |
The customer's last name. |
The unique email address of the customer. Attempting to assign the same email address to multiple customers returns an error. |
|
Phone |
The unique phone number (E.164 format) for this customer. Attempting to assign the same phone number to multiple customers returns an error. The property can be set using different formats, but each format must represent a number that can be dialed from anywhere in the world. The following formats are all valid:
|
Password |
Create a password for the customer. |
Addresses |
A list of the ten most recently updated addresses for the customer. Each address has the following properties:
|
Verified email |
Whether the customer has verified their email address. |
Tax exempt |
Whether the customer is exempt from paying taxes on their order. If enabled, then taxes won't be applied to an order at checkout. If disabled, then taxes will be applied at checkout. |
Accepts marketing |
Whether the customer has consented to receive marketing material via email. |
Note |
A note about the customer. |
Tags |
Tags that the shop owner has attached to the customer, formatted as a string of comma-separated values. |
Send email welcome |
If disabled, sending the welcome email will be skipped. |
Currency |
The three-letter code (ISO 4217 format) for the currency that the customer used when they paid for their last order. Defaults to the shop currency. Returns the shop currency for test orders. |
Update a Customer
Updates a customer.
Required Permissions: write_customers
| Customer ID | Enter the ID of the customer you want to update/change. |
Please refer to the Create a Customer section of this article for the descriptions of the Update a Product module fields.
Delete a Customer
Deletes a customer.
Required Permissions: write_customers
| Customer ID | Enter the ID of the customer you want to delete. |
Get a Customer
Returns info about a customer.
Required Permissions: read_customers
| Customer ID | Enter the ID of the customer you want to retrieve information about. |
Search for Customers
Searches for customers that match a supplied query, and returns customer details.
Required Permissions: read_customers
| Query | Enter the search query. See the Shopify Searching Your Store help page. |
| Limit | Set the maximum number of customer details Ibexa Connect will return in one cycle. |
Watch Customers
Triggers when a new customer is added.
Required Permissions: read_customers
| Limit | Set the maximum number of customers Ibexa Connect will return in one cycle. |
List Customer Addresses
Retrieves all customer addresses.
Required Permissions: read_customers
| Limit | Set the maximum number of addresses Ibexa Connect will return in one cycle. |
Caution
Sometimes it is necessary to extend existing permissions in order to work with other objects (orders, customers, products, etc.)
Articles
Create an Article
Creates an article in the shop's blog.
Required Permissions: write_content
Blog |
Select the blog you want to create an article for. |
Title |
Enter the title of the article. |
Body HTML |
The text of the body of the article, complete with HTML markup. E.g., |
Template suffix |
The name of the template an article is using if it's using an alternate template. If an article is using the default |
Summary HTML |
A summary of the article, complete with HTML markup. The summary issued by the online store theme displays the article on other pages, such as the home page or the main blog page. |
Author |
The name of the author of the article. |
Handle |
A human-friendly unique string for the article that's automatically generated from the article's title. The handle is used in the article's URL. |
Article is published |
Enable if the article should be visible. |
Published at |
The date and time (ISO 8601 format) when the article was published. Please see the list of supported date formats. |
Tags |
A comma-separated list of tags. Tags are additional short descriptors formatted as a string of comma-separated values. |
Image |
An image associated with the article:
|
Update an Article
Updates an article specified by the ID.
Required Permissions: write_content
| Blog | Select the blog you want to update the article on. |
| Article ID | Map the article ID you want to update. |
Please refer to the Create an Article section of this article for the descriptions of the Update an Article module fields.
Delete an Article
Deletes an article.
Required Permissions: write_content
| Blog | Select the blog you want to delete the article from. |
| Article ID | Map the article you want to delete. |
Get an Article
Retrieves an article's details.
Required Permissions: read_content
| Blog | Select the blog that contains the article. |
| Article ID | Map the article you want to retrieve information about. |
Search for Article
Searches for the article based on the entered filter.
Required Permissions: read_content
| Blog | Select the blog that contains the article. |
| Tag | Filter articles by a specific tag. |
| Author | Filter the article search by the author of the article. |
| Handle | Filter articles by a specific handle. |
| Status | Filter articles by a given published status. |
| Limit | Set the maximum number of search results Ibexa Connect will return in one cycle. |
Watch Articles
Triggers when a new article is added to a blog.
Required Permissions: read_content
| Blog | Select the blog that contains the article. |
| Tag | Filter articles by a specific tag. |
| Author | Filter the article search by the author of the article. |
| Status | Filter articles by a given published status. |
| Limit | Maximum number of articles Ibexa Connect will work with during one cycle. |
Pages
Create a Page
Creates a page.
| Title | Enter the page's title. |
| Body HTML | The text content of the page, complete with HTML markup. |
| Author | The name of the person who created the page. |
| Handle | A unique, human-friendly string for the page, generated automatically from its title. In online store themes, the Liquid templating language refers to a page by its handle. |
| Template suffix | The suffix of the Liquid template being used. For example, if the value is contact, then the page is using the page.contact.liquid template. If the value is an empty string, then the page is using the default page.liquid template. |
| Page is published | If enabled, the created page will be published. |
Update a Page
Updates a page.
| Page ID | Enter (map) the page ID of the page you want to update. |
Please refer to the Create a Page section of this article for the Update a Page module fields description.
Delete a Page
Deletes a page.
| Page ID | Enter (map) the page ID of the page you want to delete. |
Get a Page
| Page ID | Enter (map) the page you want to retrieve information about. |
Search for Pages
Searches for pages based on an entered filter.
| Title | The page's title. |
| Handle | A unique, human-friendly string for the page, generated automatically from its title. In online store themes, the Liquid templating language refers to a page by its handle. |
| Status | Filter pages with a given published status. |
| Limit | Set the maximum number of search results Ibexa Connect will return in one cycle. |
Watch Pages
Triggers when a new page is added.
| Status | Restrict returned pages with a given published status. |
| Limit | Set the maximum number of pages Ibexa Connect will work with during one cycle. |
Refunds
Get a Refund
Retrieves a specific refund.
| Order ID | Enter the order ID of the order that the refund is associated with. |
| Refund ID | Enter the ID of the refund that the order adjustment is associated with. |
Search for Refunds
| Order ID | Enter the order ID of the order that the refund is associated with. |
| In shop currency | If enabled, amounts in the shop currency for the underlying transaction will be displayed. |
| Limit | Set the maximum number of refunds Ibexa Connect will work with during one cycle. |
Inventory and Fulfillments
For more information about inventory and fulfillments, please refer to the Shopify API documentation – Managing Fulfillments article.
Search for Inventory Levels
Searches for inventory levels.
Required Permissions: read_inventory
| Inventory item IDs | The ID of the inventory item that the inventory level belongs to. |
| Location IDs | Select the location that the inventory level belongs to. |
| Limit | Set the maximum number of search results returned by Ibexa Connect in one cycle. |
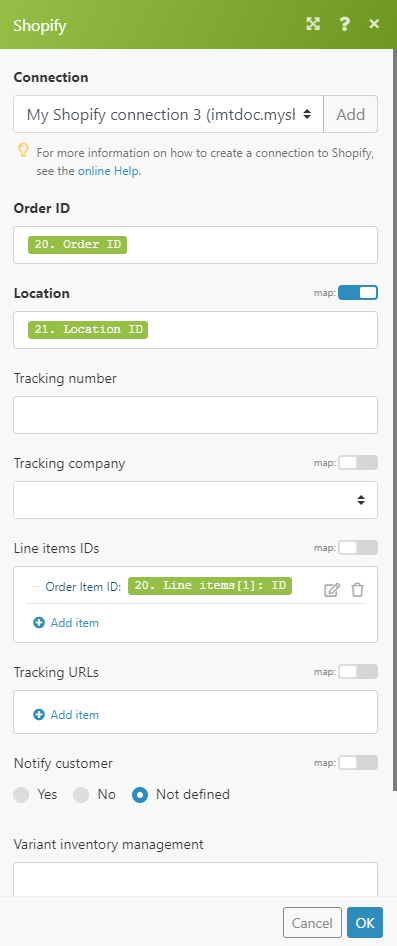
Create a Fulfillment
Creates a fulfillment.
Required Permissions: write_orders
Prerequisites: Creating a Fulfillment Using Ibexa Connect
Before you create a fulfillment, it's helpful to understand some of the different fulfillment-related resources:
-
Order: Contains information about an order, including an array of the line items that were purchased. Line items contain important fulfillment information, such as the associated variant, the quantity purchased, and the fulfillment status.
-
Location: Represents a geographical location where a line item can be fulfilled from. A fulfillment service always has its own location, and variants managed by the fulfillment service should always be fulfilled from that location.
-
Fulfillment: Represents a shipment of one or more items in an order. It includes the line item that the fulfillment applies to, its tracking information, and the location of the fulfillment.
-
FulfillmentService: Represents a third-party warehousing service that prepares and ships orders on behalf of the store owner. Each fulfillment service is associated with its own location. When you create a fulfillment service, a new location is automatically created and associated with it.
Order ID |
Map the order ID of the order you want to fulfill. |
Location |
Select the location that the fulfillment should be processed for. |
Tracking number |
Tracking number provided by the shipping company. |
Tracking company |
The name of the tracking company. When creating a fulfillment for a supported carrier, enter the tracking company name exactly as written in the list below.
|
Line items IDs |
Enter the ID of the line items that were purchased. |
Tracking URLs |
The URLs of the tracking pages for the fulfillment. |
Notify customer |
Select whether the customer should be notified. If enabled, then an email will be sent when the fulfillment is created or updated. |
Variant inventory management |
The name of the inventory management service. E.g., |
Shipment status |
The current shipment status of the fulfillment. The values are as follows:
|
Create a Fulfillment Service
Creates a fulfillment service.
Required Permissions: write_fulfillments
| Name | The name of the fulfillment service as seen by merchants and their customers. |
| Callback URL | URL of the fulfillment service. States the URL endpoint that Shopify needs in order to retrieve inventory and tracking updates. |
| Inventory management | Enable if the fulfillment service tracks product inventory and provides updates to Shopify. |
| Tracking support | Enable if the fulfillment service provides tracking numbers for packages. |
| Location | Select the location tied to the fulfillment service. |
| Required shipping method | Enable this option if the fulfillment service requires products to be physically shipped. |
| Format | Select whether the API output format is JSON or XML. |
Update a Fulfillment Service
Updates a fulfillment service.
Required Permissions: write_fulfillments
| Fulfillment service ID | Enter (map) the ID of the fulfillment service. |
Please refer to the Create a Fulfillment Service section of this article for the descriptions of the Update a Fulfillment Service module fields.
Delete a Fulfillment Service
Deletes a fulfillment service.
Required Permissions: write_fulfillments
| Fulfillment service ID | Enter (map) the ID of the fulfillment service you want to delete. |
Abandoned Checkouts
A checkout is considered abandoned when a customer has entered billing and shipping information but hasn't completed the purchase.
Required Permissions: read_checkouts, read_orders
Search for Abandoned Checkouts
Status |
Select to show only checkouts with a given status (default:
|
Limit |
Set the maximum number of search results returned by Ibexa Connect in one cycle. |
Watch Abandoned Checkouts
Triggers when a new abandoned checkout is added.
Required Permissions: read_checkouts, read_orders
Status |
Select the status of the abandoned checkout that triggers this module:
|
Limit |
Set the maximum number of abandoned checkouts returned by Ibexa Connect in one cycle. |
Transactions
Transactions are created for every order that results in an exchange of money.
Create a Transaction
Order ID |
Map the order you want to create a transaction for. |
Kind of transaction |
Select the transaction's type. The valid values are as follows:
|
Amount |
The amount of money included in the transaction. If you don't provide a value, then it defaults to the total cost of the order (even if a previous transaction has been made towards it). |
Currency |
The three-letter code (ISO 4217 format) for the currency used for the payment. |
Authorization |
The authorization code associated with the transaction. |
Gateway |
The name of the gateway the transaction was issued through. A list of gateways can be found on Shopify's payment gateways page. |
Parent ID |
The ID of an associated transaction.
|
Test transaction |
Specify whether the transaction is a test transaction. |
Processed at |
The date and time (ISO 8601 format) when a transaction was processed. This value is the date that's used in the analytic reports. By default, it matches the |
Other
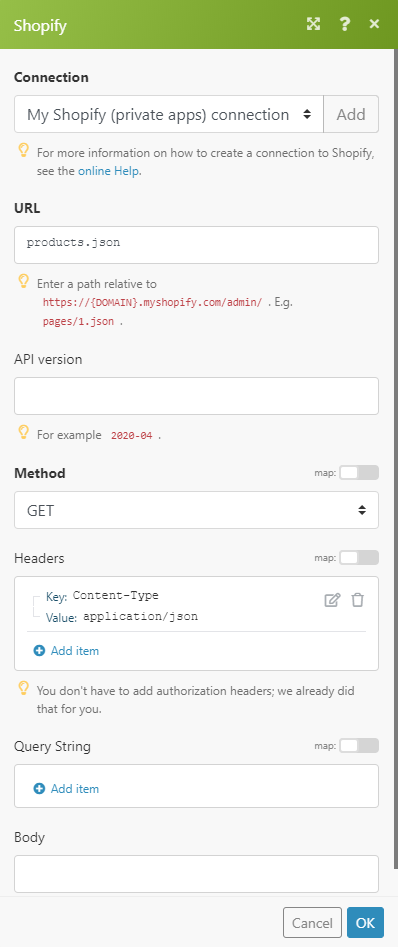
Make an API Call
Performs a custom API call.
Connection |
Select whether you want to make an API call using your private or public app. |
URL |
Enter a path relative to For the list of available endpoints, refer to the Shopify REST API Documentation. |
Method |
Select the HTTP method you want to use:
|
Headers |
Enter the desired request headers. You don't have to add authorization headers; we've already done that for you. |
Query String |
Enter the request query string. |
Body |
Enter the body content for your API call. |
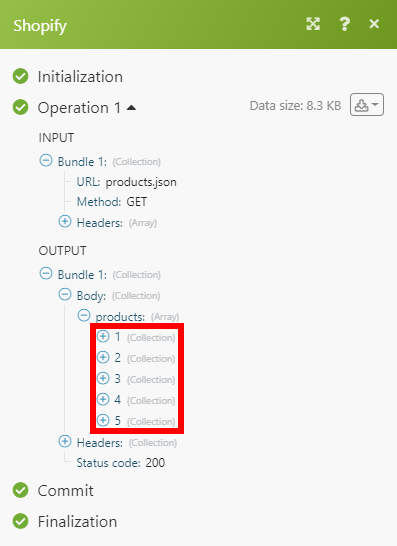
Example of Use - List Products
The following API call returns all products in your Shopify account:
URL:
products.json
Method:
GET
 |
The result can be found in the module's Output under Bundle > Body > products. In our example, 5 products were returned:
 |
Private App Connection
To establish a private app connection, you need to create a private app to obtain the API Key and Password.
1. Log in to your Shopify administration (https://{yourShopifyDomain}.myshopify.com/admin).
2. Navigate to Apps > Manage private apps.
3. Click the Create new private app button ( ).
).
4. Fill in the required fields, click Save and Create App.
5. Find the generated API Key and Password in the Admin API section.
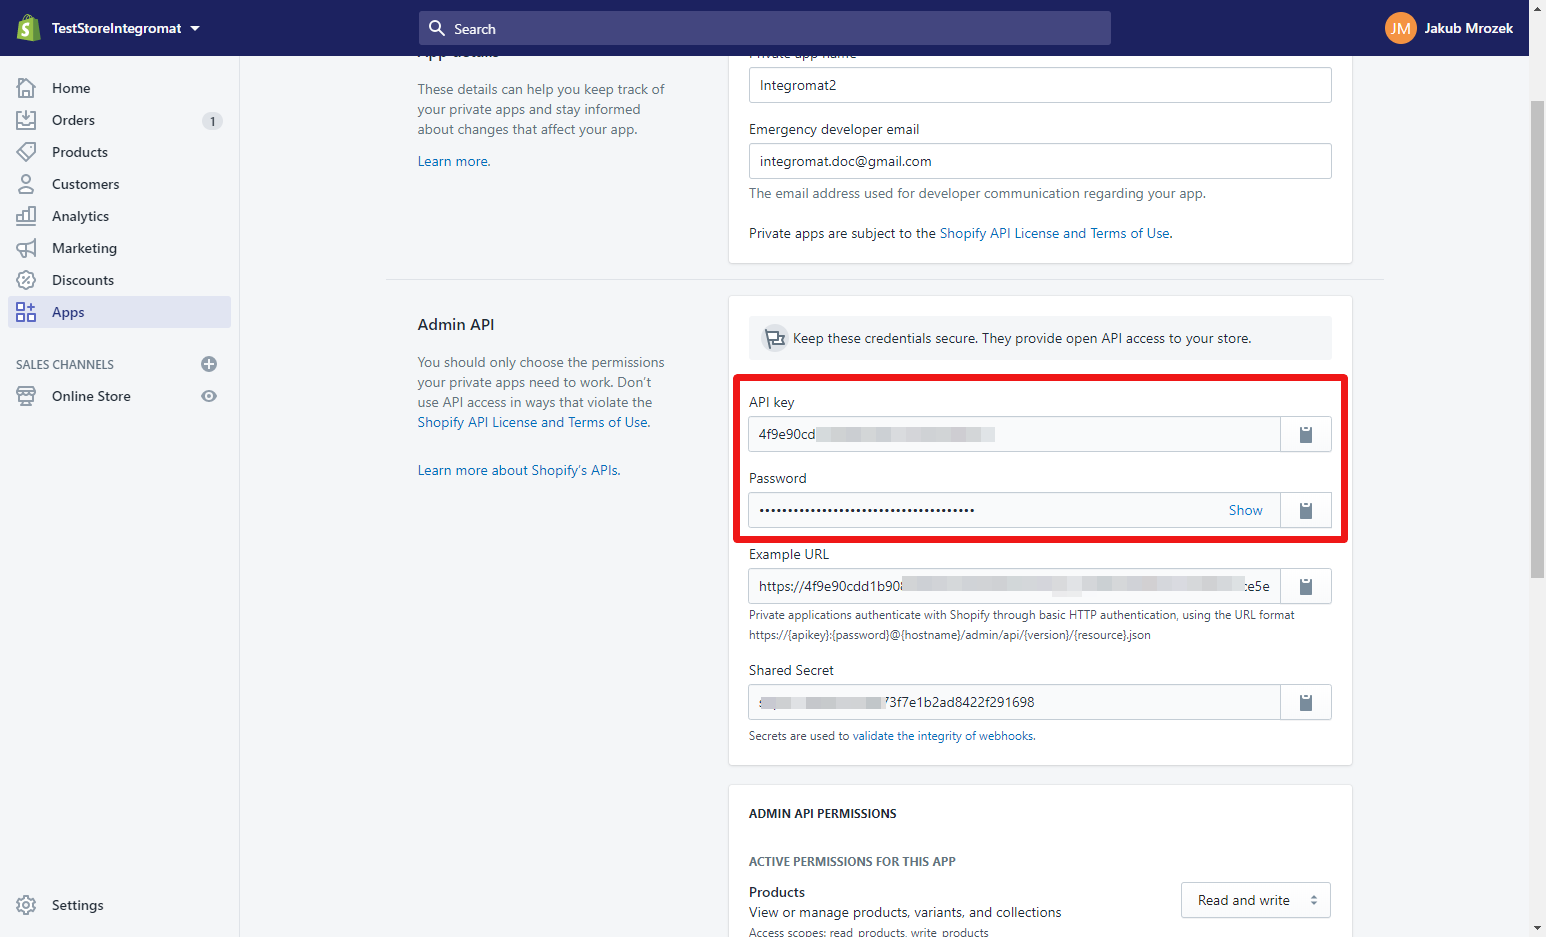
6. Go to Ibexa Connect, and open the Make an API Call module's Create a connection dialog for the Shopify private app.
7. Enter the Domain (if your Shopify online store address is, for example, xyz.myshopify.com, enter only "xyz".) and API Key and Password provided in step 5 to the respective fields, and click the Continue button to establish the connection.
The connection has been established. You can proceed with setting up the Make an API Call module for the private app.
Public App Connection
Use this to connect your Public App created in your Partner Dashboard.
To create an app:
-
From your Partner Dashboard, click Apps > Create app.
-
Provide an app name, URL, and Redirect URLs.
-
Click Create app. You are directed to your app's overview page, where you can view the API key and API secret that you will need for the module's connection configuration.
Connection Type |
|
Domain |
Enter the name of your Shopify domain. If your Shopify store address is https://mystore.myshopify.com, enter "mystore". |
Client ID |
Enter the API key for the app, as defined in the Partner Dashboard. |
Client Secret |
Enter the API secret key for the app, as defined in the Partner Dashboard. |
Scope |
Specify needed scopes. If you requested both the read and write access scopes for a resource, then enter only for the write access scope. The read access scope is omitted because it’s implied by the write access scope. For example, if your request included See the list of admin scopes. |
New Event
Triggers when a specified event is performed.
| Webhook name | Enter the name for the webhook. |
| Event | Select the event that triggers the module. |
If you receive an error, it is probably due to a scope issue.
Adding a New Scope
1. Open Create a connection dialog.
2. Click on the S*how advanced settings* dialog.
3. Add a new scope. Find the corresponding scope on the List of the API Access Scopes.
E.g., read_orders for orders/paid or orders/create events*.*
Common Issues
Errors: [API] This action requires merchant approval for \<XXXX_XXXX> scope
You need to create a new connection with a required scope.
Unfortunately, when you create a new connection, all previously used scopes are removed from your account, and only scopes added in the latest connection are used for all your connections (including the previously created connections).
Include all needed scopes in the new connection. and API secret that you will need for the module's connection configuration.
Connection Type |
|
Domain |
Enter the name of your Shopify domain. If your Shopify store address is https://mystore.myshopify.com, enter "mystore". |
Client ID |
Enter the API key for the app, as defined in the Partner Dashboard. |
Client Secret |
Enter the API secret key for the app, as defined in the Partner Dashboard. |
Scope |
Specify needed scopes. If you requested both the read and write access scopes for a resource, then enter only for the write access scope. The read access scope is omitted because it’s implied by the write access scope. For example, if your request included See the list of admin scopes. |
New Event
Triggers when a specified event is performed.
| Webhook name | Enter the name for the webhook. |
| Event | Select the event that triggers the module. |
If you receive an error, it is probably due to a scope issue.
Adding a New Scope
1. Open Create a connection dialog.
2. Click on the S*how advanced settings* dialog.
3. Add a new scope. Find the corresponding scope on the List of the API Access Scopes.
E.g., read_orders for orders/paid or orders/create events*.*
Common Issues
Errors: [API] This action requires merchant approval for \<XXXX_XXXX> scope
You need to create a new connection with a required scope.
Unfortunately, when you create a new connection, all previously used scopes are removed from your account, and only scopes added in the latest connection are used for all your connections (including the previously created connections).
Include all needed scopes in the new connection.