Sendinblue
The Sendinblue modules allow you to watch, create, update, list, and delete the contacts, lists, folders, email campaigns, events, emails, and SMS in your Sendinblue account.
Getting started with Sendinblue
Prerequisites
- A Sendinblue account
In order to use Sendinblue with Ibexa Connect, it is necessary to have a Sendinblue account. If you do not have one, you can create a Sendinblue account at sendinblue.com/register.
Caution
The module dialog fields that are displayed in bold (in the Ibexa Connect scenario, not in this documentation article) are mandatory!
Connecting Sendinblue to Ibexa Connect
To connect your Sendinblue account to Ibexa Connect you need to obtain the API Key from your Sendinblue account and insert it in the Create a connection dialog in the Ibexa Connect module.
1. Log in to your Sendinblue account.
2. Click your Profile Icon > SMTP\&API.
3. Copy the API v3 to your clipboard.
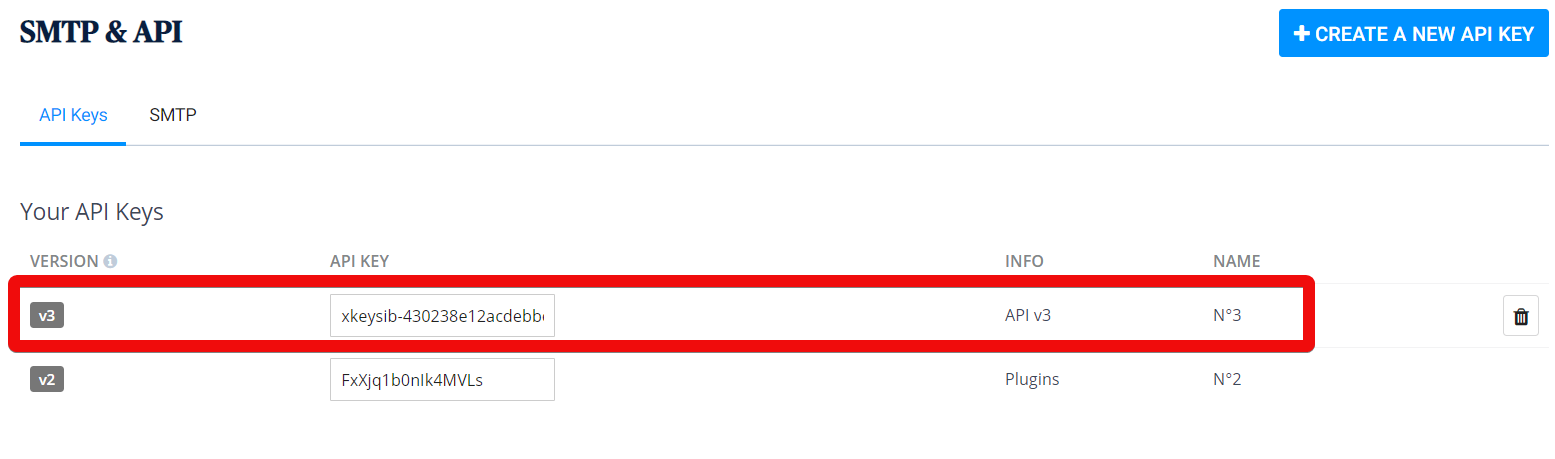
4. Go to Ibexa Connect and open the Sendinblue module's Create a connection dialog.
5. In the Connection name field, enter a name for the connection.
6. In the API Key field, enter the API key copied in step 4 and click Continue.
The connection has been established.
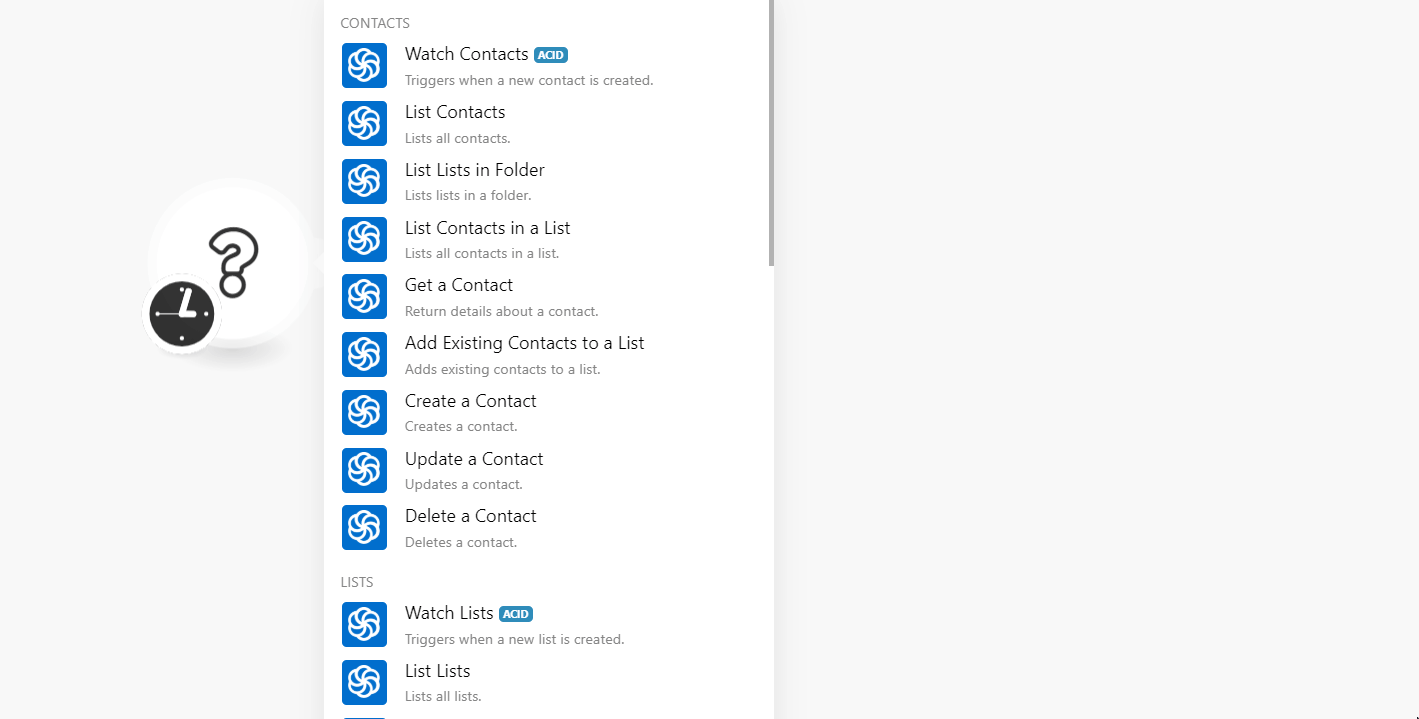
Contacts
Watch Contacts
Triggers when a new contact is created.
| Limit | Enter the maximum number of contacts Ibexa Connect should return during one scenario execution cycle. |
List Contacts
Lists all contacts.
| Modified Since | Enter the date to list the contacts that were changed or updated on or after the specified date. |
| Limit | Enter the maximum number of contacts Ibexa Connect should return during one scenario execution cycle. |
List Lists in Folder
Lists lists in a folder.
| Folder | Select the folder whose contact lists you want to list. |
| Limit | Enter the maximum number of contacts Ibexa Connect should return during one scenario execution cycle. |
List Contacts in a List
Lists all contacts in a list.
| List | Select the list whose contacts you want to list. |
| Modified Since | Enter the date to list the contacts that were changed or updated on or after the specified date. |
| Limit | Enter the maximum number of contacts Ibexa Connect should return during one scenario execution cycle. |
Get a Contact
Return details about a contact.
| Enter the email address of the contact whose details you want to retrieve. |
Add Existing Contacts to a List
Adds existing contacts to a list.
List |
Select the list to which you want to add an existing contact. |
Add the email address you want to add to the list: Value Enter the email address of the contact. |
Create a Contact
Crates a contact.
Enter the email address of the contact. |
|
Last Name |
Enter the last name of the contact. |
First Name |
Enter the first name of the contact. |
SMS |
Enter the phone number with country code to receive the SMS. |
Lists |
Select the list to which you wanted to add the contact. |
Email blacklisted |
Select whether the email address is blacklisted:
|
SMS blacklisted |
Select whether the SMS number is blacklisted:
|
Update enabled |
Select whether the contact update is enabled:
|
SMTP blacklist Number |
Add the email address transactions forbidden from the sender. This is applicable only if you enabled the update for the contact. |
Update a Contact
Updates the contact.
Enter the email address of the contact. |
|
Last Name |
Enter the last name of the contact. |
First Name |
Enter the first name of the contact. |
SMS |
Enter the phone number with country code to receive the SMS. |
Lists |
Select the list to which you wanted to add the contact. |
Unlink Lists |
Select the list from which you want to remove the contact. |
Email blacklisted |
Select whether the email address is blacklisted:
|
SMS blacklisted |
Select whether the SMS number is blacklisted:
|
Update enabled |
Select whether the contact update is enabled:
|
SMTP blacklist Number |
Add the email address transactions forbidden from the sender. This is applicable only if you enabled the update for the contact. |
Delete a Contact
Deletes a contact.
| Email Address | Enter the email address you want to delete. |
Lists
Watch Lists
Triggers when a new list is created.
| Limit | Enter the maximum number of lists Ibexa Connect should return during one scenario execution cycle. |
List Lists
Lists all lists.
| Limit | Enter the maximum number of lists Ibexa Connect should return during one scenario execution cycle. |
Get a List
Returns details about a list.
| List ID | Select the List ID whose details you want to retrieve. |
Create a Lists
Creates a list.
| Folder | Select the folder in which you want to create the list. |
| Name | Enter the name of the list. |
Update a List
Updates a list.
Folder ID |
Select the Folder ID whose list you want to update. |
I want to update |
Select the option you want to update:
|
Name |
Enter a new name for the list. |
Folder |
Select the folder to which you want to move the list. |
Delete a List
Deletes a list.
| List ID | Select the List ID you want to delete. |
Folders
Watch Folders
Triggers when a new folder is created.
| Limit | Enter the maximum number of folders Ibexa Connect should return during one scenario execution cycle. |
List Folders
Lists all folders.
| Limit | Enter the maximum number of folders Ibexa Connect should return during one scenario execution cycle. |
Get a Folder
Returns details about a folder.
| Folder ID | Select the Folder ID whose details you want to retrieve. |
Create a Folder
Creates a folder.
| Name | Enter the name of the folder. |
Update a Folder
Updates a folder.
| Folder ID | Select the Folder ID you want to update. |
| Name | Enter a new name for the folder. |
Delete a Folder
Deletes a folder.
| Folder ID | Select the Folder ID you want to delete. |
Campaigns
Watch Email Campaigns
Triggers when a new email campaign is created.
Type |
Select the email campaign type you want to watch:
|
Status |
Select the status email campaigns you want to watch:
|
Limit |
Enter the maximum number of folders Ibexa Connect should return during one scenario execution cycle. |
List Email Campaigns
List all email campaigns.
Type |
Select the email campaign type you want to watch:
|
Status |
Select the status email campaigns you want to watch:
|
Start Date |
Enter the start date of the campaign. |
End Date |
Enter the date of the campaign. |
Limit |
Enter the maximum number of campaigns Ibexa Connect should return during one scenario execution cycle. |
Create an Email Campaign
Creates a new campaign.
Name |
Enter the name of the email campaign. |
Select Sender |
Select the sender option:
|
Enter the email address from which you will send the campaign. |
|
Name |
Enter the name that appears when you send the campaign email. |
Sender |
Select the email address from which you will send the campaign. |
HTML Content |
Enter the body message of the email campaign. |
HTML URL |
Enter the HTML URL of the email message. |
Template |
Select the template for the email campaign. |
Subject |
Enter the subject line of the email campaign. |
Tag |
Enter the keywords that filter the email campaigns when searching. |
Scheduled at |
Enter the date and time when the email campaign is scheduled to send. |
Reply To |
Enter the email address to which the campaign recipients can reply to. |
To Field |
Enter the email address or first name or last name of the recipient. |
Lists |
Select the list in which the recipient email address exists. |
Exclusion Lists |
Select the list to which you do not want to send the campaign. |
Attachment URL |
Enter the file attachment URL which you want to send along with the campaign. For example, |
Inline Image Activation |
Select whether you want to display the images in the campaign:
|
Mirror Active |
Select whether you want to activate the mirror link:
|
Header |
Enter the header of the email campaign. |
Footer |
Enter the footer of the email campaign. |
UTM Campaign |
Enter the UTM campaign value. If no value is provided, the campaign name will be used. You can enter alphanumeric characters. |
Params |
Add any additional parameters: Name Enter the name of the parameter. For example, Value Enter the value of the parameter. For example, |
Send at best time |
Select whether you want to send the campaign at the best time:
|
A/B Testing |
Select whether you want to perform the A/B testing of the campaign before sending:
|
Subject A |
Enter the variant A value. |
Subject B |
Enter the Variant B value. |
Split Rule |
Enter the size of the test groups with whom you are performing A/B tests. |
Winner Criteria |
Enter the details of the winning criteria. Mandatory if splitRule >= 1 and < 50. If splitRule = 50, 'winnerCriteria' is ignored if passed. |
Winner Delay |
Enter the duration of the test in hours by which you want to delay. You can delay a maximum of seven days or 168 hours. The winning version will be sent at the end of the test. Mandatory if splitRule >= 1 and < 50. If splitRule = 50, 'WinnerDelay' is ignored if passed. |
IP Warmup Enable |
Select whether you want to enable IP warmup:
|
Initial Quota |
Enter an initial quota greater than 1 for warming up your IP. We recommend you set a value of 3000. |
Increase Rate |
Enter the increase value in percentage. This field is mandatory if you have select yes for the IP warm up. Enter the percentage increase rate. It is recommended to set the increase rate to 30% per day. If you want to send the same number of emails everyday, then set the daily increase value as 0%. |
Get an Email Campaign
Returns details about an email campaign.
| Campaign ID | Select the Campaign ID whose details you want to retrieve. |
Update an Email Campaign
Updates an email campaign.
Campaign ID |
Enter the Campaign ID you want to update. You can get the Campaign ID by using the Get Campaign ID module. |
Name |
Enter the name of the email campaign. |
Select Sender |
Select the sender option:
|
Enter the email address from which you will send the campaign. |
|
Name |
Enter the name that appears when you send the campaign email. |
Sender |
Select the email address from which you will send the campaign. |
HTML Content |
Enter the body message of the email campaign. |
HTML URL |
Enter the HTML URL of the email message. |
Template |
Select the template for the email campaign. |
Subject |
Enter the subject line of the email campaign. |
Tag |
Enter the keywords that filter the email campaigns when searching. |
Scheduled at |
Enter the date and time when the email campaign is scheduled to send. |
Reply To |
Enter the email address to which the campaign recipients can reply to. |
To Field |
Enter the email address or first name or last name of the recipient. |
Lists |
Select the list in which the recipient email address exists. |
Exclusion Lists |
Select the list to which you do not want to send the campaign. |
Attachment URL |
Enter the file attachment URL which you want to send along with the campaign. For example, |
Inline Image Activation |
Select whether you want to display the images in the campaign:
|
Mirror Active |
Select whether you want to activate the mirror link:
|
Header |
Enter the header of the email campaign. |
Footer |
Enter the footer of the email campaign. |
UTM Campaign |
Enter the UTM campaign value. If no value is provided, the campaign name will be used. You can enter alphanumeric characters. |
Params |
Add any additional parameters: Name Enter the name of the parameter. For example, Value Enter the value of the parameter. For example, |
Send at best time |
Select whether you want to send the campaign at the best time:
|
A/B Testing |
Select whether you want to perform the A/B testing of the campaign before sending:
|
Subject A |
Enter the variant A value. |
Subject B |
Enter the Variant B value. |
Split Rule |
Enter the size of the test groups with whom you are performing A/B tests. |
Winner Criteria |
Enter the details of the winning criteria. Mandatory if splitRule >= 1 and < 50. If splitRule = 50, 'winnerCriteria' is ignored if passed. |
Winner Delay |
Enter the duration of the test in hours by which you want to delay. You can delay a maximum of seven days or 168 hours. The winning version will be sent at the end of the test. Mandatory if splitRule >= 1 and < 50. If splitRule = 50, 'WinnerDelay' is ignored if passed. |
IP Warmup Enable |
Select whether you want to enable IP warmup:
|
Initial Quota |
Enter an initial quota greater than 1 for warming up your IP. We recommend you set a value of 3000. |
Increase Rate |
Enter the increase value in percentage. This field is mandatory if you have selected yes for the IP warm up. Enter the percentage increase rate. It is recommended to set the increase rate to 30% per day. If you want to send the same number of emails everyday, then set the daily increase value as 0%. |
Delete an Email Campaign
Deletes an email campaign.
| Campaign ID | Select the Campaign ID you want to delete. |
Other
New Event
Triggers when a new email event occurs.
Webhook Name |
Enter a name for the webhook. |
||||||||||||||||||||||||||
Select the type of event you to be notified about |
Select the event type for which you want to receive the notifications:
|
||||||||||||||||||||||||||
Events |
Select the event for which you want to receive the notifications.
|
See the Connecting to Sendinblue Webhook using Ibexa Connect to add the webhook in your Sendinblue account.
Send an SMS
Sends a transactional email.
Sender |
Enter the name of the sender who is sending the SMS. |
Recipient |
Enter the recipient's phone number along with the country code. |
Content |
Enter the message text. |
Type |
Select the SMS type:
|
Webhook to call for each event triggered by the message (delivered etc.). |
Enter the webhook details if applicable. |
Tag |
Enter the keyword to filter the SMS when searching. |
Send an Email
Sends a transactional email.
Template |
Select the template for the email. |
To |
Add the email addresses to which you want to send an email: Name Enter the name of the person. Enter the email address of the person. |
Subject |
Enter the subject line of the email. |
HTML Body |
Enter the email message. |
Text Body |
Enter the email message if you have not selected any template for the email. |
Name |
Enter the name of the person to which the email recipient can reply to. |
Enter the email address of the person to which the email recipient can reply to. |
|
Attachments |
Add the attachments of the email: Type Select the attachment type:
File name Enter the file name with the file extension. For example, Image URL Enter the attachment or image URL address. Data Enter the file data to the field or map the source of the file. |
BCC |
Add the email addresses which you want to add in BCC field of the email: Name Enter the name of the contact Enter the email address of the contact. |
CC |
Add the email addresses which you want to add in CC field of the email: Name Enter the name of the contact. Enter the email address of the contact. |
Name |
Enter the name of the sender. |
Enter the email address of the sender. |
|
Headers |
Enter the email header. Pass the set of custom headers (not the standard headers) that shall be sent along with the mail headers in the original email. 'sender.ip' header can be set (only for dedicated IP users) to mention the IP to be used for sending transactional emails. Headers are allowed in |
Tags |
Enter the keywords as tags to filter the emails when searching. |
Params |
Add any additional parameters: Name Enter the name of the parameter. For example, Value Enter the value of the parameter. For example, |
Send a Campaign Report
Sends a PDF campaign report to the specific email.
Campaign |
Select the campaign whose report you want to send. |
Subject |
Enter the subject line of the email. |
To |
Add the email address to whom you are sending the email: Text Enter the email address of the recipient. |
Content Type |
Select the content-type:
|
Body |
Enter the email body text. |
BCC |
Add the email addresses which you want to add in BCC field of the email: Name Enter the name of the contact Enter the email address of the contact. |
CC |
Add the email addresses which you want to add in CC field of the email: Name Enter the name of the contact Enter the email address of the contact. |
Language |
Select the language in which you want to send the email with the campaign report. |
Make an API Call
Performs an arbitrary authorized API call.
URL |
Enter a path relative to For the list of available endpoints, refer to the Sendinblue API Documentation. |
Method |
Select the HTTP method you want to use:
|
Headers |
Enter the desired request headers. You don't have to add authorization headers; we already did that for you. |
Query String |
Enter the request query string. |
Body |
Enter the body content for your API call. |
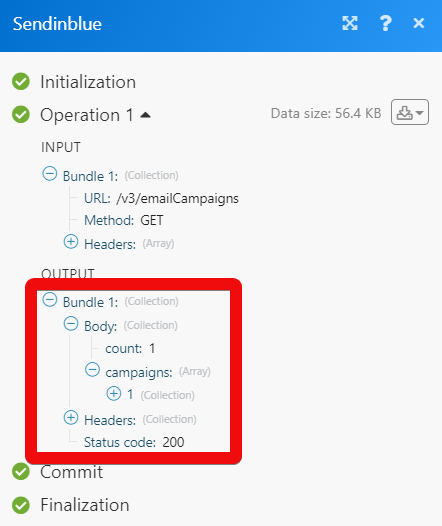
Example of Use - List Tasks
The following API call returns all tasks from your CloudFront account:
URL:
/v3/emailCampaigns
Method:
GET
Matches of the search can be found in the module's Output under Bundle > Body > data.
In our example, 1 campaign is returned:
Get My Account
Return details about my account.
Connecting to Sendinblue Webhook using Ibexa Connect
1. In the Ibexa Connect, New Event module, enter the details as mentioned in the New Event and copy the address to your clipboard.
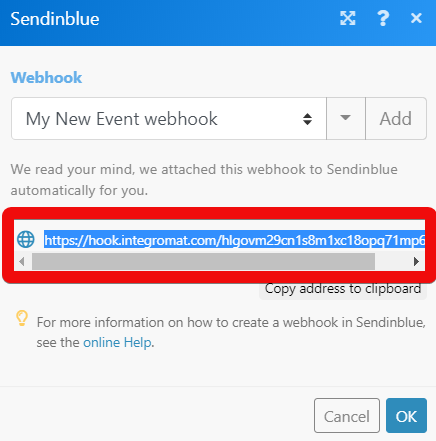
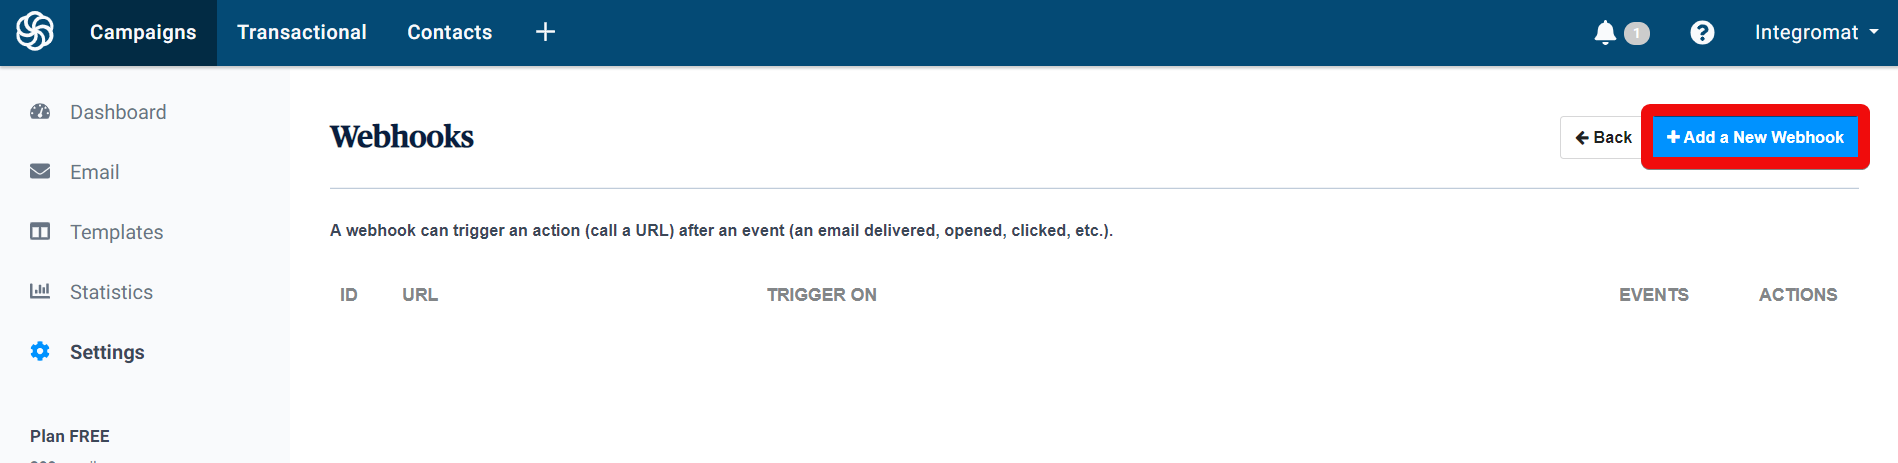
2. Login to your Sendinblue account. From the left menu, click Settings > Webhook (configure).
3. Click Add Webhook.
4. In the URL to post to field, enter the URL address copied in step 1, select the events you want to watch,, add any details about the webhook, and click Add.
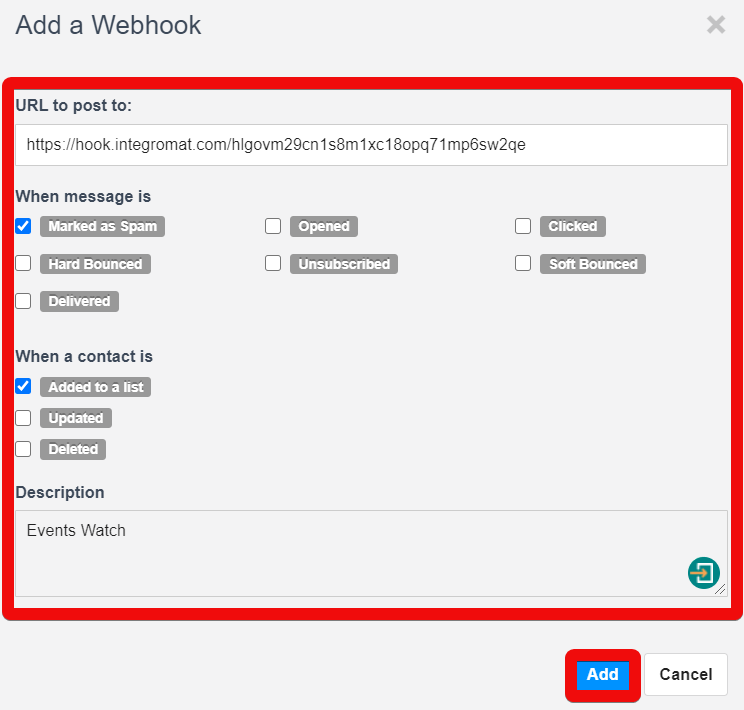
The webhook is added successfully.
