Infusionsoft
The Infusionsoft modules allow you to create, update, list, and/or delete contacts, commissions, events, campaigns, orders, transactions, emails, files, notes, opportunities, products, tasks, and tags in your Infusionsoft account.
Prerequisites
- An Infusionsoft account - create an account at signin.infusionsoft.com/registration/createInfusionsoftId.
The module dialog fields that are displayed in bold (in the Ibexa Connect scenario, not in this documentation article) are mandatory!
Connecting Infusionsoft to Ibexa Connect
To connect your Infusionsoft account to Ibexa Connect:
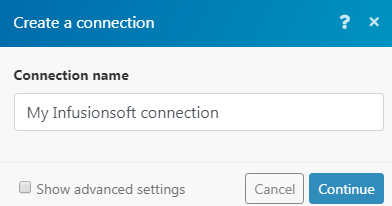
1. Go to Ibexa Connect and open the Infusionsoft module's Create a connection dialog.
2. Enter the Connection name and click Continue.
3. Enter the Email address and Password. Click Log In.
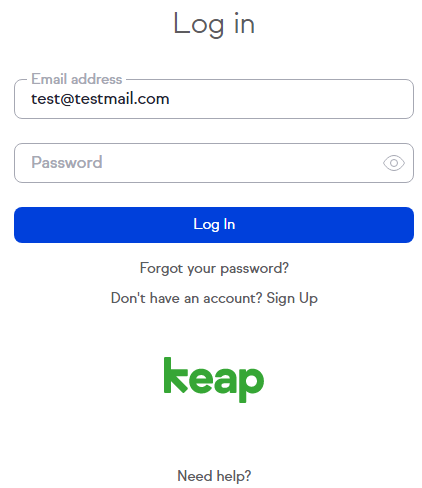
4. Click the Allow button.

The connection has been established.
Webhook
Watch Event
Triggers when a specified event occurs.
| Connection Name | Enter a name for the connection. |
| Event | Select the event you want to watch. |
Affiliate
Retrieve Commissions
Retrieves a list of commissions based on affiliate or date range.
| Since | Enter the starting date from which you want to retrieve commissions. |
| Until | Enter the ending date until which you want to retrieve commissions. |
| Limit | The maximum number of commissions Ibexa Connect should return during one scenario execution cycle. |
| Affiliate ID | Select the Affiliate ID whose commissions you want to retrieve. |
Appointment
Watch New Appointments
Checks if a new appointment was created.
| Limit | The maximum number of appointments Ibexa Connect should return during one scenario execution cycle. |
List Appointments
Retrieves all your appointments.
| Since | Enter the starting date from which you want to list the appointments. |
| Until | Enter the ending date until which you want to list appointments. |
| Number of Appointments to Return | The number of appointments Ibexa Connect should return during one scenario execution cycle. |
Retrieve an Appointment
Retrieves a specific appointment belonging to you.
| Appointment | Select the appointment whose details you want to retrieve. |
Delete an Appointment
Deletes the specified appointment.
| Appointment | Select the appointment you want to delete. |
Campaign
List Campaigns
Retrieves all your campaigns.
Option Properties |
Select the properties by which you want to list the campaigns:
|
Contact
Watch New Contacts
Checks if new contacts were created.
| Limit | The maximum number of contacts Ibexa Connect should return during one scenario execution cycle. |
List Contacts
Retrieves a list of all your contacts.
Number of Contacts to Return |
Enter the number of contacts to list. |
Enter the email address of the contact you want to list. |
|
First Name |
Enter the first name of the contact. |
Last Name |
Enter the last name or surname of the contact. |
Order |
Select the order in which you want to list the contacts:
|
Optional Properties |
Select the properties by which you want to list the contacts:
|
List Custom Field of Contacts
Retrieves a list of custom fields for contacts.
Retrieve a Contact
Retrieves a single contact.
Contact ID |
Select the Contact ID whose details you want to retrieve. |
Optional Properties |
Select the properties by which you want to list the contact:
|
Create a Contact
Creates a new contact in your contact list.
Email Addresses |
Add the Email Address of the contact:
You can add multiple email addresses for the contact. |
Phone Numbers |
Add the Phone numbers of the contact:
You can enter multiple phone numbers. |
First Name |
Enter the first name of the contact. |
Last Name |
Enter the last name of the contact. |
Middle Name |
Enter the middle name of the contact. |
Job Title |
Enter the job title of the contact. |
Company Name |
Enter the company name the contact belongs to. |
Company ID |
Enter the Company ID of the contact. |
Person Type |
Select the contact type:
|
Addresses |
Add the addresses of the contact:
You can create multiple addresses of the contact. |
Opt-In Reason |
Enter details of the contact. For example, the Customer opted-in through a webform. You may opt-in or mark a Contact as Marketable by including this field. |
Fax Numbers |
Add the fax number of the contact:
|
Website |
Enter the website of the contact or the company. |
Title |
Enter the position title of the contact. |
Suffix |
Enter the suffix for the contact:
|
Birthday |
Enter the date of birth of the contact. |
Nickname |
Enter the nickname of the contact. |
Person Notes |
Enter any information that you want to mention about the contact. |
Custom Fields |
Add custom fields:
|
Create or Update a Contact
Creates a new contact or updates a contact in your contact list.
Duplicate Option |
Select the option to create or update the contact:
|
First Name |
Enter the first name of the contact. |
Last Name |
Enter the last name of the contact. |
Middle Name |
Enter the middle name of the contact. |
Job Title |
Enter the job title of the contact. |
Company name |
Enter the company name the contact belongs to. |
Company ID |
Enter the Company ID of the contact. |
Person Type |
Select the contact type:
|
Addresses |
Add the addresses of the contact:
You can create multiple addresses of the contact. |
Opt-In Reason |
Enter details of the contact. For example, customer opted-in through a webform. You may opt-in or mark a Contact as Marketable by including this field. |
Email Addresses |
Add the Email Address of the contact:
You can add multiple email addresses for the contact. |
Phone Numbers |
Add the Phone numbers of the contact:
You can enter multiple phone numbers. |
Fax Numbers |
Add the fax number of the contact:
|
Website |
Enter the website of the contact or the company. |
Title |
Enter the position title of the contact. |
Suffix |
Enter the suffix for the contact:
|
Birthday |
Enter the date of birth of the contact. |
Nickname |
Enter the nickname of the contact. |
Person Notes |
Enter any information that you want to mention about the contact. |
Custom Fields |
Add the custom fields:
|
Update a Contact
Updates a contact with only the values provided in the request.
Contact ID |
Select the Contact ID whose details you want to update. |
First Name |
Enter the first name of the contact. |
Last Name |
Enter the last name of the contact. |
Middle Name |
Enter the middle name of the contact. |
Job Title |
Enter the job title of the contact. |
Company name |
Enter the company name the contact belongs to. |
Company ID |
Enter the Company ID of the contact. |
Person Type |
Select the contact type:
|
Owner ID |
Enter the Owner ID of the contact. |
Addresses |
Add the addresses of the contact:
You can create multiple addresses of the contact. |
Opt-In Reason |
Enter details of the contact. For example, the customer opted-in through a webform. You may opt-in or mark a Contact as Marketable by including this field. |
Email Addresses |
Add the Email Address of the contact:
You can add multiple email addresses for the contact. |
Phone Numbers |
Add the Phone numbers of the contact:
You can enter multiple phone numbers. |
Fax Numbers |
Add the fax number of the contact:
|
Website |
Enter the website of the contact or the company. |
Title |
Enter the position title of the contact. |
Suffix |
Enter the suffix for the contact:
|
Birthday |
Enter the date of birth of the contact. |
Nickname |
Enter the nickname of the contact. |
Person Notes |
Enter any information that you want to mention about the contact. |
Custom Fields |
Add the custom fields:
|
Delete Contact
Deletes the specified contact.
| Contact | Select the contact you want to delete. |
Order
Watch New Orders
Checks if new orders were created.
| Limit | The maximum number of new orders Ibexa Connect should return during one scenario execution cycle. |
List Orders
Retrieves a list of all orders using the specified search criteria.
Since |
Enter the starting date from which you want to list the orders. |
Until |
Enter the ending date from which you want to list the orders. |
Paid |
Select Yes if you want to list orders with Paid status.
|
Contact |
Select the contact whose orders you want to list. |
Product |
Select the product whose orders you want to list. |
Retrieve an Order
Retrieves a single order.
| Order ID | Select the Order ID whose details you want to retrieve. |
Retrieve Order Transactions
Retrieves a list of all transactions on a given order using the specified search criteria.
| Order | Select the order whose transaction you want to list. |
| Since | Enter the starting date from which you want to list the order transactions. |
| Until | Enter the ending date from which you want to list the order transactions. |
| Contact | Select the contact to whose order transactions you want to list. |
List Transactions
Retrieves a list of transactions for a given contact.
| Since | Enter the starting date from which you want to list the transactions. |
| Until | Enter the ending date from which you want to list the transactions. |
| Contact | Select the contact to whose transactions you want to list. |
Email
Watch Sent Emails
Checks if new emails were sent.
| Limit | The maximum number of sent emails Ibexa Connect should return during one scenario execution cycle. |
List All Emails Sent
Retrieves a list of emails that have been sent.
| Contact | Select contact whose sent emails you want to list. |
| Enter the email address whose sent the emails you want to list. |
List Emails Sent to Contact
Lists emails that have been sent to a contact.
| Contact ID | Select the Contact ID whose emails you want to list. |
| Enter the email address of the contact you want to list. |
File
Watch New Files
Checks if new files were created.
| Limit | The maximum number of new files Ibexa Connect should return during one scenario execution cycle. |
List Files
Retrieves a list of all files.
Viewable |
Select the view type of the file you want to list:
|
Permission |
Select the permission type of the file you want to list:
|
Type |
Select the file type you want to list:
|
Retrieves a File
Retrieves metadata about a specific file.
| File ID | Select the File ID whose details you want to retrieve. |
Upload a File
Uploads a file.
File Name |
Enter the file name you want to upload. |
File Data |
Select the data type of the file. |
Public |
Select if you want to make the file access public. |
File Association |
Select the option to associate the file:
|
Replace a File
Uploads a file to replace an existing one.
| File | Select the file that you want to replace. |
| File Name | Enter the file name to be uploaded. |
| File Data | Enter the data of the file. For example, get the text file from sources like Dropbox, or simply upload a text file. |
| Public | Select if the file is accessible publicly. |
| File Association | Select the association type of the file. |
Delete File
Deletes a specified file.
| File | Select the file you want to delete. |
Note
Watch New Notes
Checks if new notes were created.
| Limit | The maximum number of new notes Ibexa Connect should return during one scenario execution cycle. |
| User | Select the user assigned to the notes you want to watch. |
| Contact | Select the contact assigned to the notes you want to watch. |
List Notes
Retrieves a list of all notes.
| Number of Notes to Return | Enter the number of notes Ibexa Connect should return during one scenario execution cycle. |
| User ID | Select the User ID assigned to the notes you want to list. |
| Contact ID | Select the Contact ID assigned to the notes you want to list. |
Retrieve a Note
Retrieves a single note.
| Note ID | Select the Note ID whose details you want to retrieve. |
Delete Note
Deletes a note.
| Note ID | Select the Note ID whose details you want to delete. |
Opportunity
Watch New Opportunities
Checks if new opportunities were created.
| Limit | The maximum number of new opportunities Ibexa Connect should return during one scenario execution cycle. |
List Opportunities
Retrieves a list of all opportunities.
User ID |
Select the User ID whose opportunities you want to list. |
Stage |
Select the stage of the opportunities you want to list:
|
Order |
Select the order of opportunities you want to list:
|
Retrieve an Opportunity
Retrieves a single opportunity.
| Opportunity | Select the opportunity whose details you want to retrieve. |
Products
List Product
Retrieves a list of all products.
Active |
Select Yes if the products you want to retrieve are active:
|
Retrieve Product
Retrieves a single product from your Infusionsoft account.
| Product ID | Select the Product ID whose details you want to retrieve. |
Tags
Watch a Tag
Checks if a specific tag was added to any contact.
| Tag | Select the tag you want to watch. |
| Limit | The maximum number of tags Ibexa Connect should return during one scenario execution cycle. |
Watch New Applied Tags
Checks if a new tag was applied to a specific contact.
| Contact | Select the contact whose new applied tags you want to watch. |
| Limit | The maximum number of new applied tags Ibexa Connect should return during one scenario execution cycle. |
List Tags
Retrieves a list of tags defined in the application.
| Category ID | Select the Category ID whose tags you want to list. |
List Applied Tags
Retrieves a list of tags applied to the given contact.
| Contact | Select the contact whose applied tags you want to list. |
List Tagged Contacts
Retrieves a list of contacts that have the given tag applied.
| Tag | Select the tag whose contact you want to list. |
Retrieve a Tag
Retrieves a single tag.
| Tag | Select the tag whose details you want to retrieve. |
Apply Tag to Contacts
Applies a tag to a list of contacts.
Tag ID |
Select the Tag ID of the tag that you want to apply to the contact. |
Contact ID |
Select the Contact ID of the contact to apply the tag. You can select multiple contacts to apply the tag. |
Apply Tags
Applies a list of tags to a given contact record.
Contact ID |
Select the Contact ID of the contact to apply the tag. |
Tag ID |
Select the Tag ID to apply the tags to the contact. You can select multiple tags. |
Create Tag
Creates a new tag.
| Description | Enter the details of the tag. |
| Name | Enter the name of the tag. |
| Category ID | Enter the Category ID for the tag. |
Create Tag Category
Creates a new tag category.
| Name | Enter the name of the tag category. |
| Description | Enter the details of the tag category. |
Remove Tag from Contacts
Removes a tag from a list of contacts.
| Tag | Select the tag that you want to remove. |
| Contact | Select the contact from whom the tag should be removed. |
Remove Applied Tags
Removes a list of tags from the given contact.
| Contact | Select the contact whose applied tags you want to remove. |
Task
Watch New Tasks
Checks if new tasks were created.
| Limit | The maximum number of new tasks Ibexa Connect should return during one scenario execution cycle. |
List Tasks
Retrieves a list of all tasks using the specified search criteria.
| Contact | Select the contact whose tasks you want to list. |
| Limit | The maximum number of tasks Ibexa Connect should return during one scenario execution cycle. |
Retrieve a Task
Retrieves a single task.
| Task | Select the task whose details you want to retrieve. |
Create a Task
Creates a new task.
Contact ID |
Select the Contact ID to whom you want to assign this new task. |
Action Description |
Enter the name of the task. |
Action Date |
Enter the date on which the task must be done. |
Completion date |
Enter the date by which the task must be complete. |
Creation Notes |
Enter the details of the task. |
Priority |
Select the priority of the task:
|
Update Task
Updates a task with only the values provided in the request.
Task |
Select the task you want to update. |
Contact |
Select the contact to whom the task is assigned. |
Action Description |
Enter the name of the task. |
Action Date |
Enter the date on which the task must be done. |
Completion date |
Enter the date by which the task must be complete. |
Creation Notes |
Enter the details of the task. |
Priority |
Select the priority of the task:
|
Delete Task
Permanently deletes a specified task.
| Task | Select the task you want to delete. |
Other
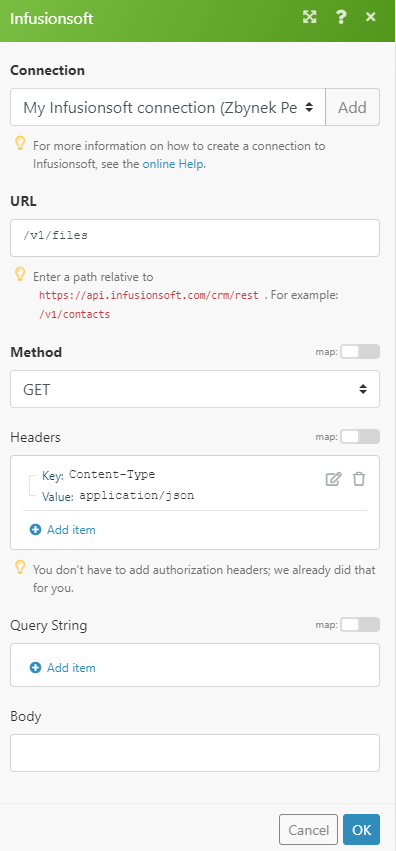
Make an API Call
Performs an arbitrary authorized API call.
URL |
Enter a path relative to For the list of available endpoints, refer to the Infusionsoft API Documentation. |
Method |
Select the HTTP method you want to use: GET to retrieve information for an entry. POST to create a new entry. PUT to update/replace an existing entry. PATCH to make a partial entry update. DELETE to delete an entry. |
Headers |
Enter the desired request headers. You don't have to add authorization headers; we already did that for you. |
Query String |
Enter the request query string. |
Body |
Enter the body content for your API call. |
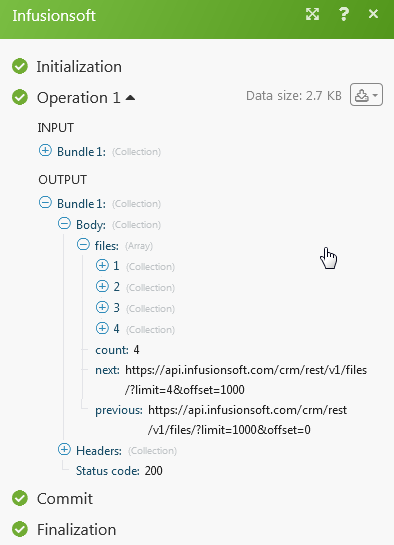
Example - List Files
Following API call returns all files:
Matches of the search can be found in the module's Output under Bundle > Body > files. In our example, 4 files were returned: