Step 3 — Customize the front page
In this step you can create the global layout of your site, and display content by using custom templates.
First, go to the root of the site (<yourdomain>).
You should now see the home page of the clean install, without any kind of layout.
You can customize this step by instructing the platform to use a custom template to render this content item.
Content rendering configuration
To use a custom template when rendering the root content, create a content_view configuration block for ibexa.
Note
When pasting YAML code, pay attention to indentation and levels. The code blocks shown here include the full structure of the YAML file to help you learn where to place new blocks. Be careful not to duplicate existing keys, because YAML doesn't allow it.
Edit config/packages/ibexa.yaml.
Add the following block under site while paying attention to indentation - content_view should be one level below site:
1 2 3 4 5 6 7 8 9 | |
This tells Ibexa DXP to use the template when rendering content with Location ID 2.
2 is the default location for the root content item.
Id\Location is one of several view matchers that you can use to customize rendering depending on different criteria.
Clear the cache
Each time you change the YAML files, you should clear the cache. It's not mandatory in dev environment.
To clear the cache:
1 | |
Create template and layout
Create the first template
Next, you need to create the template that you indicated in configuration.
For the time being, fill the template with a basic "Hello world" message.
Create a home_page.html.twig file in templates/full/:
1 2 3 | |
Refresh the page to see an unstyled version of the message.
Note
If you still see the welcome page, go to config/packages/ and make sure you deleted the ibexa_welcome_page.yaml file.
Add the site's main layout
Most sites have a general layout which includes things like header with a logo or footer. It's displayed on every page, and the content of the page is placed inside it.
To add a template like this to your site, create a main_layout.html.twig file in templates/ and paste the following code into it:
1 2 3 4 5 6 7 8 9 10 11 12 13 14 15 16 17 18 19 20 21 22 23 24 25 26 27 28 29 30 31 32 33 34 35 36 37 38 39 40 41 42 43 44 45 46 47 48 49 50 51 52 53 54 55 56 57 58 59 60 61 62 63 64 65 66 67 68 69 70 71 72 73 74 75 76 77 78 79 80 81 82 83 84 85 86 87 88 89 90 91 92 | |
In the highlighted lines (12 and 89) the template takes advantage of Symfony Webpack Encore. This tutorial leads you through configuring Webpack, but first you need assets.
Adding assets
The site has no stylesheets or assets yet.
You need to download assets.zip which contains the prepared asset files.
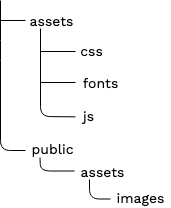
Then unpack its contents to the following directories:
css,fonts, andjsfolders toassets/imagesfolder topublic/assets/
Before proceeding, ensure that the structure of the added files looks like this:
Configuring Webpack
In Ibexa DXP, you can add assets by using Symfony Webpack Encore — an integration of Webpack that enables you to build bundles of CSS stylesheets and JS scripts and add them to the project.
For more information, see Importing assets from a bundle.
To create bundles, first, indicate which files to include in them.
Open the webpack.config.js file located in the root folder of your project.
Paste the following code right under Encore.addEntry('app', './assets/app.js');:
1 2 3 4 5 6 7 8 9 10 | |
.addStyleEntry('tutorial', []) and .addEntry('tutorial-js', []) refer to {{ encore_entry_link_tags('tutorial') }} and {{ encore_entry_script_tags('tutorial-js') }} from main_layout.html.twig.
This configuration creates a bundle consisting of files to be added to a template.
At this point the bundles are created and ready to be used.
Extending templates
Now you have to add the main_layout.html.twig template that uses the assets to the home_page.html.twig template.
To add one template to another, edit templates/full/home_page.html.twig and replace it with the following code:
1 2 3 4 5 6 7 | |
The templating language Twig supports template inheritance. Templates can contain named blocks. Any template can extend other templates, and modify the blocks defined by its parents.
The code above points to main_layout.html.twig in line 1.
It also wraps your "Hello world" message in a content block.
If you look back at the main layout template, you can see an empty {% block content %}{% endblock %} section (lines 52-53).
This is where the home_page.html.twig is rendered.
Clear the cache and regenerate the assets by running the following commands:
1 2 3 | |
Tip
You should run the yarn encore command with the environment you're using.
By default, Ibexa DXP installs in the dev environment.
If you changed it to prod, use yarn encore prod.
Refresh the page and you should see the "Hello world" placed inside a styled layout.

At this point, the template is static. It doesn't render any dynamic data from the repository.