Extend Online Editor
Ibexa DXP users edit the contents of RichText fields, for example, in the Content box of a Page, by using the Online Editor.
You can extend the Online Editor by adding custom tags and styles, defining custom data attributes, re-arranging existing buttons, grouping buttons into custom toolbar, and creating custom buttons and custom plugins.
Online Editor is based on the CKEditor5. Refer to CKEditor5 documentation to learn how you can extend the Online Editor with even more elements.
For more information about extending the back office, see Extend back office.
Configure custom tags
With custom tags, you can enhance the Online Editor with features that go beyond the built-in ones.
You configure custom tags under the ibexa_richtext key.
Start preparing the tag by adding a configuration file:
1 2 3 4 5 6 7 8 9 10 11 12 13 14 15 16 17 18 19 20 21 22 23 24 25 | |
Custom tags can have as many attributes as needed.
Supported attribute types are:
string, number, boolean, link, and choice.
choice requires that you provide a list of options in the choices key.
Provide your own SVG icon, or choose one from the built-in icons included in all-icons.svg.
You must create your own file for the Twig template.
Place the factbox.html.twig template in the
templates/themes/<your-theme>/field_type/ibexa_richtext/custom_tags directory:
1 2 3 4 5 6 | |
Tip
If an attribute isn't required, check if it's defined by adding a check in the template, for example:
1 2 3 | |
Add labels for the new tag by providing translations in translations/custom_tags.en.yaml:
1 2 3 | |
Now you can use the tag. In the back office, create or edit a content item that has a RichText field type. In the Online Editor, click Add, and from the list of available tags select the FactBox tag icon.

Inline custom tags
You can also place custom tags inline with the following configuration:
1 2 3 4 5 6 7 8 | |
is_inline is an optional key.
The default value is false, therefore, if it's not set, the custom tag is
treated as a block tag.
Use cases
Link tag
You can configure a custom tag with a link attribute that offers a basic UI with text input.
It's useful when migrating from eZ Publish to Ibexa DXP.
The configuration is:
1 2 3 4 5 6 7 8 9 10 11 12 13 14 15 16 17 18 19 20 21 22 23 24 25 26 27 28 29 30 31 | |
Provide your own SVG icon, or choose one from the built-in icons included in all-icons.svg.
Use your own file for the Twig template.
The tag has the url attribute with the type parameter set as link (lines 30-31).
Then create the templates/themes/<your-theme>/field_type/ibexa_richtext/custom_tags/linktag.html.twig template:
1 2 3 4 | |
Add labels for the tag by providing translations in translations/custom_tags.en.yaml:
1 2 3 4 5 | |
Now you can use the tag. In the back office, create or edit a content item that has a RichText field type. In the Online Editor's toolbar, click Show more items, and from the list of available tags select the Link tag icon.

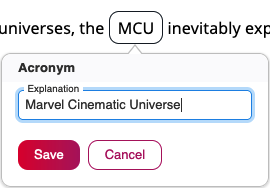
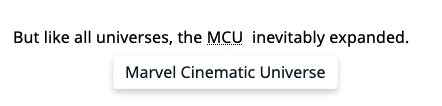
Acronym
You can create an inline custom tag that displays a hovering tooltip with an explanation of an acronym.
1 2 3 4 5 6 7 8 9 10 11 12 13 14 15 16 17 18 19 20 | |
The explanation attribute contains the meaning of the acronym that is provided
while editing in the Online Editor.
Add labels for the tag by providing translations in translations/custom_tags.en.yaml:
1 2 | |
In the template file acronym.html.twig provide the explanation as attribute value to the title of the abbr tag:
1 | |
Configure custom styles
You can extend the Online Editor with custom text styles. The styles are available in the text toolbar when a section of text is selected.
There are two kinds of custom styles: block and inline. Inline styles apply to the selected portion of text only, while block styles apply to the whole paragraph.
Start creating a custom style by providing configuration:
- a global list of custom styles, defined under the node
ibexa_richtext.custom_styles, - a list of enabled custom styles for a given
adminSiteAccess oradmin_groupSiteAccess group, located under the nodeibexa.system.<scope>.fieldtypes.ibexa_richtext.custom_styles
A sample configuration could look as follows:
1 2 3 4 5 6 7 8 9 10 11 12 13 14 | |
Note
Currently, if you define these lists for a front site SiteAccess, it has no effect.
Add labels for the new styles by providing translations in translations/custom_styles.en.yaml:
1 2 | |
Rendering
The template key points to the template that is used to render the custom style.
It's recommended that you use the design engine.
The template files for the front end could look as follows:
templates/themes/standard/field_type/ibexa_richtext/custom_styles/highlighted_word.html.twig:
1 | |
templates/themes/standard/field_type/ibexa_richtext/custom_styles/highlighted_block.html.twig:
1 | |
Templates for Content View in the back office would be templates/themes/admin/field_type/ibexa_richtext/custom_styles/highlighted_word.html.twig and templates/themes/admin/field_type/ibexa_richtext/custom_styles/highlighted_block.html.twig (assuming that the back office SiteAccess uses the default admin theme).
Use cases
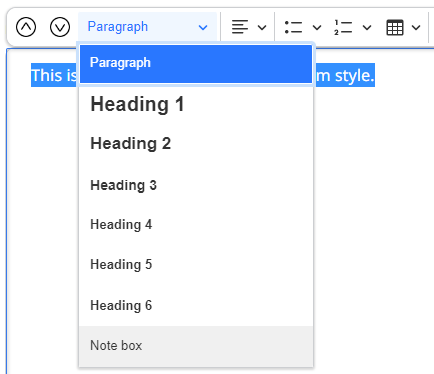
Note box
You can create a custom style that places a paragraph in a note box:
1 2 3 4 5 6 7 8 9 10 | |
The note_box.html.twig template wraps the content of the selected text
({{ content }}) in a custom CSS class:
1 | |
You can now define the custom CSS for this template, for example by using Webpack Encore and assets:
1 2 3 4 5 6 7 8 9 | |
Add label for the new style by providing a translation in translations/custom_styles.en.yaml:
1 | |
Tip
You can also create a similar note box with custom classes.
Text highlight
You can create an inline custom style that highlights a part of a text:
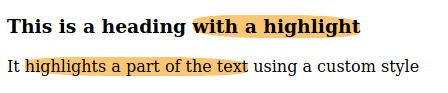
1 2 3 4 5 6 7 8 9 10 11 | |
The highlight.html.twig template wraps the content of the selected text
({{ content }}) in a custom CSS class:
1 | |
You can now define the custom CSS for this template, for example by using Webpack Encore and assets:
1 2 3 4 | |
Add label for the new style by providing a translation in translations/custom_styles.en.yaml:
1 | |

Configure custom data attributes and classes
You can add custom data attributes and CSS classes to the following elements in the Online Editor:
embedInlineembedformattedheadingheading1toheading6embedImageulolliparagraphtabletrtdlink
Heading elements
heading applies to all heading elements, and heading1 to heading6 to specific heading levels.
When you configure both heading and a specific heading level (for example, heading2) at the same time,
only the more specific configuration applies, in this case, heading2.
Overriding embed templates
If you override the default templates for embedInline, embed or embedImage
elements, for example, @IbexaCore/default/content/embed.html.twig,
the data attributes and classes aren't rendered automatically.
Instead, you can make use of the data_attributes and class properties
in your templates.
With the ibexa_data_attributes_serialize helper you can serialize the data
attribute array.
Custom data attributes
You configure custom data attributes under the fieldtypes.ibexa_fieldtype_richtext.attributes key.
The configuration is SiteAccess-aware.
A custom data attribute can belong to one of the following types: choice, boolean, string, or number.
You can also set each attribute to be required and set its default_value.
For the choice type, you must provide an array of available choices.
By adding multiple, you can decide whether more than one option can be selected.
It's set to false by default.
Use the example below to add two data attributes, custom_attribute and another_attribute to the Heading element in the admin_group SiteAccess:
1 2 3 4 5 6 7 8 9 10 11 12 13 14 15 16 | |
The configuration outputs data-ezattribute-<attribute_name>="<value>" in the corresponding HTML element.
Here, the resulting values are data-ezattribute-custom-attribute="false" and data-ezattribute-another-attribute="attr1,attr2".
Custom CSS classes
You configure custom CSS classes under the fieldtypes.ibexa_richtext.classes key.
The configuration is SiteAccess-aware.
You must provide the available choices.
You can also set the values for required, default_value and multiple.
multiple is set to true by default.
Use the example below to add a class choice to the Paragraph element in the admin_group SiteAccess:
1 2 3 4 5 6 7 8 9 10 11 | |
Label translations
If there are many custom attributes, to provide label translations for these attributes, you can use the ez_online_editor_attributes translation extractor to get a full list of all custom attributes for all elements in all scopes.
For example:
1 2 | |
Use cases
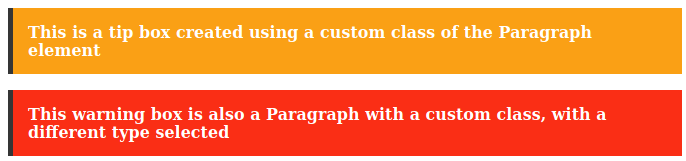
Note box
You can create a custom class that enables you to place a paragraph element in a note box:
1 2 3 4 5 6 7 8 | |
With this class you can choose one of the following classes for each paragraph element: regular, tip_box, or warning_box.
You can then style the class by using CSS.

Tip
You can also create a similar note box with custom styles.
Rearrange buttons
You can modify the order and visibility of buttons that are available in the Online Editor toolbar through configuration:
1 2 3 4 5 6 7 8 9 10 11 12 13 14 15 16 17 18 19 20 21 | |
For each button you can set priority, which defines the order of buttons in the toolbar.
For a full list of standard buttons, see the RichText module's configuration file
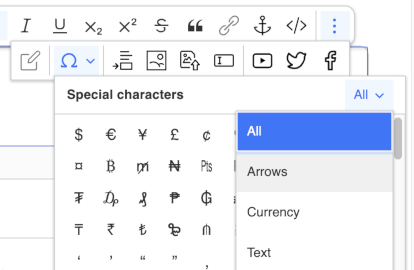
Add CKEditor plugins
Regular CKEditor plugins can be added to the Online Editor. This procedure is illustrated with the addition of the Special characters plugin.
You can install a CKEditor plugin locally by using yarn add or npm install, and deploy it by committing the yarn.lock file.
A local installation looks like:
1 | |
Make sure to specify a version range compatible with the CKEditor's version used in Ibexa DXP.
The CKEditor plugin must be added to the ibexa.richText.CKEditor.extraPlugins array.
For this purpose, create an assets/js/richtext.ckeditor-plugins.js to import the plugin elements and add them to the array using ibexa.addConfig :
1 2 3 4 5 | |
The plugin is imported from ../../node_modules/@ckeditor path and not directly from @ckeditor alias because this alias points at ./public/bundles/ibexaadminuiassets/vendors/@ckeditor.
Add the previous file to ibexa-richtext-onlineeditor-js Webpack Encore entry.
Create the following encore/ibexa.richtext.config.manager.js file:
1 2 3 4 5 6 7 8 9 | |
See Importing assets from a bundle for alternative ways to add files to Webpack Encore entries.
Add the plugin button to the RichText toolbar config (under ibexa.system.<scope>.fieldtypes.ibexa_richtext.toolbar).
A new button group is defined in config/packages/ibexa_admin_ui.yaml with the specialcharacters button exposed by the plugin API:
1 2 3 4 5 6 7 8 9 10 11 12 13 | |
Build the assets and clear the cache by running composer run-script auto-scripts.
For more information, see CKEditor plugins documentation.
Change CKEditor configuration
You can add or override CKEditor configuration to set one of the available properties.
To do it, add a custom config object to the window.ibexa.richText.CKEditor.extraConfig key
by using the addConfig method:
1 | |
To have Arrows category from previously added Special characters plugin on top of the filter menu:
1 | |
You can also use custom functions to modify the plugin configuration. The following example adds two ways to add a non-breaking space character:
1 2 3 4 5 6 7 8 9 10 11 12 | |