Create and edit content items
Create content items
-
Start creating a new content item in one of the following ways:
-
In the left panel, go to Content -> Content structure. Then select a parent content item and click Create content.
The new content item becomes a child of the content item that you originally selected.
-
In the Quick actions block of the Dashboard screen, click Create content. Then choose a location for the new item in content browser and click Create.
Tip
An alternative way of creating content items is to drag one or more files onto the Sub-items tab when viewing any content item in a content tree.
-
-
In a slide-out pane, make initial choices in the following fields, and click Create:
- Select a language - from a drop-down list, select the base language for the content item.
- Select a content type - use this field to narrow down the list of choices displayed below. Then select a content type to serve as a template for the content item.
Note
If you're using Ibexa Experience or Ibexa Commerce, the options include forms and pages. You then build forms and create pages in their respective specialist tools.
-
Fill in the fields of the content item.
-
Click Preview to see how the content item could look to an end-user.
Tip
A content item can look different on different SiteAccesses. You can select a SiteAccess to preview with a drop-down in the preview screen.
-
To discard your changes and close the window, click Delete draft.
-
To save your changes:
- Click Save to continue editing.
- Click Save and close to close the window.
-
To send your changes to another editor for review, click Send to review.
-
When the content item is ready for publication:
- Click Publish to publish it immediately.
- Click Publish later to set a specific publication date.
For more information, see Publish content.
Versioning and autosave
Whenever you edit a content item, a new version is created in the repository.
To help you preserve your work, Ibexa DXP saves drafts of content items automatically. For more information, see Autosave.
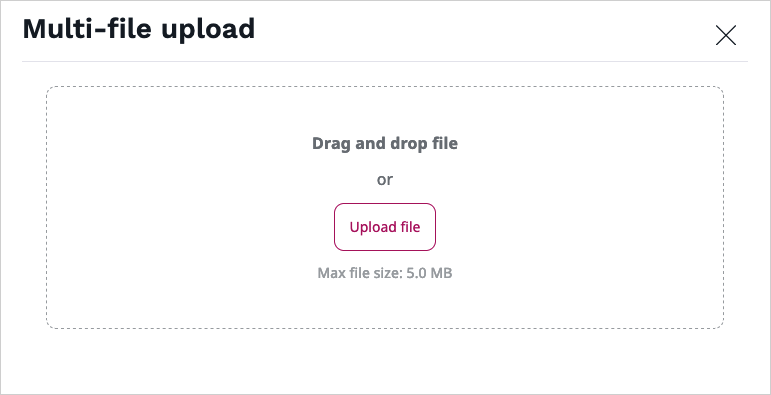
Upload multiple content items
When you view the content item details in the content tree, you can upload files such as images, videos, or PDF documents. This way you can add multiple sub-items without editing the original content item. To do it, on the content item details screen, in the Sub-items tab, click Upload and choose all items that you want to upload. When a file is uploaded with multi-file upload, it's automatically stored in a field of the content item.
Note
The content type for the uploaded files is selected automatically by the system.
Edit new or existing content items
Each content item is based on a content type. The content type defines what fields you have to fill in when creating a new item. It may also determine the layout or style in which this item is displayed.
Fields marked with an asterisk (*) are required. You can't save the content item without filling them in.
Some fields, such as Relation field (which links two content items) or Image field, require you to select a different content item to link to. A Location field is a point on the map. You can type the place name, enter its coordinates, or select it on the map.
Note
When you create or edit a content item that contains an Image or an Image asset field, you can perform basic image editing functions in an Image Editor.
Edit Rich Text fields
To fill in Rich Text fields you use an online editor. Its options appear when you click inside the field box.

You can choose from available options to edit and customize Rich Text field, for example, move up or down its elements, select heading style, add text elements, like superscript, block quote, or anchor.
You can also add new elements to the field. To do it, choose one of the available elements:
- Unordered list
- Ordered list
- Table
- Embed
- Embed product
- Image
- YouTube
- X

Each of these elements can have its own settings, such as text formatting. The option bar also lets you reorder or remove any elements in the Rich Text field.
Collaborative editing
Rich Text fields allow multiple users to edit the content simultaneously thanks to the Collaborative editing feature. When creating a new content item, the owner can invite other users, both internal and external, to collaborate on the content. Invited users can either edit the Rich Text fields or only preview the content (for example, for review purposes), depending on the access permissions granted.
Edit embedded content items
You can edit embedded content items without leaving current window.
To do it, first insert selected content item in the Rich Text field. Then, click the three dots icon on the right side and click Edit.

If the content item has more than one translation available, you need to select the language.

This action opens a new browser tab with an editing screen of the selected content item. When you finish editing the item, click Publish. To see implemented changes refresh the browser page.
This option is also available when you want to set up a relation with another content item.

Embed products
You can embed products from the product catalog directly inside a Rich Text field. Use this feature when building landing pages or articles that reference specific products, for example, a blog post that highlights a new product launch.
Two embed styles are available:
- Embed embeds a product as a standalone element between paragraphs.
- Inline embed embeds a product within a sentence or paragraph.
Distraction free mode
Distraction free mode expands the workspace to full screen and shows only editor toolbar. It's helpful when you need to work with longer texts that take more space and when you want to focus your attention on editing text.

To access distraction free mode, click Distraction free mode on the right side above the workspace.

To exit distraction free mode, click Exit distraction free mode or press Esc on the keyboard.

Anchors
For longer texts, insert an anchor linking a fragment of text with another fragment or section to quickly jump through sections of an article.
To create an anchor:
1. Click in the area to link to and select the anchor icon from the editor menu.
2. In the modal window, provide the name for the anchor.
3. Scroll to the fragment where you want to insert the link, and select the text to appear as a link.
4. In the modal window, click the Link button. This opens the window to create the link.
5. In the Link to box, enter the anchor name, and click Save.
Images
In image options you can select an image variation. Variations can include different sizing options and other filters that are applied to images. Available image variations must be configured at the developer level. See Images for a technical guide on how to do this.
Tables
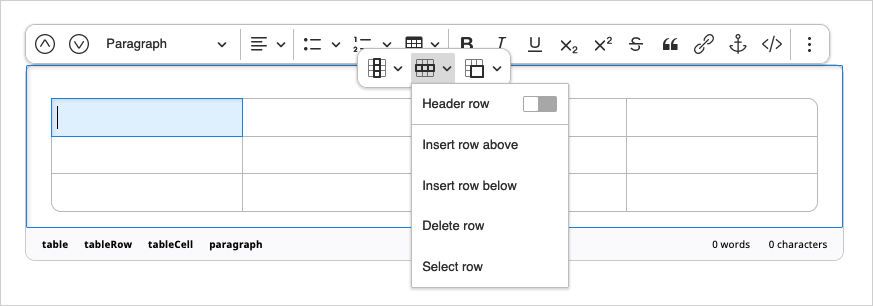
In table options you can define the first row and/or column as headers, add or delete rows and columns in any part of the table, and also merge or split cells.
Custom elements
Your installation can also have custom elements available in the Rich Text field. Contact your website administrator about the details of using them.
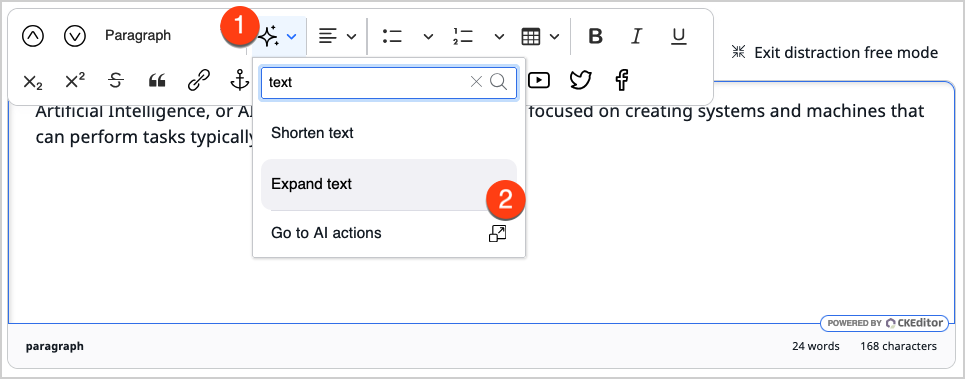
AI Assistant
If AI Actions have been configured in your application, when writing content, the Improve text button is visible in the online editor's toolbox. If you have the required permissions, you can request that the AI Assistant refines your text by using one of the defined actions. For example, you can highlight a passage and instruct the AI Assistant to extend the passage or adjust its tone to suit your needs. The Go to AI actions button can also visible to users with access to the Admin UI. By clicking it, you can quickly navigate to AI actions configuration.
The AI Assistant is also available when working with Text Line and Text Block fields, allowing you to use AI on the contents of these fields.
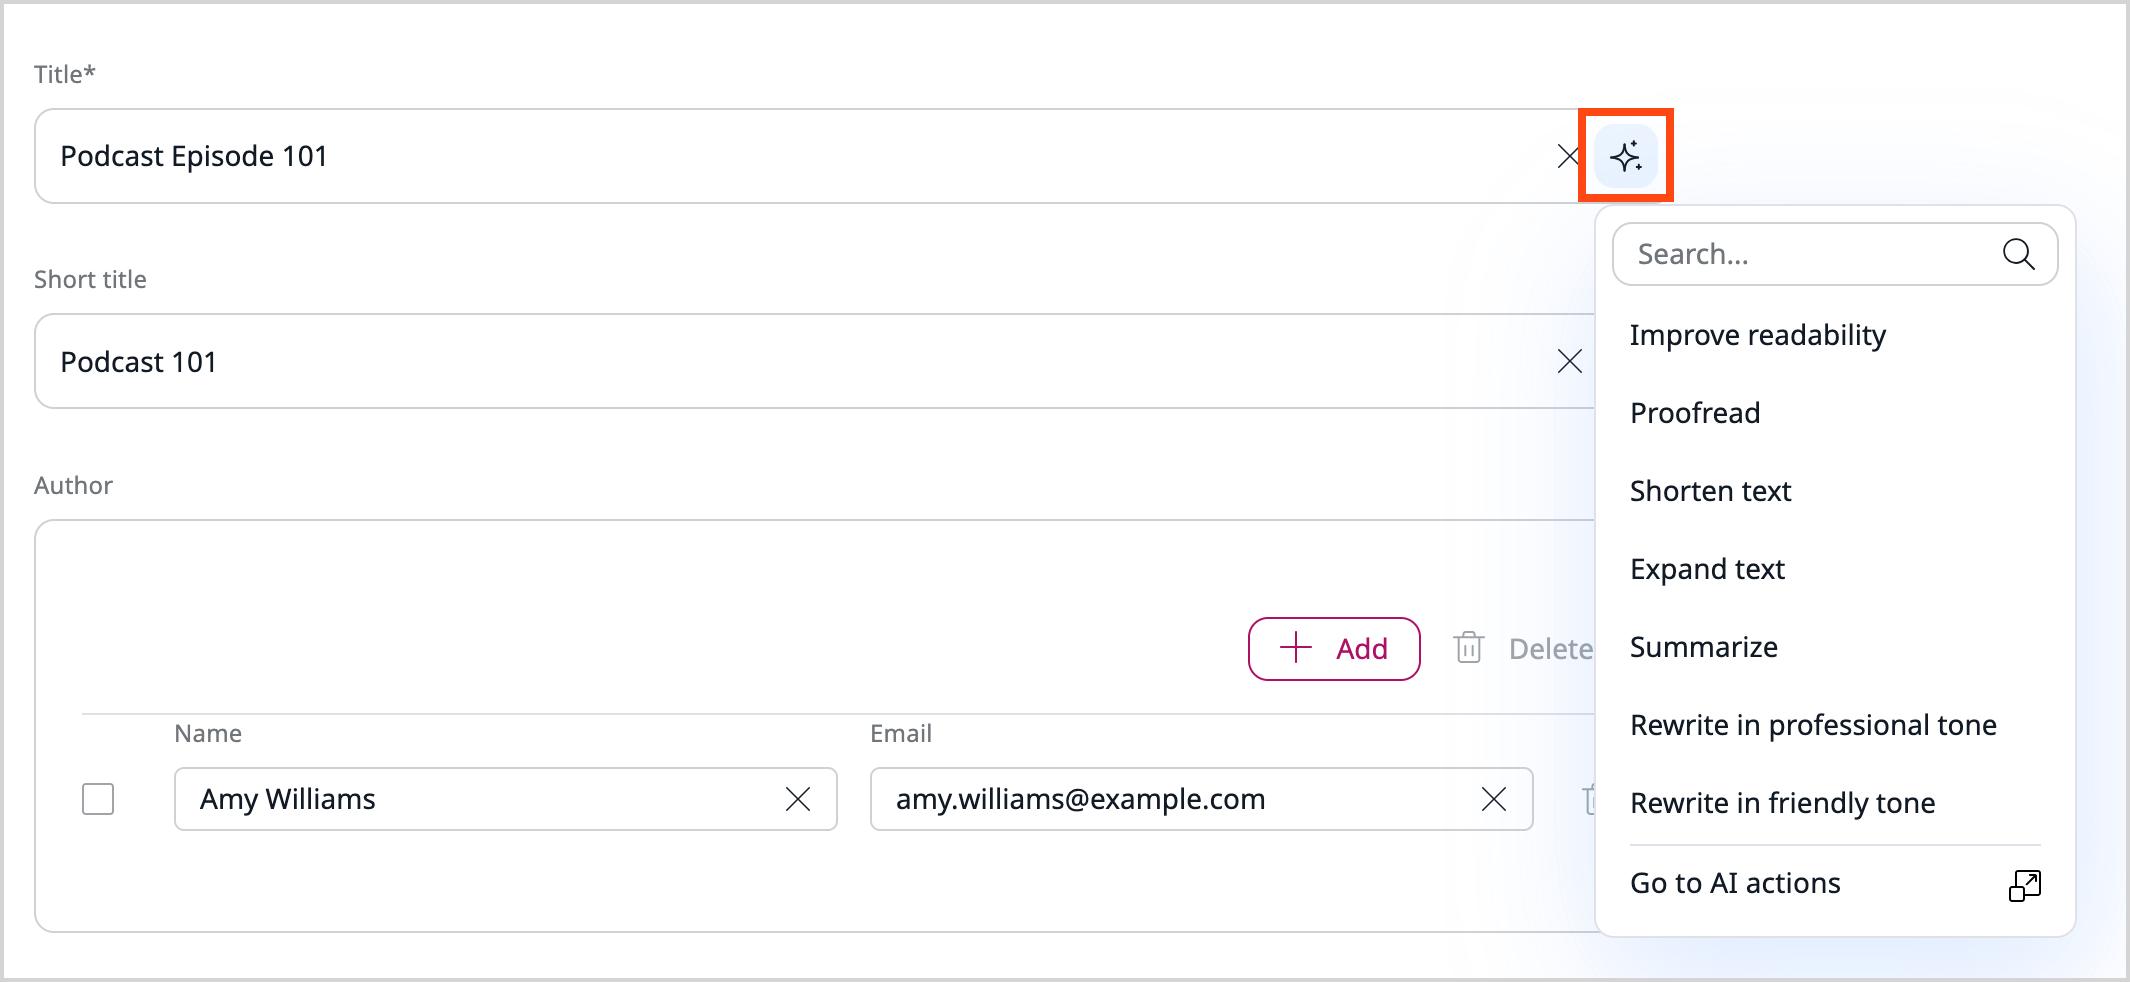
After you select an action, the AI Assistant modal appears, where you can observe the results of AI service's work. When response is displayed on the screen, depending on whether you are satisfied with the result, you can select one of the options:
- Replace - replaces the source text with the output
- Insert below - inserts the output text directly after the source passage (available only in the online editor)
- Try again - makes another attempt at generating the output

Lengthy processing of complex requests
Depending on the length of the source text and the complexity of request, processing may take a while. You may cancel the processing if it takes too long by clicking Stop.
SeenThis! streaming
Note
This custom tag is in an opt-in bundle, to use it, install ibexa/connector-seenthis bundle first.
Use SeenThis! tag to enable displaying of video with maximum quality regardless of connection and server integration.
For more information, see SeenThis! page block documentation.
Text formatting
When you select a section of text, you get access to text formatting options such as bold or underline. Here you can also add a link to the text. You can link to an external website, or to another content item.
When linking to content, you can select a SiteAccess from the drop-down to enable cross-website linking. This allows the link to work across different websites in a multisite setup.

Add taxonomy entries
To keep your content organized and searchable, you can add taxonomy entries to a content item while creating or editing it. For this feature to work as described, the content type must have a Metadata section, with a Taxonomy Entry field in it.
- Switch to the Meta tab.
- Click the Select path button.
- In the pop-up window, select the tags you want to add.

Taxonomy suggestions
If the Taxonomy suggestions feature is enabled in your system, instead of manually browsing the taxonomy tree and selecting tags one by one, you can click AI Suggest category and pick from suggestions made by the AI Assistant.

For more information, see Assign tag to content from taxonomy tree.