Translate content
The content on your website can be translated into different languages. Each content item can have different language versions. The version visible to a visitor depends on the way your installation is set up (see SiteAccess concept).
Translations management LTS Update
If the Translations management LTS Update is installed in your system, Ibexa DXP offers a side-by-side translation view that displays the source and target languages simultaneously. It makes it easier for you to provide, edit, and review translations.
Add website languages
You can only add translations in languages that have been set up for your website in the Admin panel. If your user role has the right permissions, you can create a new language for the website. To do it, go to the Admin panel, open the Languages tab, and click Add language.
Every new language must have a name and a language code written in the xxx-XX format, for example, eng-US, fre-FR, or nor-NO. After adding a language, you may have to reload the application to be able to use it.
Website configuration
Depending on the way the website is set up, additional configuration may be necessary for the new translations to be displayed properly. Contact your administrator and inform them that you need to add a new language to the website.
For example, you can only preview content items translated to languages that have a corresponding website configured in that language.

For more information, see Developer Documentation on language versions.
Add translations
1. In the left panel, go to Content -> Content structure. Then select a content item.
2. Go to Translations tab and click + Add.
3. In the Create a new translation modal, select the source and target languages, then click Create.
All the fields are then pre-filled with the values they have in the base translation. If you do not choose a base translation, the fields remain empty.
While working, you can save your work and continue or click Delete draft to discard your changes. When done, you can save your work and close the window, publish the translated article immediately, or pick another publication date.
Every time you add or edit a translation, a new version of the content item is created, the same way as when editing only one language.
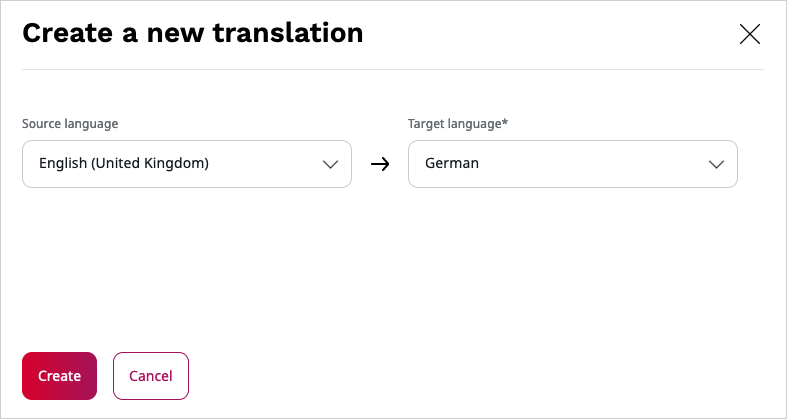
Automated translation
If your application comes with a properly configured automated translation feature, you can have your content machine-translated into multiple languages by using external translation services like Google Translate and DeepL.
To use it, in the Create a new translation modal, select the source and target languages and the Use automatic translation with... checkbox. If more than one service is configured, you can choose either of the available options.
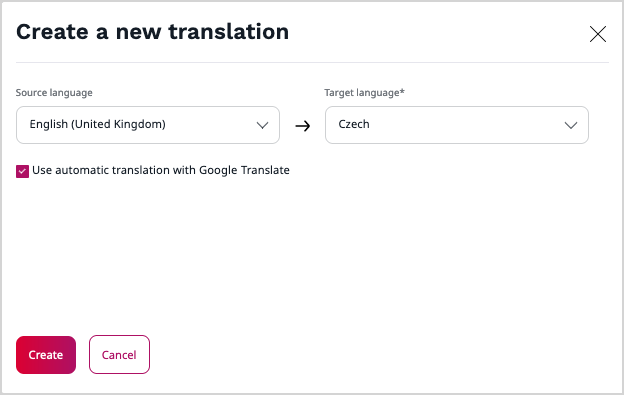
When you click Create, all the Fields are pre-filled with the values in target language, provided by the selected translation service.
Translation comparison
You can compare different versions of the translations of the content item.
2. In the left panel, go to Content -> Content structure. Then select a content item.
3. Go to Versions tab and click the Version compare icon:  .
.
4. In the Comparing versions screen, use the switcher in the top right corner, and click the split view:
5. From the drop-downs, select two different language versions of the same content item. The screen refreshes to display the side by side view of its fields.
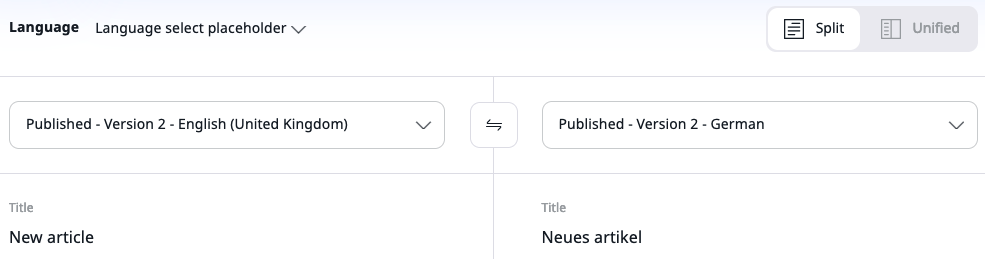
For more information, see Work with versions.
Translations management 
If the translations management feature is installed and properly configured in your system, the set of features available for content item and product translation changes:
- Application administrators can define language pairs and assign translation services to them.
- Content editors get a redesigned translation interface called side-by-side translation view. If at least one automated translation provider is configured, editors can use it to machine-translate content.
Limitations
Pages and Forms don't support the side-by-side translation view and open in the single-language editor instead.
When you translate them automatically:
- Translatable page content, including text and RichText block attributes, is sent for translation, while layout, zones, and non-translatable block attributes are preserved from the source page.
- The form that you build with the Form Builder is not translated.
Also, product attributes remain non-translatable and are inactive in the side-by-side translation view.
Manage translation services and language pairs
If you have Administrator permissions, you can enable and disable translation services and assign them to language pairs. Enabling at least one translation service is required before the editors can use automatic translation.
Translation services
To see the translation services that are available in your system, go to Admin -> Languages -> Translation services tab.
The tab lists all translation services that have been configured by the developer. Each service shows its name, vendor, and whether it's enabled. Disabled services don't appear as choices in the Create a new translation modal.
Permission to use AI actions
AI-based translation services require that policies related to AI actions are assigned to user roles. If an editor can't see AI-based services in the drop-down on the Create a new translation modal, check if the right permissions are granted in their role definition.
Language pairs
To manage language pairs, go to Admin -> Languages -> Language pairs tab.
A language pair setting decides which translation service is used by default when an editor translates from one specific language to another. When an editor opens the Create a new translation modal and selects a source and target language, a matching translation service gets pre-selected. The editor can override this selection.
To add a language pair, click + Add language pair, and then:
- Select a source language.
- Select one or more target languages.
- Select a translation service.
- Click Save and close.
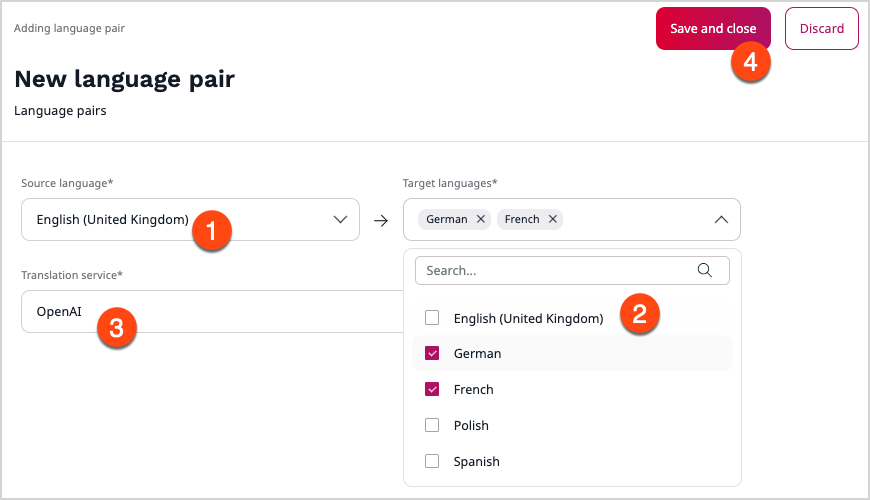
This creates one language pair per selected target language.
Existing language pairs
If a language pair for a given source-to-target combination already exists, even for a disabled translation service, you cannot create another one with a different service. Edit the existing language pair instead. To do it, you may need to temporarily re-enable the disabled services, so that all language pairs appear on the screen.
Side-by-side translation view
The side-by-side translation view displays the source and target text of the content item or product on one screen. This way you can add, modify or review translations in context without having to switch between tabs or windows.
The back office offers several entry points where you can access the side-by-side translation view, for example:
- Content item's Translations tab — go to Content -> Content structure, select a content item, open the Translations tab, and click + Add.
- Product's Translations tab — go to Product catalog -> Products, select a product, open the Translations tab, and click + Add.
- Content tree — click the three dots icon next to a content item in the content tree and, in the context menu, click Add translation.
- Content edit view — when you choose to edit a content item and several language versions exist, the Edit side-by-side button is active for all languages except for the main language of the content item.
Source and target columns
Depending on user settings, the source language column appears on the left or right of the side-by-side view. By default, the source is on the left.
Translatable non-textual fields remain active in the translation column. This way you can, for example, replace images with their localized counterparts.
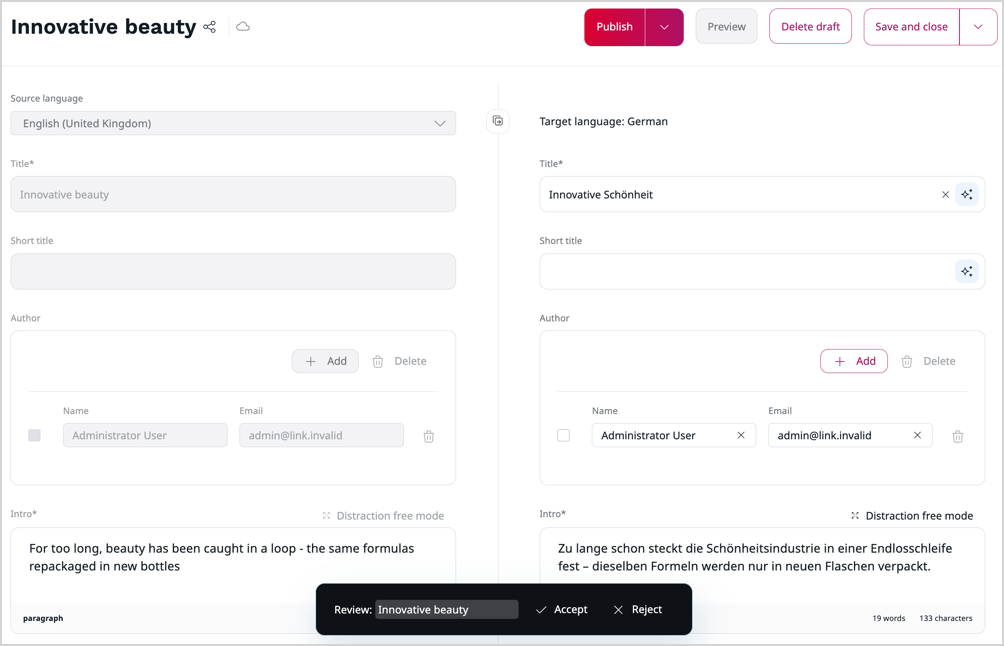
Like in the standard content item editor, when multiple sections or field groups exist within the content item or product, anchors appear at the top of the side-by-side translation view to help you jump directly to a specific section.
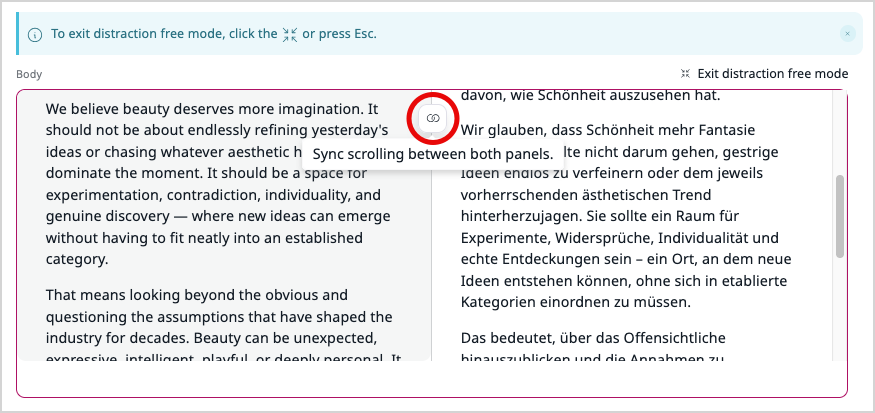
The view also supports the distraction-free mode, where longer texts in both columns can be scrolled in a synchronized way.
Change source language
When a content item or product has multiple published language versions, a drop-down list appears at the top of the source column. You can use the drop-down list to change the language that is displayed in the source column.

Copy content from source
The divider between the source and target columns contains a Copy all from source button. Click it to copy all translatable field values from the source column into the target fields in a single action. Values of all fields are copied at the same time.

Caution
When you copy content from source after a target column has been translated, it overwrites all existing translations. This action can't be reverted.
The button is absent if you switch to the distraction-free mode.
Hide the source
When the source is placed on the right, the divider between the source and target columns contains a Collapse source language button. The button toggles the source panel visibility, allowing editors to hide the source text when they no longer need it.

Add new translation
1. Either click + Add in the content item's or product's Translations tab, or Add translation in the content tree.
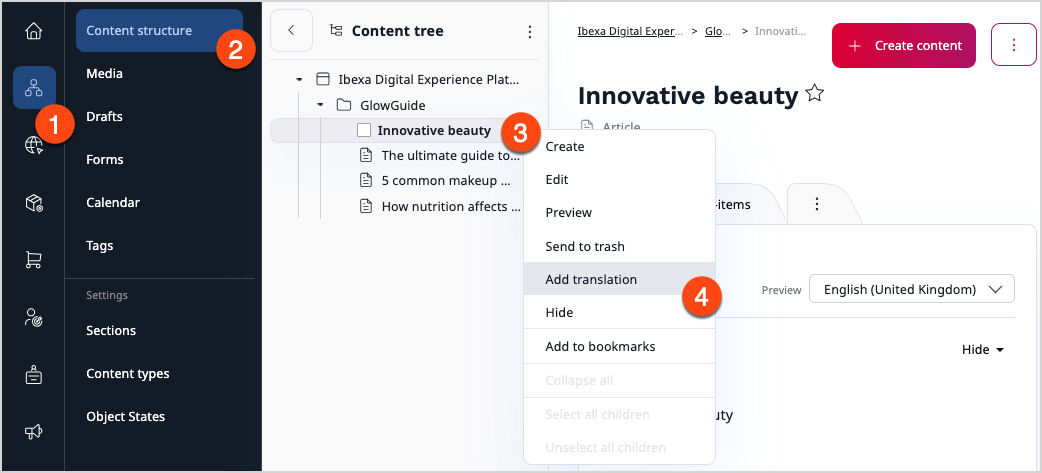
2. In the Create a new translation modal, select the source and target languages.
Draft conflict
If a draft translation of the content item already exists for the selected target language, a warning appears in the modal to inform you about this fact. You can proceed and add a new draft, or discard the modal and edit the existing draft translation.
For more information, see Edit existing translations.
3. If Use automatic translation is checked, select a translation provider from a drop-down list.
You may prefer to translate the content by yourself. To do it, uncheck Use automatic translation and proceed.
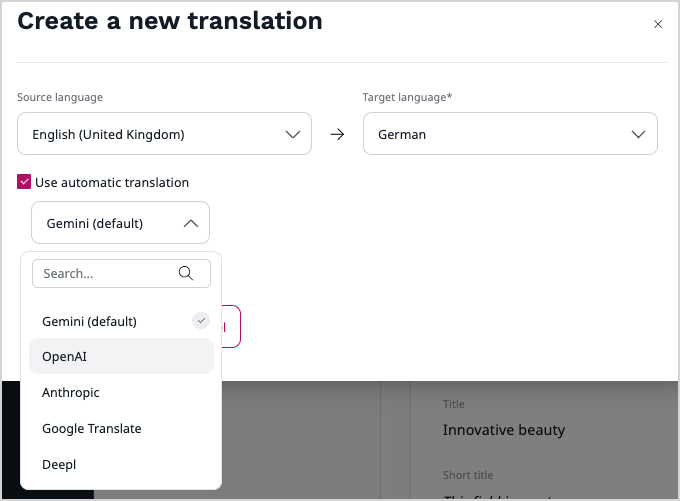
If no translation providers are configured in the system, or the providers are disabled, the checkbox is inactive. If only one provider exists in the system, there is a checkbox, but no drop-down list. When there are more than four translation services configured in the system, a search field appears in the drop-down list.
4. Click Open side-by-side.
The side-by-side translation view opens with the source text in one column and the target form in the other. Depending on whether you choose to use automatic translations, target fields can be empty or pre-translated.
Reviewing automatic translations
If you choose to use automatic translations, the side-by-side view allows you to approve or reject the translation. For more information, see Review automatic translation.
5. When you work with a product, Save and close publishes the translation and Discard removes it completely.
6. When you work with other content items, you have multiple options to quit editing and preserve the translation, while Delete draft removes it completely.
Edit existing translations
The back office offers several entry points where you can edit existing content item or product translations.
To edit a published translation of a content item:
- In the content tree, select a content item and click Edit.
- If the content item has multiple language versions, the Select translation modal displays all published translations.
- Select a language and click Edit side-by-side.
To edit a translation of a product:
- Go to Product catalog -> Products.
- Select a product and open the Translations tab.
- Next to the language version you want to edit, click the Edit side-by-side button.
This opens the side-by-side translation view, where you can perform a review or make your changes and either create a new draft of a content item or publish directly.
Tip
The Edit side-by-side button is active only for languages other than the main language of the content item or product.
To edit a draft translation of a content item:
- In the content tree, select a content item and open the Versions tab. Click the three dots icon next to a draft translation that you want to edit and, in the context menu, click Edit side-by-side.
- In the main menu, go to Content or visit the My dashboard page, and go to Drafts. Find a draft whose source and target languages differ and click Edit side-by-side.
This opens the existing draft in the side-by-side translation view, so you can review and refine a translation without creating a new draft.
Tip
Products don't have draft translations. Product translations are published instantly when you click Save and close in the editing window.
Review automatic translation
If a content item or product has draft translations created with automatic translation, the Versions tab displays a Translation status column. Such drafts are marked with one of the following badges:
- For review — you can review and approve the translation.
- Translated — the translation has been accepted.
Draft translations that you translated yourself rather than automatically don't have a badge.
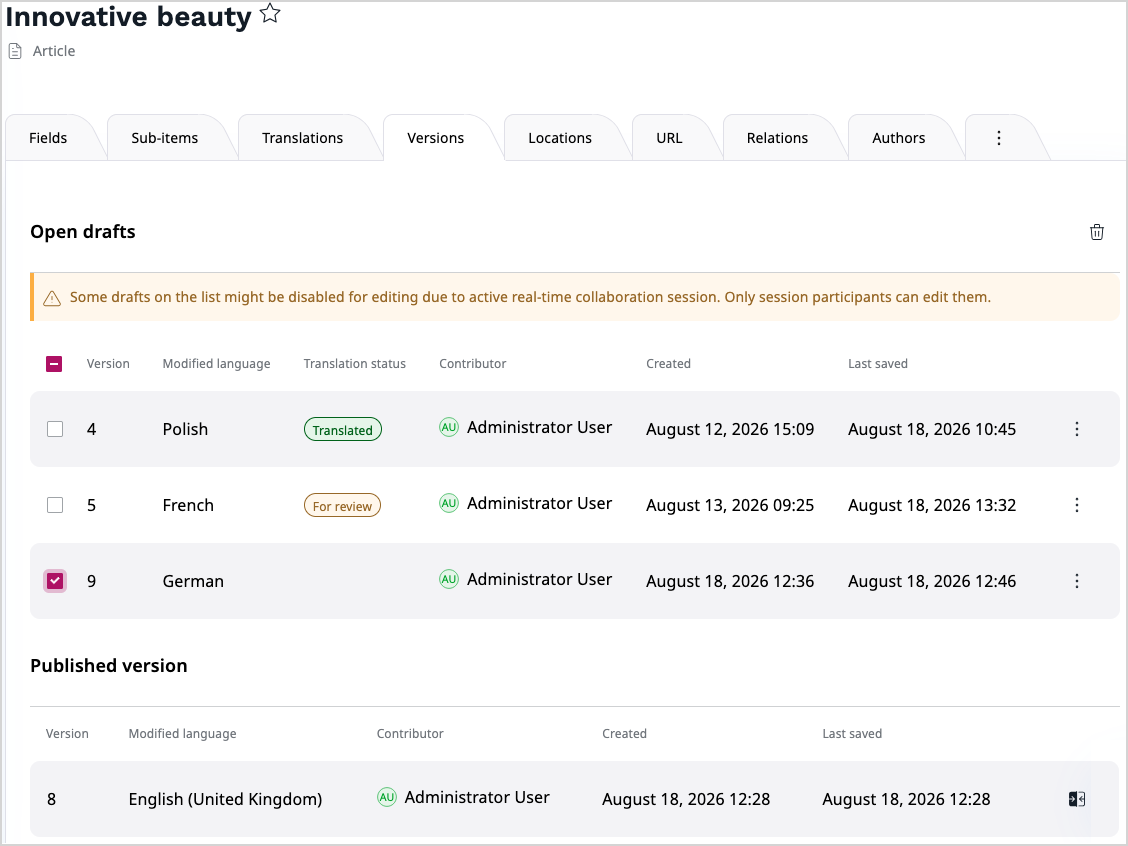
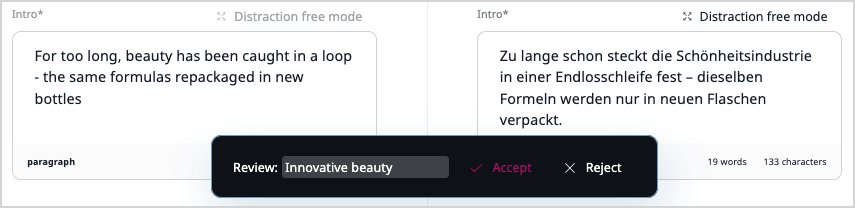
When you create and open an automatic translation or open a draft translation of a content item that has "For review" status in the side-by-side view, a review banner appears at the bottom of the screen, which allows you to accept or reject the translation.
Reject translation
On the review banner, click Reject to mark the translation as requiring further work. The review banner hides but it reappears the next time you open the translation. The For review status in the Versions tab remains unchanged.
You can reject a translation multiple times, but you can't reject a translation that has been accepted.
Tip
For content items, rejecting a translation doesn't prevent them from being published. The translation can be published regardless of its review status.
For products, rejecting a translation and then saving and closing the editing window publishes the translation despite its review status.
Accept translation
On the review banner, click Accept to mark the translation as reviewed and approved. The review banner disappears permanently and the status changes from For review to Translated.
Accepting a translation of a content item does not mean that it's published. You still need to save and publish the draft. You can also close the draft without publishing.