Clustering
Clustering in Ibexa DXP refers to setting up your installation with several web servers for handling more load and/or for failover.
Server setup overview
This diagram illustrates how clustering in Ibexa DXP is typically set up. The parts illustrate the different roles needed for a successful cluster setup.
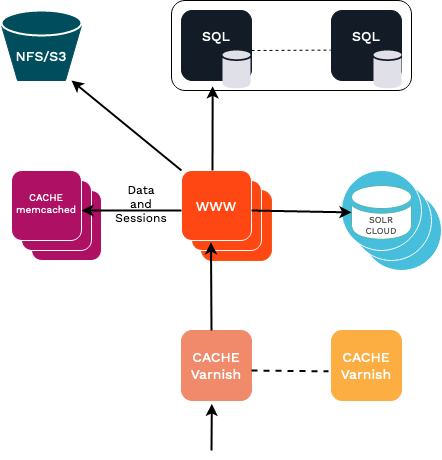
The number of web servers, Memcached/Redis, Solr, Varnish, Database and NFS servers, as well as whether some servers play several of these roles (typically running Memcached/Redis across the web server) is up to you and your performance needs.
The minimal requirements are:
- Shared HTTP cache (using Varnish)
- Shared persistence cache and sessions (using Redis or Memcached)
- Shared database (using MySQL/MariaDB)
- Shared binary files (using NFS, or S3)
For further details on requirements, see Requirements page.
It is also recommended to use:
- Solr or Elasticsearch for better search and performance
- a CDN for improved performance and faster ping time worldwide
- you can use Fastly, which has native support as HTTP cache and CDN.
- active/passive database for failover
- more recent versions of PHP and MySQL/MariaDB within what is supported for your Ibexa DXP version to get more performance out of each server. Numbers might vary so make sure to test this when upgrading.
Shared persistence cache
Redis is the recommended cache solution for clustering. An alternative solution is using Memcached.
See persistence cache documentation on information on how to configure them.
Shared sessions
For a cluster setup you need to configure sessions to use a back end that is shared between web servers. The main options out of the box in Symfony are the native PHP Memcached or PHP Redis session handlers, alternatively there is Symfony session handler for PDO (database).
To avoid concurrent access to session data from front-end nodes, if possible you should either:
- Enable Session locking
- Use "Sticky Session", aka Load Balancer Persistence
Session locking is available with php-memcached, and with php-redis (v4.2.0 and higher).
On Ibexa Cloud (and Platform.sh) Redis is preferred and supported.
Shared binary files
Ibexa DXP supports multi-server setups by means of custom IO handlers. They make sure that files are correctly synchronized among the multiple clients using the data.
DFS IO handler
The DFS IO handler (legacy_dfs_cluster) can be used to store binary files on an NFS server.
It will use a database to manipulate metadata, making up for the potential inconsistency of network-based filesystems.
Configuring the DFS IO handler
You need to configure both metadata and binarydata handlers.
Ibexa DXP ships with a custom local adapter (ibexa.io.nfs.adapter.site_access_aware),
which decorates the Flysystem v2 local adapter to enable support for SiteAccess-aware settings.
If an NFS path relies on SiteAccess-aware dynamic parameters, you must use the custom local adapter
instead of the Flysystem v2 local adapter.
Configure the custom local adapter to read/write to the NFS mount point on each local server.
As metadata handler, create a DFS one, configured with a Doctrine connection.
Tip
The default database install will now include the dfs table in the same database
First, define DFS folder path as a variable in .env file:
DFS_NFS_PATH=/tmp/ibx_1439_nfs
Next, if you are using a separate DFS database, configure it via the DATABASE_URL variable in the .env file.
Depending on which database you are using:
DFS_DATABASE_URL=mysql://root:[email protected]:3306/ibexa_dfs?serverVersion=8.0
or
DATABASE_URL=postgresql://root:[email protected]:3306/ibexa_dfs?serverVersion=8.0
For production, it is recommended to create the DFS table in its own database, manually importing its schema definition:
dfs_schema.sql (MySQL)
1 2 3 4 5 6 7 8 9 10 11 12 13 14 15 16 | |
dfs_schema.sql (PostgreSQL)
1 2 3 4 5 6 7 8 9 10 11 12 13 14 15 16 17 18 19 | |
Note
On Ibexa Cloud (and Platform.sh) a separate DFS database is supported for MySQL only.
This example uses Doctrine connection named dfs:
1 2 3 4 5 6 7 8 9 10 11 12 13 14 15 16 17 18 19 20 21 22 23 24 25 26 27 28 29 30 31 32 33 34 35 36 37 38 39 40 41 42 43 44 45 46 47 48 49 | |
Tip
If you are looking to set up S3 or other Flysystem v2/third-party adapters like Google Cloud Storage, this needs to be configured as binary handler. The rest here will still stay the same, the DFS metadata handler will take care of caching the lookups to avoid slow IO lookups.
Customizing the storage directory
Earlier versions required the NFS adapter directory to be set to $var_dir$/$storage_dir$ part for the NFS path.
This is no longer required,
but the default prefix used to serve binary files still matches this expectation.
If you decide to change this setting, make sure you also set io.url_prefix to a matching value.
If you set the NFS adapter's directory to /path/to/nfs/storage, use this configuration so that the files can be served by Symfony:
1 2 3 4 5 | |
As an alternative, you may serve images from NFS using a dedicated web server.
If in the example above, this server listens on http://static.example.com/
and uses /path/to/nfs/storage as the document root, configure io.url_prefix as follows:
1 2 3 4 5 | |
You can read more about that on Binary files URL handling.
Web server rewrite rules
The default Ibexa DXP rewrite rules will let image requests be served directly from disk.
In a cluster setup, files matching ^/var/([^/]+/)?storage/images(-versioned)?/.* have to be passed through /public/index.php instead.
In any case, this specific rewrite rule must be placed before the ones that "ignore" image files and just let the web server serve the files directly.
Apache
1 | |
Place this before the standard image rewrite rule in your vhost config (or uncomment if already there).
nginx
1 | |
Place this before the include of ez_params.d/ez_rewrite_params in your vhost config (or uncomment if already there).
Migrating to a cluster setup
If you are migrating an existing single-server site to a cluster setup, and not setting up clustering from scratch, you need to migrate your files.
Once you have configured your binarydata and metadata handlers, you can run the ibexa:io:migrate-files command.
You can also use it when you are migrating from one data handler to another, e.g. from NFS to Amazon S3.
This command shows which handlers are configured:
1 2 3 | |
You can do the actual migration like this:
1 | |
The --from and --to values must be specified as <metadata_handler>,<binarydata_handler>.
If --from is omitted, the default IO configuration will be used.
If --to is omitted, the first non-default IO configuration will be used.
Tip
The command must be executed with the same permissions as the web server.
While the command is running, the files should not be modified.
To avoid surprises you should create a backup and/or execute a dry run before doing the actual update, using the --dry-run switch.
Since this command can run for a very long time, to avoid memory exhaustion run it in the production environment using the --env=prod switch.