Permission use cases
Here are a few examples of sets of Policies that you can use to get some common permission configurations.
Enter Back Office
To allow the User to enter the Back Office interface and view all content, set the following Policies:
user/logincontent/readcontent/versionreadsection/viewcontent/reverserelatedlist
These Policies are necessary for all other cases below that require access to the content structure.
Create content without publishing 
You can use this option together with Ibexa Experience's content review options. Users assigned with these Policies can create content, but cannot publish it. To publish, they must send the content for review to another User with proper permissions (for example, senior editor, proofreader, etc.).
content/createcontent/edit
Use this setup with Ibexa Experience or Ibexa Commerce only, as Ibexa Headless does not allow the User to continue working with their content.
Create and publish content
To create and publish content, users must additionally have the following Policies:
content/createcontent/editcontent/publish
This also lets the user copy and move content, as well as add new Locations to a content item (but not remove them).
Move content
To move a content item or a Subtree to another Location, the user must have the following Policies:
content/read- on the source Locationcontent/create- on the target Location
Remove content
To send content to Trash, the User needs to have the content/remove Policy.
If content has more than one language, the User must have access to all the languages.
That is, the content/remove Policy must have either no Limitation, or a Limitation for all languages of the content item.
To remove an archived version of content, the User must have the content/versionremove Policy.
Further manipulation of Trash requires the content/restore Policy to restore items from Trash, and content/cleantrash to completely delete all content from the Trash.
Caution
With the content/cleantrash Policy, the User can empty the Trash even if they do not have access to the trashed content,
for example, because it belonged to a Section that the User does not have permissions for.
Restrict editing to part of the tree
If you want to let the User create or edit content, but only in one part of the content tree, use Limitations.
Three Limitations that you could use here are Section Limitation, Location Limitation and Subtree of Location Limitation.
Section Limitation
Let's assume you have two Folders under your Home: Blog and Articles.
You can let a User create content for the blogs, but not in Articles, by adding a Section Limitation to
the Blog content item.
This allows the User to publish content anywhere under this Location in the structure.
Section does not have to belong to the same Subtree of Location in the content structure, any Locations can be assigned to it.
Location Limitation
If you add a Location Limitation and point to the same Location, the User is able to publish content directly
under the selected Location, but not anywhere deeper in its Subtree of Location.
Subtree of Location Limitation
To limit the User's access to a subtree, use the Subtree of Location Limitation.
You do it by creating two new Roles for a User Group:
- Role with a
SubtreeLimitation for the User - Role with a
LocationLimitation for the Subtree
Follow the example below to learn how to do that.
Cookbook, Dinner recipes and Dessert recipes containers are not accessible in the frontend. Edit access to them in the Admin Panel.
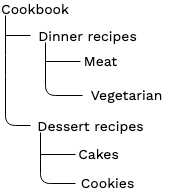
To give the vegetarian editors access only to the Vegetarian dinner recipes section,
create a new Role, for example, EditorVeg.
Next, add to it a content/read Policy with the Subtree Limitation for Cookbook/Dinner recipes/Vegetarian.
Assign the Role to the vegetarian editors User Group.
It allows users from that group to access the Vegetarian container but not Cookbook and Dinner recipes.
To give users access to Cookbook and Dinner recipes containers,
create a new Role, for example, EditorVegAccess.
Next, add to it a content/read Policy with the Location Limitations Cookbook and Dinner recipes.
Assign the new Role to the vegetarian editors User Group as well.
Only then the limitations are combined with AND, resulting in an empty set.
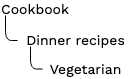
The vegetarian editors should now see the following Content Tree:
When a Policy has more than one Limitation, all of them have to apply, or the Policy does not work.
For example, a Location Limitation on Location 1/2 and Subtree of Location Limitation on 1/2/55 cannot work together,
because no Location can satisfy both those requirements at the same time.
To combine more than one Limitation with the or relation, not and,
you can split your Policy in two, each with one of these Limitations.
Manage Locations
To add a new Location to a content item, the Policies required for publishing content are enough. To allow the User to remove a Location, grant them the following Policies:
content/removecontent/manage_locations
Hiding and revealing Location requires one more Policy: content/hide.
Editorial workflows
You can control which stages in an editorial workflow the user can work with.
Do this by adding the WorkflowStageLimitation to content Policies such as content/edit or content/publish.
You can also control which transitions the user can pass content through.
Do this by using the workflow/change_stage Policy together with the WorkflowTransitionLimitation.
For example, to enable the user to edit only content in the "Design" stage and to pass it after creating design to the "Proofread stage", use following permissions:
content/editwithWorkflowStageLimitationset to "Design".workflow/change_stagewithWorkflowTransitionLimitationset toto_proofreading
Multi-file upload
Creating content through multi-file upload is treated in the same way as regular creation. To enable upload, you need you set the following permissions:
content/createcontent/readcontent/publish
You can control what content items can be uploaded and where by using Limitations
on the content/create and content/publish Policies.
A Location Limitation limits the uploading to a specific Location in the tree.
A content type Limitation controls the content types that are allowed.
For example, you can set the Location Limitation on a Pictures Folder, and add a content type Limitation
that only allows content items of type Image.
This ensures that only files of type image can be uploaded,
and only to the Pictures Folder.
Taxonomies
You can control which users or user groups can work with taxonomies. To let users create and assign taxonomy entries, set the following permissions:
taxonomy/assignto allow user to tag and untag contenttaxonomy/readto see the Taxonomy interfacetaxonomy/manageto create, edit and delete tags
With Limitations, you can configure whether permissions apply to Tags, Product categories or both.
Register Users
To allow anonymous users to register through the /register route, grant the user/register Policy to the Anonymous User Group.
Admin
To access the administration panel in the Back Office, the User must have the setup/administrate Policy.
This allows the User to view the languages and content types.
Additional Policies are needed for each section of the Admin.
System Information
setup/system_infoto view the System Information tab
Sections
section/viewto see and access the Section listsection/editto add and edit Sectionssection/assignto assign Sections to content
Languages
content/translationsto add and edit languages
Content types/action
content type/create,content type/update,content type/deleteto add, modify and remove content types
Object states
state/administrateto view a list of Object states, add and edit themstate/assignto assign Objects states to Content
Roles
role/readto view the list of Roles in Adminrole/create,role/update,role/assignandrole/deleteto manage Roles
Users
content/viewto view the list of Users
Users are treated like other content, so to create and modify them, the User needs to have the same permissions as for managing other content items.
Product catalog
You can control to what extend users can access the Product catalog and all its related parts.
Product type
To create or edit product types, a user needs to have access to attributes and attribute groups. Set the following permissions to allow such access:
product_type/createproduct_type/viewproduct_type/edit
Product item
When a product is created, a product item and a content item are also generated. Permissions for the product catalog override permissions for content, therefore, users without permissions for content can still manage products.
product/createproduct/viewproduct/edit
Commerce 
To control which commerce functionalities are available to store users, you can grant or prevent them access to individual components.
Out of the box, Ibexa Commerce comes with the Storefront User Role that is assigned to anonymous users and grants them the following permissions:
product/view,product_type/viewandcatalog/view, to allow them to view a product list and product detailscart/view,cart/createandcart/editwith theCartOwnerLimitation set toself, to allow them to add items to their own shopping cart, modify their cart, and delete itcheckout/view,checkout/create,checkout/updateandcheckout/delete, to allow them to proceed to checkout and interact with the checkout process
You can modify the default Roles by preventing anonymous users from being able to proceed with the checkout process, and creating the Registered Buyer Role that enables logged-in users to purchase products.
You could do this by moving permissions that relate to checkout from the Storefront User Role to the Registered Buyer Role,
and granting Registered Buyer with the user/register and user/login permissions which control access to registration and login.
See below for a detailed listing of permissions that apply to Commerce, together with their meaning.
Owner limitation
For anonymous users, orders, shipments, and/or payments are saved with a 'null' user reference. Therefore, when you apply the 'Owner/self' Limitation to any of the permissions below, anonymous users are not allowed to interact with any of these entities.
Cart
Set the following permissions to decide what actions are available when users interact with carts:
cart/view- to allow user to view their cartcart/delete- to delete cart, for example, after successful checkoutcart/create- to create a new cartcart/edit- to allow user to add products to their cart
To further control access to a cart, you can use the CartOwner Limitation
and set its value to self.
This way users can only interact with their own carts.
Checkout
Set the following permissions to decide what actions are available when users interact with checkout:
checkout/view- to control user access to checkoutcheckout/create- to allow starting the checkout process, by proceeding from cartcheckout/update- to allow users to modify existing information, for example item quantitycheckout/delete- to delete checkout
Order management
Set the following permissions to decide what actions are available when users interact with orders:
order/create- to allow the user to create a new orderorder/view- to allow the user to view ordersorder/update- to allow the user to change status of an existing orderorder/cancel- to allow the user to cancel an existing order
To further control access to an order, you can use the OrderOwner Limitation
and set its value to self.
This way users can only interact with their own orders.
Shipping management
Set the following permissions to decide what actions are available when users interact with shipping methods and shipments.
Shipping methods
shipping_method/create- to allow the user to create a new shipping methodshipping_method/view- to allow the user to view shipping methodsshipping_method/edit- to allow the user to modify an existing shipping methodshipping_method/delete- to allow the user to delete an existing shipping method
Shipments
shipment/create- to allow the user to create a new shipmentshipment/view- to allow the user to view shipmentsshipment/update- to allow the user to change status of an existing shipmentshipment/delete- to allow the user to cancel an existing shipment
To further control access to a shipment, you can use the ShipmentOwner Limitation
and set its value to self.
This way users can only interact with their own shipments.
Payment management
Set the following permissions to decide what actions are available when users interact with payment methods and payments.
Payment methods
payment_method/create- to allow the user to create a new payment methodpayment_method/view- to allow the user to view payment methodspayment_method/edit- to allow the user to modify an existing payment methodpayment_method/delete- to allow the user to delete an existing payment method
Payments
payment/create- to allow the user to create a new paymentpayment/view- to allow the user to view paymentspayment/edit- to allow the user to modify an existing paymentpayment/delete- to allow the user to delete an existing payment
To further control access to a payment, you can use the PaymentOwner Limitation
and set its value to self.
This way users can only interact with their own payments.